background image

8


Always unplug your hand mixer from the mains supply socket before cleaning 

it. 


Never immerse the hand mixer body, mains lead or plug in water or any other 

liquid.


Never use harsh abrasive cleaners or cleaning materials.

To make cleaning easier, clean your hand mixer and the beaters as soon as you have 

finished using them.

1.  Set the speed selector to 

OFF

.

2.  Unplug your hand mixer from the mains supply socket.
3.  Eject the beaters from your hand mixer by pressing the eject button. The beaters 

are heavy and care should be taken not to let them fall onto fragile surfaces or items 

when they are being ejected.

4.  Wash the beaters in warm soapy water. Alternatively, wash them in a dishwasher.
5.  Rinse and dry the beaters before storing or using them again.
6.  Using a dampened cloth, wipe the body of your hand mixer.

Storage

Store your hand mixer in its packing or in a clean, dry place, out of the reach of children, 

ensuring that all the parts are dismantled.

care, cleaning and storage

Содержание vfp075

Страница 1: ...simplicity hand mixer instruction booklet selection of recipes included ...

Страница 2: ... than its intended use This appliance is for household use only Do not use this appliance outdoors Always ensure that hands are dry before handling the plug or switching on the appliance Always use the appliance on a stable secure dry and level surface This appliance must not be placed on or near any potentially hot surfaces such as a gas or electric hob Never immerse any part of the appliance or ...

Страница 3: ...ing task 3 Heel stand Rest your hand mixer on its heel after use or when adding more ingredients 4 Power light Lights up when the mixer is switched on 5 Beaters The twin stainless steel beaters make light work of cake mixes sauces and whisking Due to our policy of continuous improvement the actual product may differ slightly from the one illustrated in these instructions ...

Страница 4: ... oven cleaners Using a damp cloth or sponge wipe the exterior of your hand mixer body Fitting the beaters Make sure your hand mixer is switched off and unplugged from the mains supply socket before fitting or removing the beaters 1 Ensure that your hand mixer is unplugged from the supply socket and the speed selector is set to OFF 2 Insert one beater into a slot Push it firmly until it locks into ...

Страница 5: ...5 ...

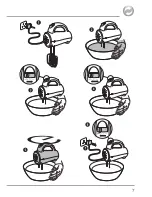
Страница 6: ...other utensils away from the beaters during operation Do not operate your hand mixer continuously for more than 3 minutes without giving it a rest period of 10 minutes Never attempt to remove or replace the beaters whilst your food mixer is in operation or plugged in to the mains supply 5 When mixing guide the hand mixer through the centre and around the sides of the mixing bowl 6 When you have fi...

Страница 7: ...7 ...

Страница 8: ...e mains supply socket 3 Eject the beaters from your hand mixer by pressing the eject button The beaters are heavy and care should be taken not to let them fall onto fragile surfaces or items when they are being ejected 4 Wash the beaters in warm soapy water Alternatively wash them in a dishwasher 5 Rinse and dry the beaters before storing or using them again 6 Using a dampened cloth wipe the body ...

Страница 9: ...9 ...

Страница 10: ...ls of the batter to the pan Swirl it around until the base of the pan is coated Cook for approximately 1 minute and then carefully flip it over 5 Cook it on the other side for another minute and then slide the pancake out of the pan onto a plate 6 Repeat the process until all the batter is used up Keep the pancakes warm until you are ready to eat them 7 Serve sprinkled with lemon and sugar Toffee ...

Страница 11: ...ift in the self raising flour and mix until creamy 4 Lay the cupcake cases out on a cake tray and spoon the mixture into cakes Bake in the oven for 12 14 minutes until they are golden and springy to the touch Remove from the oven and allow them to cool on a wire cake rack 5 To make the frosting start by rubbing the raspberries through a sieve This will remove the seeds and make a lovely raspberry ...

Страница 12: ...6 Place the meringues in the oven and reduce the heat to 140 C gas mark 1 Leave to cook for approximately 1 hours until they have a brown tinge to them Turn the oven off and leave them to cool in the oven 7 The meringues can be stored in an airtight container until they are needed 8 Using your hand mixer whip the double cream on a medium speed setting until it is thick Top the meringues with the c...

Страница 13: ...um speed begin to beat the double cream in a large mixing bowl Increase the speed until it is thick Stir in the cream cheese 4 In a separate bowl mix together the sugar orange juice zest vanilla and cornflour Pour this into the cream and cheese and beat on a low speed until it is fully combined 5 Melt the chocolate in the microwave and allow it to cool slightly Remove about a quarter of the mixtur...

Страница 14: ...ixture will start to thicken 4 Once it has reached a thick creamy consistency stir in the salt and the lemon juice 5 This can then be stored in the fridge whilst you make the rest of the dish 6 For the tempura batter add the corn flour plain four egg yolk and water in a bowl and using your hand mixer on a medium speed mix together to form a batter You may wish to add a little more or less water to...

Страница 15: ... Remove from the heat and gradually stir in the milk mixing thoroughly in small quantities at a time before adding more Return to the heat and stir the mixture continuously until it becomes very thick Transfer the mixture to a bowl and allow to it cool 3 Separate the eggs placing the whites into a clean bowl and stirring the yolks into the sauce Stir in the goats cheese and season well 4 Begin whi...

Страница 16: ...ta until it s golden and crispy be careful because pancetta slices cook really quickly Remove the pancetta from the pan with a slotted spoon and drain on kitchen paper Allow it to cool then crumble it 3 In the same fat used to cook the pancetta sauté the spring onion until just softened about five minutes then set aside to cool 4 Place the flour baking powder bicarbonate of soda and pepper into a ...

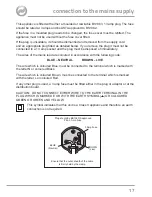
Страница 17: ...LUE NEUTRAL BROWN LIVE The wire which is coloured Blue must be connected to the terminal which is marked with the letter N or coloured Black The wire which is coloured Brown must be connected to the terminal which is marked with the letter L or coloured Red If any other plug is used a 3 amp fuse must be fitted either in the plug or adaptor or at the distribution board CAUTION DO NOT CONNECT EITHER...

Страница 18: ...liance to the Customer Service Department follow the steps below 1 Pack it carefully preferably in the original carton Ensure the unit is clean 2 Enclose your name and address and quote the model number on all correspondence 3 Give the reason why you are returning it 4 If within the guarantee period state when and where it was purchased and include proof of purchase e g till receipt 5 Send it to o...

Страница 19: ...e misuse abuse repair or alteration by a person other than a person authorised by JCS Europe Faults that occur through improper use damage abuse use with incorrect voltage acts of nature events beyond the control of JCS Europe repair or alteration by a person other than a person authorised by JCS Europe or failure to follow instructions for use are not covered by this guarantee Additionally normal...

Страница 20: ...93575 0 VFP075_Iss_1 03 13 ...

Отзывы: