background image

15

DE

Vor der ersten Beobachtung

Bevor du zum ersten Mal etwas beobachtest, musst du das Sucherfernrohr (2) und das Fernrohr (1) auf-

einander abstimmen. Du musst das Sucherfernrohr so einstellen, dass du dadurch das gleiche siehst, wie 

durch das Okular des Fernrohrs. Nur so kannst du bei deinen Beobachtungen das Sucherfernrohr zum 

groben Anpeilen von Objekten benutzen, bevor du sie vergrößert durch das Fernrohr-Okular betrachtest.

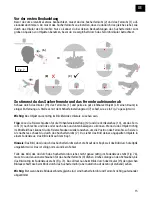
(A)

(B)

(C)

Fig. 7

=

So stimmst du das Sucherfernrohr und das Fernrohr aufeinander ab

Schaue durch das Okular (15) des Fernrohrs (1) und peile ein gut sichtbares Objekt (z.B. einen Baum) in 

einiger Entfernung an. Stelle es mit dem Scharfeinstellungsrad (7) scharf, wie es in Fig. 7a gezeigt wird.

Wichtig:

 Das Objekt muss mittig im Blickfeld des Okulars zu sehen sein.

Tipp:

 Löse die Fixierschrauben für die Höhenfeineinstellung (12) und die Vertikalachse (13), um das Fern-

rohr (1) nach rechts und links oder nach oben und unten bewegen zu können. Wenn du das Objekt richtig 

im Blickfeld hast, kannst du die Fixierschrauben wieder anziehen, um die Position des Fernrohrs zu fixieren. 

Als nächstes schaust du durch das Sucherfernrohr (2). Du siehst das Bild deines angepeilten Objekts in 

einem Fadenkreuz. Das Bild steht auf dem Kopf. 

Hinweis:

 Das Bild, das du durch das Sucherfernrohr siehst, steht auf dem Kopf, weil das Bild durch die Optik 

umgekehrt wird. Das ist völlig normal und kein Fehler.

Falls das Bild, das du durch das Sucherfernrohr siehst, nicht genau mittig im Fadenkreuz steht (Fig. 7b), 

musst du an den Justierschrauben für das Sucherfernrohr (3) drehen. Drehe solange an den Schrauben, bis 

das Bild mittig im Fadenkreuz steht (Fig. 7c). Du solltest nun beim Blick durch das Okular (15) den gleichen 

Bildausschnitt wie beim Blick durch das Sucherfernrohr (aber natürlich auf dem Kopf stehend) sehen.

Wichtig:

 Erst wenn beide Bildausschnitte gleich sind, sind Sucherfernrohr und Fernrohr richtig aufeinander 

abgestimmt.

Содержание NATIONAL GEOGRAPHIC Series

Страница 1: ...PE MIT AZ MONTIERUNG TELESCOPES WITH AZ MOUNT Bedienungsanleitung Operating instructions Mode d emploi Instrucciones de uso DE EN FR ES AZ MOUNT T LESCOPES QUIP S D UNE MONTURE AZ TELESCOPIOS CON MONT...

Страница 2: ...on Keep packaging mate rial like plastic bags and rubber bands out of the reach of children as these materials pose a choking hazard Risk of fire Do not place the device particularly the lenses in dir...

Страница 3: ...e priv e de vos concitoyens et n utilisez pas ces unit pour par exemple observer ce qui se passe dans un appartement ES Advertencias de car cter general Existe PELIGRO DE CEGUERA No mire nunca directa...

Страница 4: ...a p gina web utilizando el siguiente enlace c digo QR para ver las versiones disponibles PT Deseja um manual detalhado deste produto numa determinada l ngua Visite a nossa Website atrav s da seguinte...

Страница 5: ...nleitung 6 Operating instructions 20 Mode d emploi 34 Instrucciones de uso 48 DE EN FR ES www bresser de warranty_terms SERVICE AND WARRANTY www bresser de guide TELESCOPE GUIDE i www bresser de faq T...

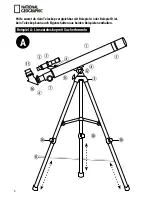
Страница 6: ...ob dein Teleskop vergleichbar mit Beispiel A oder Beispiel B ist Dein Teleskop kann auch Eigenschaften aus beiden Beispielen enthalten b c d e g h f J 1 1 1 1 i 1 1 1 1 A Beispiel A Linsenteleskop mit...

Страница 7: ...ularstutzen 7 Scharfeinstellungsrad 8 Fernrohr Anschlussst ck 9 Stativkopf mit Halterung 10 Feststellclips 11 Stativbeine ausziehbar 12 Fixierschraube f r die H henfeineinstel lung Auf und Abw rtsbewe...

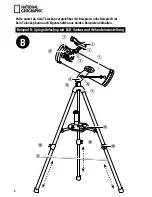
Страница 8: ...Teleskop vergleichbar mit Beispiel A oder Beispiel B ist Dein Teleskop kann auch Eigenschaften aus beiden Beispielen enthalten b f 1 j 1 1 1 1 1 i c B Beispiel B Spiegelteleskop mit LED Sucher und H h...

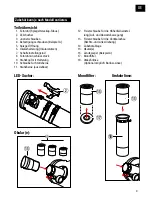
Страница 9: ...ungsrad 8 Fernrohr Anschlussst ck 9 Stativkopf mit Halterung 10 Schraube f r Stativbeine 11 Stativbeine ausziehbar 12 Fixierschraube f r die H henfeineinstel lung Auf und Abw rtsbewegung 13 Fixierschr...

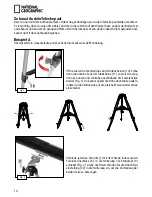
Страница 10: ...it Sucherfernrohr auf einer AZ Montierung Fig 1 1 ffne zuerst die Feststellclips an den Stativbeinen 10 Ziehe dann die unteren Teile der Stativbeine 11 so weit wie m g lich nach unten und schlie e ans...

Страница 11: ...teleskop verwendest Entferne nun die Staubschutzkappe von der Okularhalterung 6 Nun kannst du den Zenitspiegel 16 in die Okularhalterung einsetzen und ihn mit der kleinen Schraube am Stutzen befestige...

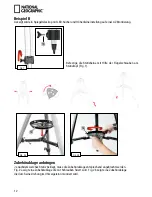
Страница 12: ...ivbeine mit Hilfe der Fl gelschrauben am Stativkopf Fig 1 Fig 2a 1 Fig 2b 1 Zubeh rablage anbringen Je nachdem welches Stativ beiliegt muss die Zubeh rablage entsprechend angebracht werden Fig 2a zeig...

Страница 13: ...st du das Okular 15 in die Okularhalterung ein setzen und ihn mit der kleinen Schraube am Stutzen befesti gen Fig 4 Hinweis Setze zuerst das Okular mit der gr ten Brennwei te z B 20 mm in den Zenitspi...

Страница 14: ...ormel 600 mm 20 mm 30X 600 mm 12 5 mm 48X 600 mm 4 mm 150X Formel zur Berechnung der Vergr erung Brennweite Teleskop Brennweite Okular Vergr erung Beispiele Azimutale Montierung Azimutale Montierung b...

Страница 15: ...lachse 13 um das Fern rohr 1 nach rechts und links oder nach oben und unten bewegen zu k nnen Wenn du das Objekt richtig im Blickfeld hast kannst du die Fixierschrauben wieder anziehen um die Position...

Страница 16: ...den zugeh rigen Abbildungen kannst du sehen wie du die Objekte durch dein Teleskop mit den mitgelieferten Okularen bei guten Sichtverh ltnissen sehen wirst Mond f 20 mm f 6 mm Der Mond ist der einzig...

Страница 17: ...r Seitenebene betrachten w rde er dem Dumbbell Nebel M27 hneln Wir blicken bei diesem Objekt genau auf den Pol des Nebels Sternbild F chslein M27 f 20 mm f 6 mm Rektaszension 19h 59m Stunden Minuten D...

Страница 18: ...es eine einfache Rechenformel Brennweite des Fernrohrs Brennweite des Okulars Vergr erung Du siehst Bei einem Teleskop ist die Vergr erung sowohl von der Brennweite des Okulars als auch von der Brenn...

Страница 19: ...rscheint durch einen Zenitspiegel zwar aufrecht stehend aber seitenverkehrt Entsorgung Entsorgen Sie die Verpackungsmaterialien sortenrein Beachten Sie bitte bei der Entsorgung des Ger ts die aktuelle...

Страница 20: ...t check if your telescope is comparable to example A or example B Your telescope may also contain features from both examples b c d e g h f J 1 1 1 1 i 1 1 1 1 A Example A Refractor telescope with vie...

Страница 21: ...el 8 Telescope connecting piece 9 Tripod head with holder 10 Locking clips or screw for the tripod legs 11 Tripod legs extendable 12 Locking screw for the vertical fine adjustment upward and downward...

Страница 22: ...r telescope is comparable to example A or example B Your telescope may also contain features from both examples b f 1 j 1 1 1 1 1 i c Example B Reflector telescope with LED viewfinder and vertical fin...

Страница 23: ...necting piece 9 Tripod head with holder 10 Locking clips or screw for the tripod legs 11 Tripod legs extendable 12 Locking screw for the vertical fine adjustment upward and downward motion 13 Locking...

Страница 24: ...ctor telescope with viewfinder on an AZ mount Fig 1 1 Open the locking clips on the tripod legs 10 Then pull the lower parts of the tripod legs 11 downward as far as they will go Finally close the loc...

Страница 25: ...refractor telescope Take the lens cap off the eyepiece 6 You can now place the zenith mirror 16 into the eyepiece holder and secure it with the small screw on the connector Fig 4 Next set the eyepiec...

Страница 26: ...the tripod head with the help of the wing screw washers and wing nuts Fig 1 Fig 2a 1 Fig 2b 1 Attaching the accessory tray Depending on which tripod is included the accessory tray must be fitted acco...

Страница 27: ...piece holder and secure it with the small screw on the connector Fig 4 Note First put the eyepiece with the largest focal width e g 20 mm onto the zenith mirror While you ll get the least amount of ma...

Страница 28: ...on 600 mm 20 mm 30X 600 mm 12 5 mm 48X 600 mm 4 mm 150X Formula for calculating magnification Focal length Telescope Focal length Eyepiece Magnification Examples Azimuthal mounting Azimuthal mounting...

Страница 29: ...for the vertical fine adjustment 12 and the vertical axis 13 you will be able to move the telescope 1 to the right and left up and down When you have the object well placed in your field of vision yo...

Страница 30: ...and easy to find celestial objects you may want to observe through your telescope The pictures show what the objects will look like through your tel escope s eyepiece Moon f 20 mm f 6 mm The moon is...

Страница 31: ...look at the Ring Nebula from the side it would look like the Dumbbell Nebula M 27 When viewed from Earth we are looking directly at the pole of the nebula Constellation Vulpecula Little Fox The Dumbbe...

Страница 32: ...ating the magnification Focal width of the telescope tube Focal width of the eyepiece Magnification In a telescope the magnification depends on both the focal width of the tele scope tube and the foca...

Страница 33: ...that you can comfortably observe by looking downwards into the eyepiece The image in a zenith mirror appears upright but rotated around its vertical axis what is left appears right and vice versa Dis...

Страница 34: ...1 1 1 i 1 1 1 1 A Tout d abord v rifiez si votre t lescope est comparable l exemple A ou l exemple B Votre t lescope peut galement contenir des caract ristiques des deux exemples Exemple A Lunette ast...

Страница 35: ...te Oculaire 7 Molette de mise au point 8 Fixation du tube 9 T te de pied avec support 10 Blocage des jambes 11 Jambes tirables 12 Molette de blocage mouvement Vertical 13 Molette de blocage mouvement...

Страница 36: ...ut d abord v rifiez si votre t lescope est comparable l exemple A ou l exemple B Votre t lescope peut galement contenir des caract ristiques des deux exemples Exemple B T lescope miroir avec viseur LE...

Страница 37: ...e de mise au point 8 Fixation du tube 9 T te de pied avec support 10 Blocage des jambes 11 Jambes tirables 12 Molette de blocage mouvement Vertical 13 Molette de blocage mouvement Horizontal 14 Platea...

Страница 38: ...une lunette astronomique avec le viseur sur une monture AZ Fig 1 1 Ouvre d abord les clips de maintien sur les pieds 10 Puis tire les pi ces inf rieures des tr pieds 11 aussi loin que pos sible vers...

Страница 39: ...tenant le couvercle anti poussi re du support de l oculaire 6 Maintenant tu peux installer le miroir z nith 16 dans le support de l oculaire et le fixer sur les supports avec la petite vis Fig 4 Insta...

Страница 40: ...s rondelles m talliques et les crous ailettes sur la t te de pied Fig 1 Fig 2a 1 Fig 2b 1 Fixation du plateau porte accessoires Selon le tr pied fourni le porte accessoires doit tre mont en cons quenc...

Страница 41: ...support de l oculaire et le fixer sur les supports avec la petite vis Fig 4 Indication Installe d abord l oculaire avec la focale la plus lev e par Ex 20mm dans le porte Oculaire Le grossisse ment se...

Страница 42: ...facile 600 mm 20 mm 30X 600 mm 12 5 mm 48X 600 mm 4 mm 150X Formule pour calculer l agrandissement Distance focale T lescope Distance focale Oculaire Grossissement Exemples Monture Azimutale La montu...

Страница 43: ...de haute pr cision 12 et l axe vertical 13 pour pou voir faire bouger la lunette 1 droite et gauche ou en haut et en bas Si l objet est bien plac dans le champ visuel tu peux retirer les vis de fixat...

Страница 44: ...rps c lestes et amas stellaire tr s int ressants Sur les illustrations vous pouvez voir de quelle fa on vous pourriez voir ces objets travers votre t lescope avec les oculaires livr s et dans de bonne...

Страница 45: ...nulaire de profil elle ressemblerait la n buleuse M27 Dumbell Avec cet objet nous voyons pr cis ment le p le de la n buleuse Constellation du petit Renard M27 f 20 mm f 6 mm L ascension droite 19h 59m...

Страница 46: ...e de la lunette Centre de l oculaire grossissement Tu vois Dans un t lescope le grossissement d pend autant de la distance focale de l oculaire que de la distance focale de la lunette Puis l on obtien...

Страница 47: ...r z nith appa ra t certes la verticale mais invers e lat ralement Elimination Eliminez l emballage en triant les mat riaux Pour plus d informations concernant les r gles appli cables en mati re d limi...

Страница 48: ...f J 1 1 1 1 i 1 1 1 1 A Primero verifica si tu telescopio es comparable al ejemplo A o al ejemplo B Su telescopio tambi n puede contener caracter sticas de ambos ejemplos Ejemplo A telescopio refracto...

Страница 49: ...escopio 9 Cabeza del tr pode con soporte 10 Clips para las patas del tr pode 11 Patas del tr pode extensibles 12 Tornillo de fijaci n para ajuste de precisi n de la altura movimiento hacia arriba y ha...

Страница 50: ...h 1 1 Primero verifica si tu telescopio es comparable al ejemplo A o al ejemplo B Su telescopio tambi n puede contener caracter sticas de ambos ejemplos Ejemplo B telescopio reflector con buscador LED...

Страница 51: ...del tr pode con soporte 10 Tornillo de sujeci n para las patas del tr pode 11 Patas del tr pode extensibles 12 Tornillo de fijaci n para ajuste de precisi n de la altura movimiento hacia arriba y haci...

Страница 52: ...a AZ Fig 1 1 En primer lugar abre los clips de sujeci n de las patas del tr pode 10 Tira despu s todo lo que puedas hacia abajo de la parte inferior de las patas del tr pode 11 y a continuaci n cierra...

Страница 53: ...copio refractor Quita ahora la cobertura de protecci n contra el polvo del soporte del ocular 6 Ahora puedes colocar el espejo cenital 16 en el soporte del ocular y sujetarlo al tubo con el tornillito...

Страница 54: ...los tornillos de mariposa las arandelas y las tuercas de mariposa Fig 1 Fig 2a 1 Fig 2b 1 C mo colocar la bandeja de accesorios La bandeja de accesorios se instalar en funci n de qu tr pode est inclu...

Страница 55: ...ar 15 en el soporte del ocular y sujetarlo al tubo con el tornillito Fig 4 Indicaci n de momento coloca el ocular en el espejo cenital con la mayor distancia focal p ej 20 mm Aunque ste sea el menor a...

Страница 56: ...X 600 mm 4 mm 150X F rmula para calcular el aumento Distancia focal Telescopio Distancia focal Ocular Aumento Ejemplos Montaje azimutal Montaje azimutal s lo significa que puedes mover tu telescopio h...

Страница 57: ...para poder mover el telescopio hacia la derecha y hacia la izquierda o hacia arriba y hacia abajo Puedes atornillar de nuevo los tornillos de fijaci n para fijar la posici n del telescopio cuando el...

Страница 58: ...ilustraciones presenta la forma en la que estos objetos se ver n a trav s del telescopio y con los oculares incluidos en el volumen de suministro siempre y cuando las condiciones visuales sean buenas...

Страница 59: ...o se contemplara desde el lateral se asemejar a a la nebulosa Dumbbell M27 En este objetos miramos exactamente al polo de la nebulosa Constelaci n de Vulp cula M27 f 20 mm f 6 mm Ascensi n recta 19h 5...

Страница 60: ...tm tica Distancia focal del telescopio Distancia focal del ocular Aumento Como puedes ver en un telescopio el aumento depende tanto de la distancia focal del ocular como de la distancia focal del tele...

Страница 61: ...tante la imagen que se obtiene a trav s de un espejo cenital aparece vertical pero con los lados invertidos SMALTIMENTO Smaltire i materiali di imballaggio in maniera differenziata Le informazioni su...

Страница 62: ...62...

Страница 63: ...63...

Страница 64: ...cal changes reserved Bresser GmbH Gutenbergstr 2 DE 46414 Rhede www bresser de info bresser de 2018 National Geographic Partners LLC All rights reserved NATIONAL GEOGRAPHIC and Yellow Border Design ar...

Отзывы: