


7 / 16
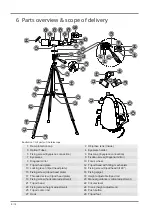
29 Tripod leg lower part
30 Lower locking clip
31 Tripod leg center section
32 Upper locking clip
33 Tripod cross
34 Tripod leg upper part
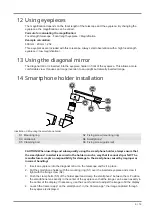
35 Mounting base
36 Dust cap (lens)
37 Mounting ring
38 Fixing screw (mounting ring)
39 Bracket
40 Guide rail
41 Fixing screw (bracket)
42 Velcro fasteners
43 Carrying strap
44 Zipper (back)
Scope of delivery:
Optical tube (A), tripod (B), 3 eyepieces: SR-4mm, H-12.5mm, H-20mm (C), diagonal mirror (D),
smartphone holder (E), backpack (F), user manual
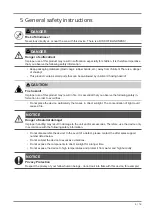
7 Site location
Choose a dark location to avoid an interference of dark adaption throughout lights. A flat and stable
surface is recommended.
Do not observe from closed rooms. Approx. 30 minutes before starting an observation, position the
telescope and the accessories on the desired location to allow a temperature compensation.
8 Setting up the tripod
1. Press the push button on the tripod center rod and at the same time slowly pull the tripod legs out-
wards until the tripod cross is fully extended.
2. Open the upper locking clips one after the other and pull out the tripod leg middle parts completely.
3. Open the lower locking clips one after the other and extend the tripod leg lower parts to the de-
sired height.
4. Make sure that the air bubble of the circular level is centered in the circle to ensure a level stand. If
necessary, readjust the lower parts of the tripod leg.
5. Close the locking clips.
6. Loosen the fixing screw for the height adjustment.
7. Extend the tripod head to the desired height using the crank.
8. Hand-tighten the fixing screw for the height adjustment.
9 Moving the tripod head
NOTICE
Tighten locking screws/rings only by hand.
Tighten locking screws/rings only by hand. Rings and threads can break when overtighten them!
1. Loosen the fixing screw for horizontal movement to move the tripod head to the right or to the left.
2. Tighten the fixing screw by hand to set the tripod in current horizontal position.
3. Loosen the fixation for vertical movement by turning the handle counterclockwise. Tilt the tripod
head up and down.
4. Turn the handle clockwise to to set the tripod head in current vertical position.
5. Loosen the fixing screw for the tripod tilt plate to tilt the the attached optics sidewards for a viewing
position up to 90 degrees.
Содержание 80/400
Страница 1: ...Telescope NightExplorer 80 400 EN Instruction manual...
Страница 12: ......
Страница 13: ......
Страница 14: ......


