background image

9 / 16

12 Using eyepieces

The magnification depends on the focal length of the telescope and the eyepiece. By changing the
eyepieces, the magnification can be varied.

Formula for calculating the magnification:

Focal length telescope : Focal length eyepiece = Magnification

Example calculation:

400 mm : 20 mm = 20x

Three eyepieces are included with this telescope. Always start observation with a high focal length
eyepiece (= low magnification).

13 Using the diagonal mirror

The diagonal mirror is inserted into the eyepiece holder in front of the eyepiece. This allows a more
comfortable view. It causes an image inversion to an upright but laterally inverted image.

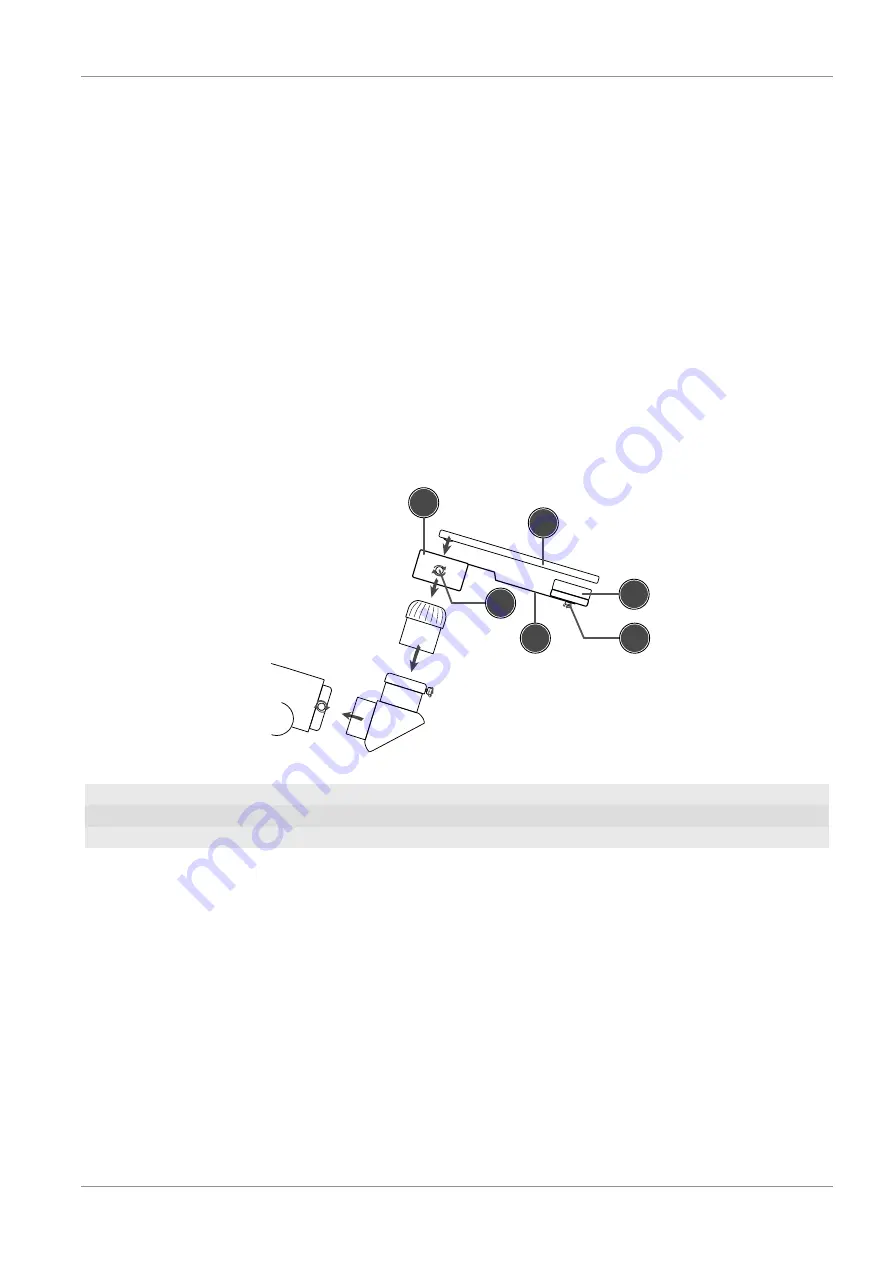
14 Smartphone holder installation

S4

S1

S2

S5

S6

S3

Illustration 3: Mounting the smartphone holder

S1 Mounting ring

S2 Fixing screw (mounting ring)

S3 Guide rail

S4 Smartphone*

S5 Clamping bolt

S6 Fixing screw (guide rail)

CAUTION! When inserting and subsequently using the smartphone holder, always ensure that
the smartphone* inserted is secured in the holder in such a way that it cannot slip or fall! The
manufacturer accepts no responsibility for damage to the smartphone caused by improper or
incorrect handling!

1. Insert an eyepiece into the diagonal mirror on the telescope and fix it in place.

2. Put the smartphone holder with the mounting ring (S1) over the inserted eyepiece and screw it

tight with the fixing screw (S2).

3. Push the clamp bolts (S5) of the holder apart and clamp the smartphone* between them. Position

the smartphone lens exactly in the center of the eyepiece so that the image can be seen exactly in
the center of the display. If necessary, use the zoom function to adjust the image to fill the display.

4. Launch the Camera app* on the smartphone*. In the Camera app*, the image captured through

the eyepiece is displayed.

Содержание 80/400

Страница 1: ...Telescope NightExplorer 80 400 EN Instruction manual...

Страница 2: ...le code QR ou le lien correspondant NL Bezoek onze internetpagina via de volgende QR code of weblink voor meer informatie over dit product of de beschikbare vertalingen van deze gebruiksaanwijzing ES...

Страница 3: ...7 Site location 7 8 Setting up the tripod 7 9 Moving the tripod head 7 10 Mounting the OTA on the tripod 8 11 Installing accessories 8 12 Using eyepieces 9 13 Using the diagonal mirror 9 14 Smartphone...

Страница 4: ...er countries 2 Validity note This documentation is valid for the products with the following article numbers 9621800 Manual version 0921 Manual designation Manual_9621800_NightExplorer 80 400_en_BRESS...

Страница 5: ...observe the following safety in formation in order to avoid fires Do not place the device particularly the lenses in direct sunlight The concentration of light could cause a fire NOTICE Danger of mate...

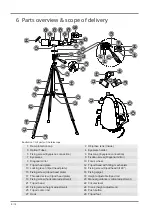
Страница 6: ...Eyepiece connection 7 Eyepieces 8 Fixation screw Diagonal mirror 9 Diagonal mirror 10 Focus wheel 11 Tripod head plate 12 Tripod head with tilting mechanism 13 Locking lever tripod head plate 14 Fixi...

Страница 7: ...her and pull out the tripod leg middle parts completely 3 Open the lower locking clips one after the other and extend the tripod leg lower parts to the de sired height 4 Make sure that the air bubble...

Страница 8: ...tripod head plate to the optical tube Make sure that the fixing pin engages in the corresponding hole 3 Push the locking lever on the tripod head to the FREE position and insert the optical tube with...

Страница 9: ...g ring S3 Guide rail S4 Smartphone S5 Clamping bolt S6 Fixing screw guide rail CAUTION When inserting and subsequently using the smartphone holder always ensure that the smartphone inserted is secured...

Страница 10: ...ired object e g the moon and look through the eyepiece 2 By adjusting the telescope horizontally and vertically bring the object into the center of the field of view 3 The object is magnified through...

Страница 11: ...ces with short ra dial wiping movements Replace the tissues as often as possible If the air humidity is high the glass may fog up and moisture may form This is not a defect In this case allow the devi...

Страница 12: ......

Страница 13: ......

Страница 14: ......

Страница 15: ...e 00 800 6343 7000 BRESSER France SARL Service apr s vente P le d Activit s de Nicopolis 314 Avenue des Ch nes Verts 83170 Brignoles France Prix d un appel local depuis la France ou Belgique Service N...

Страница 16: ...Bresser GmbH Gutenbergstra e 2 46414 Rhede Germany www bresser de BresserEurope Bresser UK Ltd Suite 3G Eden House Enterprise Way Edenbridge Kent TN8 6Hf Great Britain...

Отзывы: