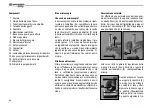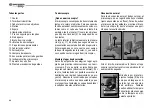
background image

16

NL

  Handleiding

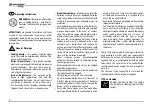
WAARSCHUWING! 

Niet geschikt voor 

kinderen jonger dan drie jaar. Verstik

-

kingsgevaar - kleine onderdelen. Bevat 

functioneel scherpe randen en punten!

LET OP: 

Alleen geschikt voor kinderen van mins

-

tens 8 jaar oud. Instructies voor ouders of ande

-

re verantwoordelijke personen zijn bijgevoegd en 

moeten worden opgevolgd. Bewaar de verpakking 

aangezien deze belangrijke informatie bevat.

Algemene waarschuwingen

• 

VERSTIKKINGSGEVAAR!

 Dit product 

bevat kleine onderdelen die door kinderen 

kunnen worden ingeslikt! Er bestaat 

VERSTIKKINGSGEVAAR!

• 

GEVAAR VOOR ELEKTRISCHE SCHOK! 

Dit 

toestel bevat elektronische onderdelen 

die door een elektriciteitsbron (batterijen) 

worden gevoed. Het toestel mag alleen 

gebruikt worden zoals in de handleiding wordt 

beschreven, anders bestaat er GEVAAR op een 

STROOMSTOOT!

• 

BRAND-/EXPLOSIEGEVAAR!

 Stel het apparaat 

niet bloot aan hoge temperaturen. Gebruik 

uitsluitend de aanbevolen batterijen. Sluit het 

apparaat en de batterijen niet kort en gooi 

deze niet in het vuur! Te hoge temperaturen 

en ondeskundig gebruik kunnen leiden tot 

kortsluitingen, branden en zelfs explosies!

• 

GEVAAR VOOR INBRANDEND ZUUR!

 Let bij 

het plaatsen van de batterijen op de juiste 

richting van de polen. Lekkende of beschadigde 

batterijen veroorzaken irritaties wanneer deze 

met de huid in aanraking komen. Gebruik 

in dat geval alleen hiervoor goedgekeurde 

beschermingshandschoenen.

• Uitgelopen batterijzuur kan tot corrosieve 

brandwonden leiden! Vermijd contact van het 

batterijzuur met de huid, ogen en slijmvliezen. 

Spoel de getroffen lichaamsdelen bij contact 

met het zuur onmiddellijk met ruim helder water 

af en raadpleeg een arts.

• Gebruik alleen de aanbevolen batterijen. 

Vervang zwakke of lege batterijen alleen 

door een set nieuwe batterijen met volledige 

capaciteit. Gebruik geen batterijen van 

verschillende merken, types of capaciteiten 

samen. Verwijder de batterijen uit het toestel 

wanneer deze langere tijd niet gebruikt wordt of 

als de batterijen leeg zijn!!

• Laad in geen geval normale, niet weer 

oplaadbare batterijen op! Deze kunnen bij het 

opladen exploderen.

•  Oplaadbare batterijen mogen alleen onder 

toezicht van een volwassene worden opgeladen.

•  Oplaadbare batterijen moeten uit het speelgoed 

worden verwijderd voordat ze worden opgeladen.

•   De klemmen mogen niet kortgesloten worden.

• Neem het toestel niet uit elkaar! Neem bij 

defecten a.u.b. contact op met de verkoper. Deze 

zal contact opnemen met een servicecenter 

en kan het toestel indien nodig voor reparatie 

terugsturen.  

• Tijdens het gebruik van dit toestel worden 

regelmatig scherpe hulpmiddelen gebruikt. 

Bewaar dit toestel en alle toebehoren en 

hulpmiddelen dus op een voor kinderen 

ontoegankelijke plaats. Er bestaat GEVAAR 

VOOR VERWONDINGEN!

•  Bewaar de instructies en de verpakking omdat 

deze belangrijke informatie bevatten.

•  

De bijgeleverde chemicaliën en vloeistoffen mo

-

gen niet in de handen van kinderen vallen! Che

-

mische stoffen niet drinken! Handen na gebruik 

met stromend water grondig schoonmaken. 

Bij onbedoeld contact met ogen of mond met 

water uitspoelen. Bij klachten onmiddellijk een 

arts raadplegen en de substanties laten zien.

Controleer regelmatig voor gebruik de stroom

-

voorziening voor beschadigingen aan de kabel, 

stekker, behuizing of andere onderdelen. Niet ge

-

bruiken totdat de beschadiging is verholpen. Het 

speelgoed is niet bedoeld voor kinderen jonger 

dan drie jaar. Het speelgoed mag alleen worden 

gebruikt met de aanbevolen stroomvoorziening De 

stroomvoorziening is geen speelgoed. Het speel

-

goed mag niet op meer dan de aanbevolen aantal 

voedingen worden aangesloten.

TIPS voor het schoonmaken

Ontkoppel het apparaat vóór het 

schoonmaken van de stroombron 

(batterijen verwijderen)!

Содержание 8851200

Страница 1: ...ns FR Mode d emploi NL Handleiding IT Istruzioni per l uso ES Instrucciones de uso PL Instrukcja obs ugi SK N vod na pou itie HR Upute za rukovanje CZ N vod k pou it RO Manual de utilizare BG Mikrosko...

Страница 2: ...uso 24 PL Instrukcja obs ugi 28 SK N vod na pou itie 32 HR Upute za rukovanje 36 CZ N vod k pou it 40 RO Manual de utilizare 44 BG 48 2 www bresser de warranty_terms SERVICE AND WARRANTY www bresser d...

Страница 3: ...functionele scherpe kanten en punten Kleine onderdelen GEVAAR VOOR VERSTIKKING Niet geschikt voor kinderen jonger dan 3 jaar Avvertenza Contiene componenti funzionali affilati e appuntiti Componenti d...

Страница 4: ...lich klarem Wasser und suchen Sie einen Arzt auf Benutzen Sie nur die empfohlenen Batterien Ersetzen Sie schwache oder verbrauchte Batterien immer durch einen komplett neuen Satz Batterien mit voller...

Страница 5: ...er in Batteriesammelgef en entsorgt werden Informationen zur Entsor gung alter Ger te oder Batterien die nach dem 01 06 2006 produziert wurden erfahren Sie beim kommunalen Entsorgungsdienstleister ode...

Страница 6: ...stabile Unterlage zu stellen da sich auf einem wackeligen Unter grund keine zufrieden stellenden Ergebnisse erzielen lassen Normale Beobachtung F r die normale Beobachtung stellst Du das Mik roskop a...

Страница 7: ...igten Angabe ein Der Gummifu wird wieder aufgesetzt Die Beleuchtung wird eingeschaltet indem Du die Beleuchtung in Richtung des Objekttisches 4 drehst Schau durch das Okular und stelle jetzt die Beleu...

Страница 8: ...with different capacities Remove the batteries from the unit if itis not to be used for a long period of time or if the batteries are empty Never recharge normal non rechargeable batteries This could...

Страница 9: ...In accordance with the regulations con cerning batteries and rechargeable bat teries disposing of them in the normal house hold waste is explicitly forbidden Please make sure to dispose of your used b...

Страница 10: ...ce 1 Then you can see the microscope picture Assembly and Location Before you start choose an ideal location for using your microscope On the one hand it s important there is enough light normal obser...

Страница 11: ...e microscope and insert the batteries according to the displayed in formation Reattach the rubber base to the mi croscope You can turn on the light by rotating it in the di rection of the stage 4 Take...

Страница 12: ...es meilleurs d lais N utilisez que les batteries conseill es Rempla cez toujours les batteries trop faibles ou us es par un jeu complet de nouvelles batteries dis posant de toute sa capacit N utilisez...

Страница 13: ...droit national les quipements lectriques doivent tre tri s et d pos s un endroit o ils seront recycl s de fa on colo gique Les piles et les accumulateurs usag s doivent tre d pos s dans des conteneurs...

Страница 14: ...seconde lentille oculaire 1 et appara t alors comme image microscopique Montage et mise en place Avant de commencer cherche une place adapt e pour ton microscope D une part il est important que cet en...

Страница 15: ...ant le et le comme indiqu Ensuite le pied en caoutchouc doit tre remis en place FR L clairage s allume lorsque tu tournes la lampe en direction de la table des objectifs 4 Regarde travers l oculaire e...

Страница 16: ...t nieuwe batterijen met volledige capaciteit Gebruik geen batterijen van verschillende merken types of capaciteiten samen Verwijder de batterijen uit het toestel wanneer deze langere tijd niet gebruik...

Страница 17: ...iden worden inge zameld en volgens de milieurichtlijnen worden gerecycled Lege batterijen en accu s moeten door de ge bruiker bij inzamelingspunten voor batterijen worden aangeboden Informatie over de...

Страница 18: ...oculair 1 nog eens vergroot en dan zie je het micro scoop beeld Waar en hoe zet je de microscoop neer Voordat je begint kies je een geschikte plaats uit om met de microscoop te kunnen werken Aan de e...

Страница 19: ...oscoop en plaats de batterijen volgens de markering Doe de rubberen voet weer op zijn plaats De verlichting gaat aan als je lamp in de rich ting van de objecttafel 4 draait Kijk door het oculair en st...

Страница 20: ...e di marche tipi o livelli di carica diversi Togliere le batterie dall apparecchio nel caso non venga utilizzato per un periodo prolungato o se le batterie sono scariche Non tentare mai di ricaricare...

Страница 21: ...iti separatamente per poter essere trattati e riciclati nel rispetto dell am biente Le batterie scariche anche quelle ricaricabili devono essere smaltite dal consumatore pres so gli appositi punti di...

Страница 22: ...econda lente oculare 1 Questa quindi l immagine che vedi al micro scopio Struttura e ubicazione Prima di cominciare scegli una posizione adat ta per effettuare le tue osservazioni al micro scopio Da u...

Страница 23: ...batterie nel vano rispettan do le polarit indicate Successivamente rimetti il piede di gomma al suo posto IT Per accendere l illuminazione girala verso il tavolino portaoggetti 4 Guarda attraverso l...

Страница 24: ...completo de pilas nuevas con plena capacidad No utilice pilas de marcas o modelos distintos ni de distinto nivel de capa cidad Hay que retirar las pilas del aparato si no se va a usar durante un perio...

Страница 25: ...tinarse a un reciclaje adecuado des de el punto de vista medioambiental Las pilas y los acumuladores gastados o des cargados deben ser eliminados por el con sumidor en recipientes especiales para pila...

Страница 26: ...a segunda lente ocular 1 y es enton ces cuando ves la imagen de microscopio Montaje y lugar de observaci n Antes de empezar debes elegir un lugar apro piado para practicar observaciones con tu mi cros...

Страница 27: ...scopio e introducir las pilas seg n la indicaci n mostrada A continuaci n colo ca de nuevo el pie de goma ES La iluminaci n se enciende gir ndola en direc ci n a la platina 4 Mira por el ocular y ajus...

Страница 28: ...kali w i cieczy Nie pi odczynnik w chemicz nych Po u yciu dok adnie umy r ce pod bie c wod W przypadku gdy substancje dostan si do oczu lub ust przemy je wod W przy padku dolegliwo ci niezw ocznie zg...

Страница 29: ...orstwie utylizacji od pad w lub w urz dzie ds ochrony rodowiska Baterie nie mog by usuwane wraz z pozosta ymi odpadami domowymi Kon sument jest prawnie zobowi zany do oddawa nia baterii po zu yciu np...

Страница 30: ...stabilnym pod o u poniewa na chybotliwym pod o u nie da si uzyska zadowalaj cej jako ci obrazu Zwyk a obserwacja W celu prowadzenia zwyk ych obserwacji ustaw mikroskop w jasnym miejscu przy oknie lub...

Страница 31: ...cznym 6 potrzebne Ci s dwie baterie 1 5 V kt re wk ada si do podstawy mikrosko pu 7 Nast pnie trzeba zdj gumow stop mikroskopu 8 i w o y baterie do zasobnika zgodnie z oznaczeniem biegun w Po w o eniu...

Страница 32: ...t rie nevystavujte skratom ani ne vhadzujte do oh a Vystavovanie nadmern m hor av m a neodborn manipul cia m u vies ku skratom po iarom a dokonca k v buchom NEBEZPE ENSTVO k d na majetku Pr stroj nero...

Страница 33: ...ry s ozna en pre krtnu t m smetn m ko om a tie chemick m sym bolom kodlivej l tky Cd znamen kadmium Hg znamen ortu a Pb znamen olovo Cd Hg Pb 1 Bat ria obsahuje kadmium 2 Bat ria obsahuje ortu 3 Bat r...

Страница 34: ...oskop polo ili na stabiln podlo ku ke e sa na k vaj com povrchu nedaj z ska uspokojiv v sledky Norm lne pozorovanie Na norm lne pozorovanie postavte mikroskop na svetl miesto okno stolov lampa Mik ros...

Страница 35: ...nohy mikroskopu 7 Odstr te gumo v p tku 8 na mikroskope a vlo te bat rie v s lade s ozna enou polaritou Potom znova nasa te gumen p tku Osvetlenie zapnete tak e osvetlenie oto te v smere pozorovacej p...

Страница 36: ...pa ak i ek splozije OPASNOST nastanka predmetne tete Ne rastavite ure aj U slu aju defekta molimo da se obratite Va em stru nom trgovcu On e se povezati sa servisnim centrom i u slu aju potrebe mo e...

Страница 37: ...Cd Hg Pb 1 Baterija sadr i kadmij 2 Baterija sadr i ivu 3 Baterija sadr i olovo EZ izjava o sukladnosti EZ izjavu o sukladnosti u skladu s mjerodavnim direktivama i odgovaraju om normom izdala je tvr...

Страница 38: ...ma nije mogu e postizanje zadovoljavaju ih rezultata Normalno promatranje Za normalno promatranje mikroskop postavi na dobro osvijetljeno mjesto prozor stolna lampa U tu svrhu izvadi mikroskop iz paki...

Страница 39: ...je koje trebaju biti umetnute u stalak mikroskopa 7 Nakon toga treba odstraniti gumenu nogicu 8 na mikroskopu i baterije umetni u skladu sa pri kazanim podacima Gumena nogica treba kasnije ponovo biti...

Страница 40: ...dn manipulace mohou zp sobit zkrat po r nebo dokonce v buch NEBEZPE po kozen v cn ho majetku P stroj nerozeb rejte Obra te se v p pad z vady na va eho odborn ho pro dejce Prodejce se spoj se servisn m...

Страница 41: ...rn dvory Baterie a akumul tory jsou ozna eny p e krtnu t m symbolem popelnice a chemickou zna kou kodliv l tky Cd znamen kadmium Hg rtu a Pb olovo Cd Hg Pb 1 Baterie obsahuje kadmium 2 Baterie obsahuj...

Страница 42: ...skop um stil a na stabiln podklad nebo na nerovn m povr chu nelze doc lit uspokojiv ch v sledk B n pozorov n Pro b n pozorov n um sti mikroskop na sv tl m sto u okna stoln lampy Mikroskop vyjmi z obal...

Страница 43: ...8 na mikroskopu a vlo baterie podle vyzna en polarity Gumovou patici pot znovu nasa Osv tlen se spust ot en m sv tla ve sm ru stolu na objekty 4 Pod vej se okul rem a osv tlen nyn nastav tak abys dos...

Страница 44: ...nipularea incorect pot provoca un scurtcircuit incendii sau chiar i explozii RISC de daune materiale Nu dezasambla i dispozitivul n caz de defecte lua i leg tura cu reprezentan a Personalul reprezenta...

Страница 45: ...orii sunt marca i cu un tom beron barat i cu simbolul chimic al substan ei toxice respective Cd nseamn cadmiu Hg nseamn mercur i Pb nseamn plumb Cd Hg Pb 1 Bateria con ine cadmiu 2 Bateria con ine mer...

Страница 46: ...rezultate satisf c toare dac l amplasa i pe o suprafa care se clatin Observarea normal Pentru observarea normal a eza i microscopul ntr un loc luminos l ng o fereastr lamp de birou Scoate i microscop...

Страница 47: ...tul pentru baterii din piciorul microscopului 7 ndep rta i talpa de cauciuc 8 a microscopu lui i introduce i bateriile conform indica iilor afi ate Pune i la loc talpa de cauciuc a microscopului Pute...

Страница 48: ...48 BG 2002 96 EC...

Страница 49: ...49 01 06 2006 Cd Hg Pb Cd Hg Pb 1 2 3 Bresser GmbH EG www bresser de download 8851200 CE 8851200_CE pdf BG...

Страница 50: ...50 1 3 11 1 9 C D 2 3 F 5 1 2 3 4 5 6 7 8 9 10 11 12 13 14 15 16 17 18...

Страница 51: ...51 11 4 2 6 1 5 V 7 8 4 3 14 5 www bresser de warranty_terms BG...

Страница 52: ...e que el texto contenga errores Zastrzegamy sobie mo liwo pomy ek i zmian technicznych Omyly a technick zmeny vyhraden Pridr avamo pravo na pogre ke i tehni ke promjene Omyly a technick zm ny vyhrazen...

Отзывы: