


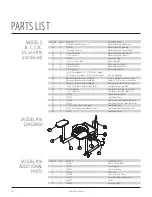
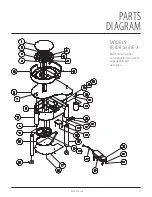


20
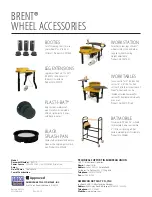
brentwheels.com
ITEM #
QTY. PART #
DESCRIPTION
45
4
Used for Manufacturing Only
Motor Mounting Bolt Retainer
46
8
22306M
Motor Mounting Bushing
47
4
1/4 Fender Washer
Motor Mounting Fender Wsher
48
4
1/4 Lock Washer
Motor Mounting Lock Washer
49
4
1/4-20 Hex Nut
Motor Mounting Hex Nut
50
3
22695P
Frame Leg Plug
51
2
1/4-20 x 3/4 Hex Bolt
Belt Guard Bolt
52
2
1/4 Lock Washer
Belt Guard Flat Washer
53
2
1/4 Flat Washer
Belt Guard Lock Washer
54
2
1/4-20 Hex Nut
Belt Guard Hex Nut
22906Y for Models B, 16 22907A for C Model
55
1
22908C for CXC Model 22912F for EX Model Classic Controller
56
1
Please call for prices and availability
Power Cord for Classic Controller
57
1
Please call for prices and availability
Power Switch for Classic Controller
58
1
Please call for prices and availability
Reversing SwitchClassic Controller
59
2
1/4-20 x 1 Phillips Head Machine Screw
Controller Mounting Bolt
60
2
1/4 Star Washer
Controller Mounting Star Washer
61
2
1/4-20 Nylok Nut
Controller Mounting Nylok Nut
62
1
22035R
Foot Pedal Complete
63
1
22278C
Foot Pedal Cover
63
1
22858R
Electric Sub-assembly for Foot Pedal
63
1
22881S
Foot Pedal Tension Hardware & Arm
64
4
22273W (Mtg. Screws Included)
Foot Pedal Foot
65
4
6/32 X 3/8 Phillips Head Machine Screw
Foot Pedal Foot Mounting Screw
66
1
22945T
Foot Pedal Cord
ITEM # QTY.
PART #
DESCRIPTION
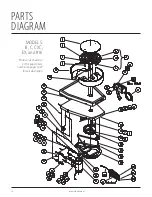
1
1
22508S
Frame, 16 Complete
2
2
22851G
Arm Supports
3
1
22849F
Crank Assembly
4
1
22935H
Belt Guard
5
1
22823B
Foot Lever with Lever
6
1
22818T
Foot Pedal Mounting Bracket
7
4
22847C
Caster
8
4
22846D
Adjusting Foot
PARTS LIST
MODELS:
B, C, CXC,
EX, and #16
(continued)
MODEL #16
ADDITIONAL
PARTS
MODEL #16
DIAGRAM