


Page 2
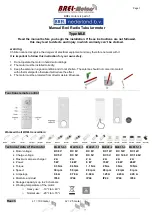
If charging the MLE15, MLE25, only use a charger with Micro-USB plug (5V)
The battery is fully charged when the light stops blinking and lights-up continuously.
For charging in the UK the MLE16 and MLE28 and MLE35 only use the DC-213 ( 12.6V ).
For Europe use DC-212.
The battery is fully charged when the light on the charger
DC-212/ DC-213
changes from red to blue.
Make sure that during installation the motor is sufficiently charged. Take care that the motor is not operated during charging.
_______________________________________________________________________________
Functions
MLE15, MLE25
Micro-USB
--------
Antenne-------
Antenne------
Micro-USB
-----
P1
------------------
MLE25
MLE15
On/off button --------
MLE15
P1 button
-------------
Note: Take away the plastic cover to connect the micro-USB plug to the motor.
Charging plug ----------
MLE16
MLE16 and MLE28 and MLE35
Charging plug ---------------
Charging plug ------------
Antenna ------------------
P1 button
-------------------------
Antenna --------------
MLE35
MLE28
P1 ----
Antenna ------------------
_______________________________________________________________________________
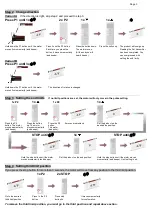
Installing the motor
Attach the crown and wheel to the motor and place the clip on the shaft of the motor so that the wheel
is fixed to the motor.
Install the motor with the motorbracket on the product and take care that it is secured.
Place the motor in the tube of the roller/shutter.
(These assemblies are usually already done in the factory) During programming the motor;
the following must be done within 10sec. After 10 sec. the motor will quit the programming mode.
EMERGENCY CONTROL:
If a transmitter has been paired and the end positions determined in the motor,
you can use the P1 key as the control key.
NOTE:
The MLE15 and MLE 16 does not beep.
_______________________________________________________________________________
Step 1 Setting up the first channel
Press P1 until 1x
2x P2
1x
The direction of
rotation is right.
Go to setting the
.
end position.
Go to step 3.
The direction of
rotation is wrong.
Go to step 2.
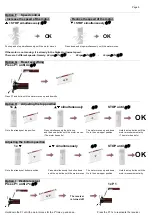
Hold down the P1 button until the motor
Press 2x on the
Press the button up.
moves momentarily (and beeps).
P2 button. Each
The motor moves.
time you press the
button, it moves
momentarily (and beeps}
With the above action you will delete all channels in memory and the final setting.


