


Basic Installation
BreezeACCESS/MMDS Series
3
SU-I/ID Installation Manual
2.3 Installation Overview
Standard installation involves the following steps:
1. Verify that all components of the packing list, described in Section 2.1, are
intact and verify availability of the required items listed in Section 2.2.
2. Install the unit and antenna(s) in optimal locations as described in
Section 2.4.
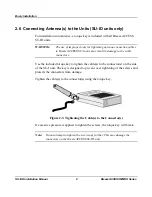
3. Connect the antenna(s) to the unit as described in Section 2.6.(SU-ID units)
4. Connect the power supply to the unit as described in Section 2.7.
5. Connect the Ethernet port to the unit as described in Section 2.7.
6. Configure the basic system parameters as described in Section 3.
7. Align the antenna(s) for optimal connectivity and configure the Maximum
Data Rate if applicable, as described in Chapters 4 and 5.
8. Check the functionality of the unit as described in Chapter 6.
2.4 Installation Guidelines
This section describes the installation guidelines and the various considerations
that must be taken into account when planning the installation.
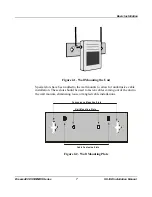
2.4.1 Location of the Unit and Antenna(s)
•
The unit can be placed on a shelf, or can be attached to the ceiling or a wall
using a mounting bracket. SU-ID units should be installed as near to the
antenna(s) as possible to minimize loss of RF power in the cable(s).
•
Keep the units well away from sources of heat, such as radiators, air-
conditioners, etc.
Содержание BreezeACCESS
Страница 8: ......