Figure 3
Fi
t a
n
d u
se
10
11
Retractable tie downs
Retractable tie downs
1.
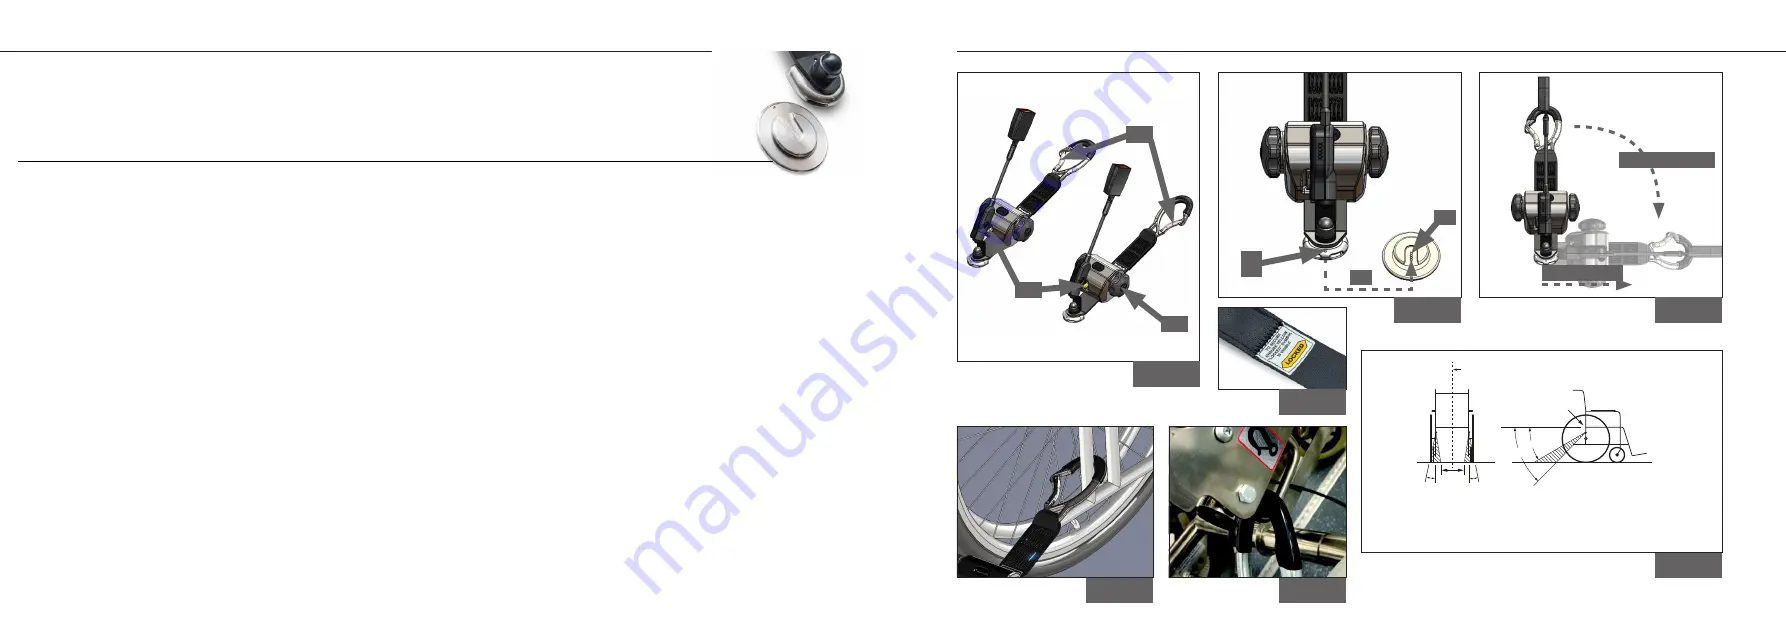
When placing the Quattro Express tie-down with karabiners behind the
wheelchair, ensure that the karabiner gates are facing outwards, (Fig. 1A).
2.
Install the restraint(s) onto the floor anchor(s) by aligning the open mouth of
the cleat and the protrusion, (Fig. 2C), to the slot on the floor anchor, (Fig. 2A &
2B).
3. Slide the cleat fully home (allowing the keyway within the cleat to guide into
its home position), rotate the assemblies through 90° to allow the karabiners
to be attached to the wheelchair frame, (Fig. 3A & 3B).
4.
Extend the webbing and attach the karabiner fixing around the wheelchair’s
securement points with the open gate facing outboard, (Fig. 4).
Note: It is not
necessary to press the yellow button if the lock label, (Fig. 5), is NOT visible. The
yellow button must be pressed if extending webbing with the label in view,
(Fig. 1B). Some wheelchairs will indicate the securement points, (Fig. 6).
5. Slack in the webbing will be taken in automatically by the reel to create an
angle of around 30° to 45° and within the rear view zone, (Fig. 7).
6. Final tensioning is achieved by turning each tensioning handle, (Fig. 1C),
until the webbing is equally taut on each side. The webbing will retract
automatically into the reel.
IMPORTANT: the yellow label must be visible, to
ensure that the reel is locked off, (Fig. 5).
7. Ensure that each rear Quattro Express webbing is approximately of the same
length.
Removing the I-SQE16MK tie-down
IMPORTANT: First remove occupant
restraint, as instructed in the relevant
manual.
1.
Release the tension in the front
tie-downs by pressing the yellow
button, (Fig. 1B), and extending the
webbing to allow the karabiner to
be removed from the wheelchair
frame. If the webbing is particularly
tight, it may be necessary to
slightly ’tension’ the webbing with
the hand wheel, (Fig. 1C), while
pressing the yellow button, to
remove the webbing lock on the
retractor.
2. Remove each Quattro Solo from
the anchor by rotating the tie-
down through 90° so that the
raised protrusion, (Fig. 2C), on the
cleat is aligned with the indent on
the floor anchors, (Fig. 2A & 2B).
Slide off.
3. Pull the tie-down away from the
floor anchor and store safely.
Fit and use
I-SQE16MK
Solo floor anchor - rear wheelchair tie-down
Figure 2
C
Figure 6
Figure 5
Figure 1
B
A
C
A
B
Figure 4
Figure 7
Rear
securement
points
Wheelchair
reference
plane
45°
30°
SIDE VIEW
REAR VIEW
10°
10°
300mm
(12in)
NOTE Note that angles indicated are obtained by projecting the angle of each tie-down strap
onto a vertical plane parallel to the wheelchair reference plane (side view) or onto a vertical
plane that is perpendicular to the wheelchair reference plane (rear view).
A - slide on
B - rotate 90°


