9
B Epilation
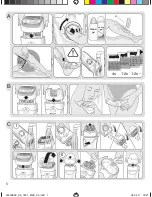
Remove the Smoothing cap (2) and attach
the Epilation cap (11) or the cap for sensitive
areas (12). You may epilate under wet or dry
conditions:
Wet usage: To achieve best gliding
conditions, make sure the skin
is very moist.
Dry usage: Make sure your skin is dry and
free from grease and cream.
Leg epilation:
•
Stretching your skin, guide the appliance
in a slow, continuous movement without
pressure against the hair growth in the
direction of the switch.
•
As hair grows in different directions, it
may be helpful to guide the appliance in
different directions to achieve best results.
Epilation in sensitive areas:
•
For underarm and bikini line epilation,
attach the Epilation cap (12) which has
been specifically developed for use in
sensitive areas.
•
Before epilating, thoroughly clean the
respective area to remove residues (like
deodorant). Keep your arm raised up so
that the skin is stretched and guide the
appliance in different directions. As skin
may be more sensitive directly after epila-
tion, avoid using irritating substances
such as deodorants with alcohol.
•
Please be aware that especially in the
beginning, these areas are particularly
sensitive to pain. Therefore, we recom-
mend that you select speed setting «I» for
the first few usages.
With repeated usage the pain sensation
will diminish. For more comfort, ensure
that the hair is at the optimum length of
2-5 mm.
Overheating protection
As a safety feature to avoid the unlikely
event of the appliance overheating, it may
happen that the red low charge light shines
permanently for 8 seconds and then the
appliance turns off automatically. In this
case, turn the switch back to the position «0»
and let the appliance cool down.
Keeping the appliance in top
shape
Cleaning with water
After each wet usage, thoroughly clean the
appliance with water to ensure optimum
performance.
Remove the Smoothing cap (2) and clean it
under warm running water.
Hold the appliance with the epilation head
under running water and briefly switch it on.
Then press the release button (10) to remove
the epilation head.
Thoroughly shake both, the epilation head
and the appliance to make sure that
remaining water can drip out. Remove the
non-slip grip and leave all parts to dry.
Before reattaching, make sure all parts are
completely dry.
After reassembling the epilation head and
the Smoothing cap (2), you may attach the
protection cap (1) to protect the blade.
Cleaning with the brush
If you have used the appliance in dry
conditions, it may be sufficient to clean it
with the brush.
Thoroughly clean the tweezers from the rear
side of the Epilation head with the brush
dipped into alcohol. While doing so, turn the
tweezer element manually. This cleaning
method ensures best hygienic conditions for
the epilation head.
99903889_SE_7891_MEA_S6-28.indd 9
99903889_SE_7891_MEA_S6-28.indd 9
28.04.11 14:08
28.04.11 14:08
Содержание Silk-Epil 7 7891 WD
Страница 16: ...17 99903889_SE_7891_MEA_S6 28 indd 17 99903889_SE_7891_MEA_S6 28 indd 17 28 04 11 14 08 28 04 11 14 08...
Страница 17: ...18 99903889_SE_7891_MEA_S6 28 indd 18 99903889_SE_7891_MEA_S6 28 indd 18 28 04 11 14 08 28 04 11 14 08...
Страница 18: ...19 99903889_SE_7891_MEA_S6 28 indd 19 99903889_SE_7891_MEA_S6 28 indd 19 28 04 11 14 08 28 04 11 14 08...
Страница 19: ...20 99903889_SE_7891_MEA_S6 28 indd 20 99903889_SE_7891_MEA_S6 28 indd 20 28 04 11 14 08 28 04 11 14 08...
Страница 20: ...21 99903889_SE_7891_MEA_S6 28 indd 21 99903889_SE_7891_MEA_S6 28 indd 21 28 04 11 14 08 28 04 11 14 08...
Страница 21: ...22 99903889_SE_7891_MEA_S6 28 indd 22 99903889_SE_7891_MEA_S6 28 indd 22 28 04 11 14 08 28 04 11 14 08...
Страница 22: ...23 99903889_SE_7891_MEA_S6 28 indd 23 99903889_SE_7891_MEA_S6 28 indd 23 28 04 11 14 08 28 04 11 14 08...
Страница 23: ...24 99903889_SE_7891_MEA_S6 28 indd 24 99903889_SE_7891_MEA_S6 28 indd 24 28 04 11 14 08 28 04 11 14 08...


