background image

3

F

S

ommaire

· Consignes de sécurité.............................................................................

4

· Respect de l'environnement et économies d'énergie.............................

5

· Description de votre appareil..................................................................

6

1 Comment effectuer votre première installation 

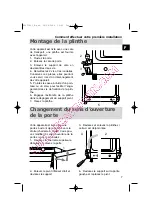
· Montage de la plinthe..............................................................................

7

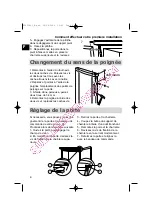
· Changement du sens d'ouverture de la porte.........................................

7

· Changement du sens de la poignée.......................................................

8

· Réglage de la porte.................................................................................

8

· Installation de votre appareil...................................................................

9

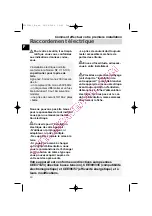
· Raccordement électrique........................................................................

10

2 Comment utiliser votre cave à vin

· Mise en service ......................................................................................             11
· Réglage de la température .....................................................................

12

· Froid brassé............................................................................................

13

· Rangement des bouteilles.......................................................................

13

· Modularité de l'agencement ...................................................................

15

· L'Air Pur Pack anti-odeurs.......................................................................

16

3 Entretien courant de votre appareil

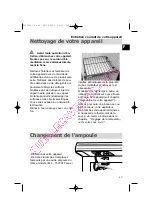
· Nettoyage de votre appareil....................................................................

17

· Changement de l'ampoule......................................................................

17

4 Anomalies de fonctionnement

· Désagréments.........................................................................................

18

· Anomalies...............................................................................................

19

· Bruits de fonctionnement normaux..........................................................

19

5 Service consommateur

· Service après-vente................................................................................

20

· Relations consommateurs.......................................................................

20

Le guide d'installation et d'utilisation de votre cave à vin est valable pour plu-

sieurs modèles. De légères différences de détails et d'équipements peuvent apparaî-
tre entre votre appareil et les descriptions présentées.

Au fil des pages de cette notice, vous découvrirez les symboles suivants qui vous signale-
ront :

les consignes de sécurité à respecter impérativement

un danger électrique

les conseils et les informations importantes

99633601_B.qxd  28/04/2004  16:00  Page 3

Содержание CB1781

Страница 1: ...e cellar Gebruiks en installatiehandleiding van uw wijnkast Installations und Gebrauchsanleitung Ihres Weinkellers Manual de instalaci n y utilizaci n del armario bodega Guia de Instala o e de Utiliza...

Страница 2: ...gamme des produits Brandt un vaste choix de lave vaisselle lave linge et s che linge r frig rateurs cong lateur cuisini res et fours tables de cuisson et hottes que vous pourrez associer votre nou ve...

Страница 3: ...16 3 Entretien courant de votre appareil Nettoyage de votre appareil 17 Changement de l ampoule 17 4 Anomalies de fonctionnement D sagr ments 18 Anomalies 19 Bruits de fonctionnement normaux 19 5 Ser...

Страница 4: ...luer vers le moteur avant de brancher l appareil faute de quoi vous risquez de l endommager Proc dez au premier nettoyage voir chapitre Installation de votre appa reil avant de brancher votre appareil...

Страница 5: ...e celles composant l ensemble de votre appareil utilisent des mat ri aux recyclables Il convient d en tenir compte lors de leur limination Renseignez vous aupr s de votre revendeur ou des services tec...

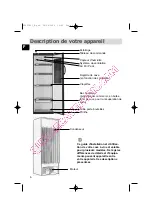
Страница 6: ...r positionner comme ici en but e fond de cuve pour la r cup ration de l eau Grille porte bouteilles Plinthe Condenseur Moteur Ce guide d installation et d utilisa tion de votre cave vin est valable po...

Страница 7: ...in the 6 Engagez l extr mit de la plinthe dans le d gagement du support pivot 7 Vissez la plinthe Votre appareil est livr avec une porte s ouvrant de la gauche vers la droite charni re droite Vous pou...

Страница 8: ...ez la poign e l aide des deux vis et replacez les caches vis R glage de la porte Si n cessaire vous pouvez r gler l ali gnement de la porte et le bandeau de commande de votre cave vin Proc dez alors d...

Страница 9: ...del de ces temp ratures les performances de votre appareil peuvent se trouver diminu es Classe climatique Temp rature ambiante SN ST 10 C 38 C Maintenez une distance minimum entre votre cave vin et l...

Страница 10: ...ous votre installateur Proc dez au premier nettoyage voir chapitre Installation de votre appareil avant de brancher votre appareil au r seau lectrique Avant toute op ration d entretien d branchez la f...

Страница 11: ...yant orange allum Le voyant doit imp rativement rester allum Votre cave fonctionne correctement lorsque le voyant du thermostat de s curit 1 est associ aux voyants de r gulation 3 Si toutefois seul le...

Страница 12: ...chauffement de la temp rature int rieure R glage de la temp rature A la mise en service de votre appa reil placez le thermostat sur une position moyenne zone de vieillisse ment 11 14 4 heures apr s la...

Страница 13: ...es utili s es Les quantit s ne sont donn es qu titre indicatif Les bouteilles utili s es pour les essais sont de type bordelaise de hauteur 290 mm dia m tre 76 5 mm type syndicale all g m dium optima...

Страница 14: ...avec 4 clayettes 166btes Rangement type avec 3 clayettes 173btes Mod le porte verre Rangement type avec 5 clayettes 155btes Rangement type avec 4 clayettes 166btes Comment utiliser votre cave vin F 99...

Страница 15: ...r utilisa bles Nous vous conseillons d utiliser un crayon type B ou BB ou un crayon feutre effa able l eau pour crire sur celles ci Vous pouvez galement vous procurer d autres tiquettes chez votre re...

Страница 16: ...le film plastique Tirez sur la languette pour activer le gel Replacez la cartouche sur son sup port dans votre cave vin Renouvellement de la cartouche Lorsque vous ne voyez plus de gel bleu sur la fa...

Страница 17: ...ur jet de vapeur haute pression La vapeur br lante pourrait endommager les surfaces et les circuits lectriques Vous seriez expos un risque d lectrocution Rincez l eau essuyez avec un chif fon V rifiez...

Страница 18: ...rtante quantit de bouteilles attendre que l appareil se stabilise en temp rature avant de r ajuster le thermostat veillez ne pas ouvrir trop souvent la porte de votre appareil ou ne pas la laisser ouv...

Страница 19: ...t en dehors de la gamme de r gulation Attendez la stabilisation de la temp rature Ajoutez de l eau dans le bac hydrateur V rifiez l alimentation de votre appareil Anomalies BRUIT Bourdonnements Gargou...

Страница 20: ...souci d une am lioration constante de nos produits nous nous r servons le droit d apporter leurs caract ristiques techniques fonctionnelles ou esth tiques toutes modi fications li es leur volution Br...

Страница 21: ...so offers you a vast selection of dishwashers washing machines refrigerators freezers cookers and ovens hobs and cooker hoods that will go perfectly with your new BRANDT wine cellar On the cutting edg...

Страница 22: ...Air Pur Pack anti odour 35 3 Ongoing maintenance of your appliance Cleaning your appliance 36 Changing the lightbulb 36 4 Operational anomalies Troubleshooting 37 Anomalies 38 Abnormal operational noi...

Страница 23: ...he refrigeration circuit and you must leave it time to flow back towards the motor before connec ting the appliance Failure to do so may damage the appliance Carry out an initial cleaning operation se...

Страница 24: ...well as those that make up your appliance use recyclable materials Please take account of this when discarding them Your supplier or your local council will be able to tell you about the possibilitie...

Страница 25: ...ating tray to position as shown in contact of the back for defrost water recovery Wire bottle rack Plinth Condenser Motor The guide to installation and use of your wine cellar is applicable to several...

Страница 26: ...securing screws 6 Fit the plinth end into the space provided for the hinge bracket 7 Screw the plinth on Your appliance is delivered with the door opening from left to right hinges on right You can i...

Страница 27: ...4 mm holes 4 Refit the handle with the two screws and replace the screw covers Adjusting the door If necessary you can adjust the align ment of the door and the wine cellar control panel Proceed in th...

Страница 28: ...ge the perfor mance of your appliance may be diminished Climate class Ambient temperature SN ST 10 C to 38 C Leave a minimum distance of 3 to 5 cm at the sides between your wine cellar and your furnit...

Страница 29: ...ut the initial cleaning See section on Installation of your appliance before connec ting your appliance to the electri cal supply Disconnect your appliance prior to carrying out any maintenance ope ra...

Страница 30: ...on The light must stay on Your wine cellar is functioning correctly when the thermostat safety light 1 is on as well as the regulating lights 3 If however only the orange light 1 comes on your wine c...

Страница 31: ...e the internal temperature to rise Adjusting the temperature When putting your appliance into service set the thermostat to a medium position ageing zone 11 to 14 4 hours after putting your appliance...

Страница 32: ...and on the number of racks used The quantities given are only a guide The bottles used for the tests are of the Bordeaux type 290 mm tall 76 5 mm in diameter type syndi cal lightweight medium optima I...

Страница 33: ...ttles Glass door model Typical storage with 5 racks 155 bottles Typical storage with 4 racks 166 bottles How to use your wine cellar 50 bottles 50 bottles 50 bottles 50 bottles 18 bottles 18 bottles 3...

Страница 34: ...u to write on them using a B or BB pencil or a water soluble felt tip pen to write on them You can also buy more labels form your dealer or after sales service Wine register depending on the model The...

Страница 35: ...ve the plastic film Pull the slip to activate the gel Replace the cartridge in its casing in your wine cellar When to change the cartridge When you no longer see any blue gel at the front of the cartr...

Страница 36: ...e a high pressure steam cleaner The very hot steam could damage the surfaces and the electri cal circuits you would expose yourself to a risk of electrocution Rinse with water dry with a cloth Periodi...

Страница 37: ...it for the appliance temperature to stabilise before re adjusting the thermostat be careful not to open your appliance s door too often and not to leave it open check that your appliance is connected...

Страница 38: ...de which guarantees maintenan ce of the temperature Wait for the temperature to stabilise Add some water to the hydrating tray Check the electrical supply to your appliance Anomalies NOISE Buzzing Gar...

Страница 39: ...ovement in our products we reserve the right to make any modifications linked to their development ot their technical operational or aesthetic characteristics Brand Appliances SAS au Capital de 10 000...

Страница 40: ...kasten diepvriesapparaten fornuizen ovens kookpla ten en afzuigkappen die u op een elegante manier met uw nieuwe BRANDT wijnkast kan combineren Brandt staat niet alleen voor technologische innovatie m...

Страница 41: ...Ontgeuringssysteem Air Pur Pack 54 3 Normaal onderhoud van de wijnkast Reiniging van de wijnkast 55 Vervanging van het lampje 55 4 Problemen bij de werking Problemen en oplossingen 56 Problemen 57 No...

Страница 42: ...dien u de wijnkast meteen na een horizontaal transport aansluit kan dit mogelijk schade veroorzaken Reinig uw wijnkast een eerste maal zie hoofdstuk Installatie van de wijn kast alvorens ze op het ele...

Страница 43: ...jnen voor dergelijke producten dient te verwijderen Zowel voor de verpakking als het apparaat worden recycleerbare materialen gebruikt Hou hiermee rekening wan neer u verpakking en apparaat als afval...

Страница 44: ...tigingsbak zoals hier afgebeeld onderaan in de wijnkast om het water op te vangen Flessenrooster Plint Condensator Motor De gebruiks en installatiehandlei ding van uw wijnkast is geldig voor meerdere...

Страница 45: ...s het uiteinde van de plint in de open ruimte van de draaisteun 7 Schroef de plint vast De deur van uw wijnkast is een deur die van links naar rechts open gaat de scharnieren bevinden zich aan de rech...

Страница 46: ...t handvat met de schroe ven opnieuw vast en plaats de schroef kapjes opnieuw op de schroeven Wijzigen van de positie van de deur Indien nodig kan u de deur en het bedieningspaneel van uw wijnkast per...

Страница 47: ...atklasse Omgevingstemperatuur SN ST 10 C tot 38 C Voorzie een minimale afstand tus sen de zijwanden van uw wijnkast en andere meubelen van 3 tot 5 cm en tussen de bovenzijde van uw wijnkast en andere...

Страница 48: ...k Installatie van de wijnkast alvorens ze op het elektriciteitsnet aan te sluiten Indien u later uw wijnkast wil reini gen of een herstelling laat uitvoe ren trekt u altijd eerst de stekker uit Trek n...

Страница 49: ...het oranje lampje licht op Het oranje lampje dient ononder broken te branden Uw wijnkast werkt correct indien het oranje lampje 1 gelijktijdig met 1 of meerdere groene lampjes 3 brandt Indien evenwel...

Страница 50: ...e wijnkast te snel zou stijgen Instelling van de temperatuur Bij de ingebruikneming van uw wijn kast plaatst u de thermostaatknop in de middelste zone rijpingszone van 11 C tot 14 C 4 uur na de inscha...

Страница 51: ...ijn kast en van het aantal rekken in de wijnkast De hoeveelheden hieronder worden enkel ter informatie vermeld Voor de test hebben we flessen van het Bordeaux type gebruikt Deze flessen hebben een hoo...

Страница 52: ...lessen Model met glazen deur Opbergsysteem met 5 rekken 155 flessen Opbergsysteem met 4 rekken 166 flessen Gebruik van uw wijnkast 50 flessen 50 flessen 50 flessen 50 flessen 18 flessen 18 flessen 37...

Страница 53: ...te gebruiken om de wijngegevens op het etiket te schrijven Bij uw dealer of onze servicedienst kan u eveneens bijkomende etiketten aankopen Wijnregister volgens model Op de binnendeur van uw wijnkast...

Страница 54: ...verwijderen Verwijder de plastic folie Trek de strip los om de gel te acti veren Plaats het patroon opnieuw in zijn steun in de wijnkast Vervanging van het gelpatroon Indien er zich op de voorzijde va...

Страница 55: ...mreini ger De hitte van de stoom kan de oppervlaktes van de wijnkast en elektrische circuits beschadigen Bovendien stelt u zichzelf bloot aan mogelijke elektrocutie Spoel de binnen en buitenzijde van...

Страница 56: ...t heeft opgeborgen wacht u tot de temperatuur in de wijnkast gestabiliseerd is alvorens eventueel de thermo staat in een andere stand te plaatsen Vermijd de deur van de wijnkast te vaak te openen of d...

Страница 57: ...ordt gehouden Wacht tot de temperatuur in de wijnkast gestabiliseerd is Voeg water aan de bevoch tigingsbak toe Controleer de voeding van de wijnkast Problemen GELUID Brommend geluid Borrelend of lich...

Страница 58: ...onderbroken naar verbeteringen van onze producten en behouden ons bij gevolg het recht voor op basis van de technologische evolutie alle noodzakelijke technis che functionele of esthetische wijziginge...

Страница 59: ...von Brandt enth lt auch eine gro e Auswahl an Geschirrsp lern Waschmaschinen und W schetrocknern K hlschr nken Gefriertruhen K chenherden und Back fen Kochfeldern und Dampfabzugshauben die Sie mit Ihr...

Страница 60: ...le Pflege Ihres Ger tes Ger tereinigung 74 Austausch der Birne 74 4 Funktionsst rungen Unannehmlichkeiten 75 St rungen 76 Normale Betriebsger usche 76 5 Verbraucherservice Kundendienst 77 Verbraucherv...

Страница 61: ...Eine geringe Menge l k nnte in das K hlsystem gelaufen sein und muss vor dem Anschluss des Ger tes wieder zum Motor zur ck flie en da dasselbe sonst besch digt werden k nnte F hren Sie eine erste Rei...

Страница 62: ...en verlangen F r die Verpackung sowie f r alle Bestandteile Ihres Ger tes wurden recycelf hige Materialien verwendet Bitte ber cksichtigen Sie dies bei Ihrer Entsorgung Erkundigen Sie sich bei Ihrem V...

Страница 63: ...en des Beh lters zum Auffangen von Wasser anbringen Flaschengittereinsatz Leiste Kondensator Motor Die Installations und Gebrauchsanleitung Ihres Weinkellers ist f r mehrere Modelle g ltig Deshalb k n...

Страница 64: ...en der Leiste zu erleichtern 6 Das Ende der Leiste in den Abstand der Drehachsenhalterung schieben 7 Die Leiste festschrauben Ihr Ger t wird mit einer sich von links nach rechts ffnenden T r geliefert...

Страница 65: ...4 Den Griff anhand der beiden Schrauben erneut montieren und die Schraubenabdeckungen wieder einsetzen T rausrichtung Sie k nnen wenn erforderlich die Axialit t der T r und der Bedienungsblende Ihres...

Страница 66: ...schreiten dieser Temperaturen kann sich die Leistung des Ger tes verringern Klimatische Klasse Umgebungstemperatur SN ST 10 C bis 38 C Sie m ssen einen Mindestabstand von mindestens 3 bis 5 cm zwische...

Страница 67: ...te von Kindern sein Wenn Sie irgend einen Zweifel haben wenden Sie sich bitte an Ihren Installateur F hren Sie die erste Reinigung durch siehe Kapitel Ger teinstallation bevor Sie Ihr Ger t ans Stromn...

Страница 68: ...dig brennen Ihr Keller funktioniert richtig wenn die Sicherheitskontrolllampe 1 gleich zeitig mit den Regelungskontrolllampen 3 brennt Wenn nur die orange Kontrolllampe 1 brennt bedeutet dies dass Ih...

Страница 69: ...hat eine Erh hung der Temperatur im Weinkeller zur Folge Einstellen der Temperatur Bei Inbetriebnahme des Ger tes den Thermostat in eine mittlere Temperaturstufe stellen Reifungsbereich 11 bis 14 4 S...

Страница 70: ...dienen der Information Die f r die Tests benutzten Flaschen entspre chen den 290 mm hohen Bordeaux Flaschen mit einem Durchmesser von 76 5 mm des gewerkschaftlichen erleichterten Medium und Optima Typ...

Страница 71: ...ttereins tzen 155 Flaschen Lagerung des Typs mit 4 Gittereins tzen 166 Flaschen Benutzung Ihres Weinkellers 37 Flaschen 11 Flaschen 50 Flaschen 50 Flaschen 50 Flaschen 56 Flaschen 50 Flaschen 50 Flasc...

Страница 72: ...mpfehlen Ihnen f r ihre Beschriftung einen Bleistift des Typs B oder BB oder einen wasserl slichen Filzstift zu benutzen Sie k nnen sich bei Ihrem H ndler oder Kundendienst auch zus tzliche Etiketten...

Страница 73: ...Die Kunststofffolie entfernen An der Zunge ziehen um das Gel zu aktivieren Die Kartusche wieder in ihre Haltevorrichtung im Weinkeller set zen Austausch der Kartusche Wenn Sie an der Vorderseite der...

Страница 74: ...ck Der hei e Dampf k nnte die Oberfl chen sowie die Stromkreise besch digen Es ents teht ein Stromschlagrisiko Mit klarem Wasser nachsp len und einem Tuch trocken reiben berpr fen Sie regelm ig die Sa...

Страница 75: ...abilisiert hat bevor Sie den Thermostat nachstellen Darauf achten dass die T r Ihres Weinkellers nicht zu oft ge ffnet wird oder zu lange ge ffnet bleibt berpr fen ob das Ger t korrekt ans Stromnetz a...

Страница 76: ...rt im Sicherheitsmodus Die Beibehaltung der Temperatur ist somit gew hrleistet Die Temperaturstabilisierung abwarten Zus tzlich Wasser in den Hydratationsbeh lter gie en Die Stromversorgung des Ger te...

Страница 77: ...ontoise 440 303 303 Darum bem ht unsere Produkte st ndig zu verbessern behalten wir uns das Recht vor ihre technischen funktionellen oder sthetischen Eigenschaften die mit der Entwicklung der Technik...

Страница 78: ...aptarse a sus h bitos de consu mo La gama de productos Brandt tambi n le ofrece una amplia selecci n de lavava jillas lavadoras y secadoras frigor ficos congeladores cocinas y hornos enci meras y camp...

Страница 79: ...ntenimiento habitual del aparato Limpieza del aparato 93 Cambio de la bombilla 93 4 Anomal as en el funcionamiento Incidentes 94 Anomal as 95 Ruidos de funcionamiento normales 95 5 Servicio de atenci...

Страница 80: ...dejar pasar cierto tiempo hasta que refluya hacia el motor antes de conectar el aparato sino podr a da arlo Proceda a la primera limpieza v ase cap tulo Instalaci n del aparato antes de conectar el a...

Страница 81: ...el conjunto del aparato utilizan materiales reciclables Es con veniente tenerlo en cuenta en el momento de su eliminaci n Inf rmese de las posibilidades de desechar adecuadamente el producto y respet...

Страница 82: ...onar como aqu en el fondo de la cuba para la recuperaci n del agua Estante botellero Z calo Condensador Motor Este manual de instalaci n y utiliza ci n del armario bodega es v lido para varios modelos...

Страница 83: ...uzca la extremidad del z calo en el emplazamiento del soporte eje 7 Atornille el z calo El aparato se suministra con una puerta que se abre de derecha a izquierda bisagra a la derecha Si lo desea podr...

Страница 84: ...los dos tornillos y a colocar los cubre tornillos Ajuste de la puerta En caso necesario tendr la posibili dad de regular la alineaci n de la puerta y el cartel de identificaci n de los mandos del arm...

Страница 85: ...se disminui dos Clase clim tica Temperatura ambiente SN ST 10 C a 38 C Para una buena circulaci n del aire alrededor del aparato mantenga una distancia m nima entre el armario bodega y los dem s muebl...

Страница 86: ...cap tulo Instalaci n del aparato antes de conectar el apa rato a la red el ctrica Antes de realizar cualquier operaci n de mantenimiento desconecte el enchufe de alimentaci n el ctrica No debe tirar...

Страница 87: ...uedarse encen dido El armario bodega funcionar correctamente cuando el indicador luminoso del termostato de seguridad 1 est asociado con los indicadores luminosos de ajuste 3 Si a pesar de todo nicame...

Страница 88: ...ra prolongada de la puerta del armario bodega conlle va un aumento de la temperatura interior Ajuste de la temperatura Cuando ponga en marcha el apara to coloque el termostato en una posi ci n media p...

Страница 89: ...e estantes utilizados Las cantidades s lo se dan a t tulo indicativo Las botellas utilizadas para las pruebas son de tipo Burdeos altu ra de 290 mm di metro de 76 5 mm Tipo sindical aligerado m dium p...

Страница 90: ...155 bot Distribuci n tipo con 4 estantes 166 bot C mo utilizar el armario bodega 37 Botellas 11 Botellas 50 Botellas 50 Botellas 50 Botellas 56 Botellas 50 Botellas 50 Botellas 50 Botellas 50 Botella...

Страница 91: ...en ellas le aconse jamos utilizar un l piz de tipo B o BB o un rotulador que se borre con agua Tambi n podr adquirir m s etiquetas en su distribuidor o en el servicio post venta Registro de bodega se...

Страница 92: ...re el film transparente Tire de la leng eta para activar el gel Sustituya el recambio del soporte del armario bodega Sustituci n del recambio Cuando no se vea m s gel azul en el frontal del recambio s...

Страница 93: ...de chorro a vapor de alta presi n El vapor muy caliente podr a da ar las superficies y los circuitos el ctricos Se expon dr a usted a un riesgo de electrocu ci n Aclare con agua seque con un trapo Com...

Страница 94: ...de botellas en el armario bodega espere a que la temperatura del apa rato se estabilice antes de reajustar el termostato Procure no abrir demasiado a menudo la puerta del aparato o no dejarla abierta...

Страница 95: ...de las son das de temperatura Al funcio nar el aparato en modo seguri dad le garantizar el manteni miento de la temperatura Espere que la temperatura se estabilice A ada agua al caj n Compruebe la ali...

Страница 96: ...stantemente nos reservamos el derecho de aportar a sus caracter sticas t cnicas funcionales o est ticas cualquier modificaci n relacionada con su evoluci n Brandt Appliances SAS con un capital de 10 0...

Страница 97: ...o Encontrar tamb m na gama dos produtos Brandt uma vasta escolha de m qui nas de lavar loi a m quinas de lavar e secar roupa frigor ficos arcas congela doras fog es e fornos placas de cozedura e exaus...

Страница 98: ...posi o 110 L Air Pur Pack O Neutralizador de cheiros 111 3 Manuten o regular do seu electrodom stico Limpeza do seu electrodom stico 112 Substitui o da l mpada 112 4 Anomalias de funcionamento Problem...

Страница 99: ...do no circuito de refrigera o devendo ent o aguardar at que este reflua para o motor antes de ligar o electrodo m stico Se n o proceder desta forma correr o risco de danific lo Efectue a primeira limp...

Страница 100: ...aquelas que comp em o conjunto do seu elec trodom stico utilizam materiais reci cl veis Tenha este pormenor em linha de conta aquando da sua elimina o Informe se junto do seu revendedor ou dos servi...

Страница 101: ...v veis Reservat rio de hidrata o a posicionar como aqui no fundo da cuba para a recupera o da gua Grelha porta garrafas Plinto Condensador Motor Este Guia de Instala o e de Utiliza o da sua Cave de Vi...

Страница 102: ...a extremidade do plinto no espa o do apoio amov vel 7 Aperte os parafusos O seu electrodom stico entregue com uma porta cuja abertura se efec tua da esquerda para a direita articu la o do lado direito...

Страница 103: ...s dos dois parafusos e coloque novamente as protec es dos parafusos Regula o da porta Caso seja necess rio poder regular o alinhamento da porta e a barra de controlo da sua Cave de Vinhos Para tal pr...

Страница 104: ...as temperaturas o desempenho do electrodom stico poder diminuir Classe clim tica Temperatura ambiente SN ST 10 C a 38 C Mantenha uma dist ncia m nima entre a Cave de Vinhos e os restan tes m veis de 3...

Страница 105: ...u electrodom stico antes de ligar o electrodom stico corrente el c trica Antes de realizar qualquer opera o de manuten o desligue a ficha de alimenta o el ctrica N o puxe pelo cabo de alimenta o retir...

Страница 106: ...dor deve imperativamen te permanecer aceso A sua Cave de Vinhos funciona correctamente a partir do momento em que o indica dor do term stato de seguran a 1 estiver associado aos indicadores de regula...

Страница 107: ...ovoca um aumento da temperatura inter ior Regula o da temperatura Aquando da coloca o em funcio namento do seu electrodom stico coloque o term stato em posi o m dia zona de envelhecimento 11 C a 14 C...

Страница 108: ...antidades apenas s o assinaladas a t tulo indicativo As gar rafas utilizadas para as amostras s o do tipo Bordalesa com uma altura de 290 mm di metro de 76 5 mm tipo sindical delgada m dia grande Na v...

Страница 109: ...gfas Disposi o tipo com 4 prateleiras 166 gfas Como utilizar a sua Cave de Vinhos 37 garrafas 11 garrafas 50 garrafas 50 garrafas 56 garrafas 50 garrafas 50 garrafas 50 garrafas 50 garrafas 50 garraf...

Страница 110: ...l pis tipo B ou BB ou uma caneta de feltro apag vel com gua para poder escrever novamente nelas Poder tamb m adquirir novas etique tas junto do seu revendedor ou junto do Servi o P s venda da sua rea...

Страница 111: ...t lo do seu apoio Retire a pel cula de pl stico Coloque novamente o cartucho no respectivo apoio na sua Cave de Vinhos Renova o do cartucho Quando j n o for poss vel ver gel na parte frontal do cartuc...

Страница 112: ...e alta press o As altas temperaturas do vapor poder o danificar as superf cies e os circuitos el ctricos expondo o a ris cos de electrocuss o Enxag e com gua e seque com um pano Verifique periodicamen...

Страница 113: ...ande quantidade de gar rafas na Cave aguarde que o electrodom stico estabili ze a temperatura antes de reajustar o term stato assegure se de que n o abre a porta do electrodo m stico ami de ou que n o...

Страница 114: ...rantindo a conserva o da temperatura Aguarde at que a tempera tura estabilize Deite gua no reservat rio de hidrata o Verifique a alimenta o el ctri ca do seu electrodom stico Anomalias RU DO Zumbidos...

Страница 115: ...elhoria constante dos nossos produtos reservamo nos o direito de incrementar nas suas caracter sticas t cnicas funcionais ou est ticas toda e qualquer altera o associada sua evolu o Brandt Appliances...

Отзывы: