Brandt bfl 2322 bw Скачать руководство пользователя страница 9

30

Your appliance must be installed in compliance with the instructions given in this
"Operating and installation instructions manual" in order to keep your food under
optimum conditions and with optimal energy consumption.

- The appliance should be installed in a dry,
well-ventilated room.
- Avoid balconies, verandas, and patios: the
excessive heat in summer and the cold in
winter could prevent your appliance from
functioning properly, or may even damage it.
- Do not place your appliance near a heat
source such as an oven or radiator.
- Your appliance has been designed for opti-
mum functioning at a certain ambient temper-
ature; it is designed for a particular "climate
class". This climate class is clearly indicated on
the identification plate situated on the inside of
your appliance, low down on the left wall.
Outside of this temperature range, the perfor-
mance of your appliance may be reduced

.

- Maintain a minimum distance between your
appliance and the other units: 3 to 5 cm at the
sides, or 10 cm if your appliance is close to a
wall, and 10 cm above to ensure good circula-
tion of air all around the appliance.
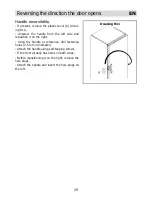
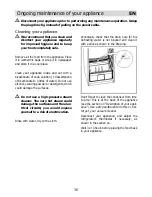
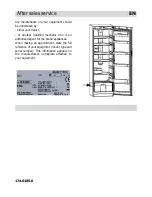
- Position the appliance at a suitable distance
from the wall using the spacers provided in the
accessories packet. The spacers should be
mounted on the back of the appliance (see
Drawing).

Once you have installed your appliance, adjust its feet so that it is tilting backwards slightly:
this helps the door to close correctly.

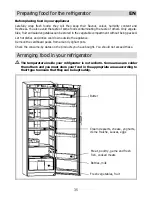
Before placing any food in your appliance, clean it inside and out with a bicarbon-
ate of soda solution (1 dessertspoon of bicarbonate to 4 litres of water). Do not
use alcohol, scouring powder or detergents, which could damage the surfaces.
See the section on "Cleaning your Appliance".

Installing your appliance

EN

Climate Class Ambient 

temperature

N

 +16°C  to  +32°C

N-ST

 +16°C  to  +38°C

N-T

 +16°C  to  +43°C

SN

 +10°C  to  +32°C

SN-ST

 +10°C  to  +38°C

SN-T

 +10°C  to  +43°C

ST

 +18°C  to  +38°C

T

 +18°C  to  +43°C

Содержание bfl 2322 bw

Страница 1: ...FR GUIDE D INSTALLATION D UTILISATION EN OPERATING AND INSTALLATION INSTRUCTIONS R frig rateur Fridge...

Страница 2: ...refrigerator 35 Automatic defrosting 36 Ice maker depending on the model 37 5 Ongoing maintenance of your appliance Cleaning your appliance 38 Humidity filter 39 Changing the light bulb 39 Clearit 39...

Страница 3: ...ven cooking hobs and ventilation hoods that you can coordinate with your new BRANDT fridge Visit our website www brandt com where you will find all of our products as well as useful and complementary...

Страница 4: ...astors please remember that they are only designed to assist in small movements Do not use them for longer journeys Carry out an initial cleaning operation see the section on Installing your appliance...

Страница 5: ...PROTECTION This appliance s packaging material is recyclable Help recycle it and protect the environment by dropping it off in the municipal receptacles provided for this purpose Your appliance also c...

Страница 6: ...r rack with Door rack Vacuum box Control panel depending on the model Adjustable foot glass shutter Ice maker Optifresh This guide to installing and using your fridge is applicable to several models T...

Страница 7: ...45 degree angle E and gently pushing it toward the bottom F remove the top hinge pin drawing R3 7 Remove the top pin on the left H drawing R4 8 Remove the plate from the upper right hand part of the...

Страница 8: ...e right Using the handle as reference drill fastening holes 2 5 mm in diameter Attach the handle using self tapping screws If the door already has holes on both sides Before repositioning it on the ri...

Страница 9: ...ce of your appliance may be reduced Maintain a minimum distance between your appliance and the other units 3 to 5 cm at the sides or 10 cm if your appliance is close to a wall and 10 cm above to ensur...

Страница 10: ...mps supplied with the accessories Figures A and B show how to install these clamps they must be fixed in the corners on the back of the appliance using the screws supplied with the accessories and als...

Страница 11: ...ur home in a horizontal position stand it upright and then wait 2 hours before plugging it in A small amount of oil may have flowed into the refrigeration circuit and you must allow time for this to f...

Страница 12: ...he symbol opposite in your refrigerator It clearly shows the location of your appliance s coldest zone the temperature here is 4 C or less A temperature indicator here enables you to check that your r...

Страница 13: ...dvantages we recommend that you use the fan When the climatic conditions are extreme e g a heat wave If you have just placed a large amount of food in your appliance s To start the fan Appliance witho...

Страница 14: ...iance Remove the cardboard packs from around yoghurt pots Check the consume by dates on the products you have bought You should not exceed these The temperature inside your refrigerator is not uniform...

Страница 15: ...quiches fresh produce and raw milk cheese ready to use vegetables sold in plastic bags and more generally any fresh product whose consume by date is linked to its storage at a temperature of 4 C or be...

Страница 16: ...and push it fully into its housing until you hear the click as it locks in place Insert it gently to avoid spilling the liquid in the trays It is suggested to regulate the temperature to 4 c or 5 c s...

Страница 17: ...ich could damage the surfaces Do not use a high pressure steam cleaner The very hot steam could damage the surfaces and the elec trical circuits you would expose yourself to a risk of electrocution Ri...

Страница 18: ...nterior light in place Remove the interior light and replace the bulb with another of the same type 15 WATTS max Refit the interior light and screw it in place To keep your appliance in good working o...

Страница 19: ...ending on the model the air circulating inside your appliance makes a slight background noise PROBLEM ADVICE Unusual noises check the adjustement of the feet of your appliance and its stability check...

Страница 20: ...ere when your appliance is operating normally This frost is regularly eliminated during your refrigerators automatic defrosting cycles Droplets stagnate at the back of the appliance check that the dra...

Страница 21: ...42 Notes EN...

Страница 22: ...43 Notes EN...

Страница 23: ...qualified mechanic who is an authorized agent for the brand appliances When making an appointment state the full reference of your equipment model type and serial number This information appears on th...

Отзывы: