background image

38

Warning

The hood must be installed in compliance with all applicable regulations concerning the

ventilation of premises. In France these regulations are described in DTU 61.1 from the CSTB.
In particular, the evacuated air should never be conveyed to a duct used to evacuate smoke
from appliances that use gas or other combustible fuels. Unused ducts may only be used after
approval from a competent specialist.

Warning

This appliance is delivered with a H 05

VVF power cord. It must be connected to the
main power supply (which should be a 220-
240 V single phase current) via a CEI 60083
standardised socket that should remain
accessible after installation, in keeping with
installation guidelines.

We cannot be held responsible for any acci-
dent resulting from an inexistent, defective
or incorrect ground lead. The fuse for your
installation must be 10 or 16A. If the power
cable is damaged, call the after-sales serv-
ice department in order to avoid danger.

Warning

If the electrical installation at your resi-

dence requires any changes in order to hook
up your appliance, call upon a professional
electrician.

Warning

If the hood displays any malfunctions,

unplug the appliance or remove the fuse cor-
responding to the electrical socket where
your appliance is plugged in.

ELECTRICAL CONNECTIONS

During installation and maintenance opera-
tions, the appliance must be unplugged from
the electrical grid; fuses must be cut off or re-
moved.
The electrical connection must be made
before completely fixing the ventilation shaft
to the ceiling.
Ensure that:
- the electrical installation has sufficient volt-
age,
- the electrical wires are in good condition,
- the diameter of the wires complies with the
installation requirements.

2 / INSTALLING YOUR APPLIANCE

EN

Important

The accessible parts of this appliance may become hot if it is used with a cooking

appliance.

Содержание AD1188X

Страница 1: ... DA BRUGERVEJLEDNING EN GUIDE TO INSTALLATION DE BETRIEBSANLEITUNG CZ NÁVOD K POU ITÍ PT MANUAL DE UTILIZAÇÃO Hotte décorative Dekorativ emhætte Decorative Hood Dekor Dunstabzugshaube Dekorativní odsavač Exaustor decorativo ...

Страница 2: ...and we would like to thank you We have invested all our dedication and know how in this appliance so that it would best meet your needs With innovation and performance we designed it to be always easy to use In the B BR RA AN ND DT T product range you will also find a wide choice of ovens microwaves cooking hobs cookers dishwashers washing machines driers fridges and freezers that you can coordina...

Страница 3: ... connections 38 Assembling the hood 39 3 3 U US SI IN NG G Y YO OU UR R A AP PP PL LI IA AN NC CE E Description of control panel 42 4 4 C CA AR RI IN NG G F FO OR R A AN ND D C CL LE EA AN NI IN NG G Y YO OU UR R A AP PP PL LI IA AN NC CE E Cleaning the filter cartridges 43 Changing the carbon filter 43 Cleaning the outer surfaces 43 Changing the light bulb 43 Maintaining your appliance 44 5 5 T T...

Страница 4: ...r operate gas rings under the hood without placing cookware on them the flames sucked up into the hood can damage the appliance When frying food under the appliance you must carefully monitor the preparation at all times Oils and grease brought to very high temperatures can catch fire Respect the recommended frequency of cleaning and filter replacements The accumu lation of grease deposits may cau...

Страница 5: ...ur appliance also contains a great amount of recyclable material It is marked with this label to indicate the used appliances that should not be mixed with other waste This way the appli ance recycling organised by your manufacturer will be done under the best possible conditions in compliance with European Directive 2002 96 EC on Waste Electrical and Electronic Equipment Contact your town hall or...

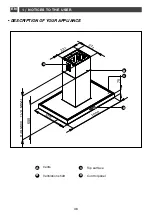
Страница 6: ...36 DESCRIPTION OF YOUR APPLIANCE Vents Ventilation shaft Top surface Control panel A B C D 1 NOTICES TO THE USER EN 331 277 830 MINI 1170 MAXI 600 1000 75 605 B C A D ...

Страница 7: ... approx 30 kg During installation of the hood place the product packaging on the cooking surface to protect it in the event of the hood falling down The appliance must be unplugged during installation or when any repair or maintenance work is being performed Ensure that the network voltage corresponds to the voltage noted on the identification plate located inside the hood If the electrical instal...

Страница 8: ... your installation must be 10 or 16A If the power cable is damaged call the after sales serv ice department in order to avoid danger Warning If the electrical installation at your resi dence requires any changes in order to hook up your appliance call upon a professional electrician Warning If the hood displays any malfunctions unplug the appliance or remove the fuse cor responding to the electric...

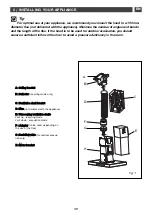
Страница 9: ...deficiency in the room C C V Ve en nt ti il la at ti io on n s sh ha af ft t b br ra ac ck ke et t D D F Fl lu ue e not delivered with the appliance F F A Ad da ap pt te er r to be used depending on the size of the flue G G B Ba ac ck k f fl lo ow w v va al lv ve e for outdoor evacua tion only E E T Te el le es sc co op pi in ng g v ve en nt ti il la at ti io on n s sh ha af ft ts s Vent up recycl...

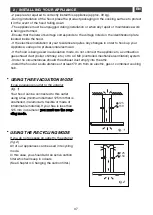
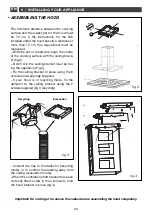
Страница 10: ... installed under the hood specify a distance of more than 70 cm this requirement must be respected With the aid of a lead wire align the centre of the cooking surface with the ceiling brack et fig 2 Notch A in the ceiling bracket must be fac ing the appliance Fig 2 Fix the ceiling bracket in place using the 6 screws and wall plugs supplied If your hood is in recycling mode fix the deflector to the...

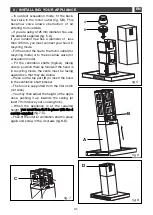
Страница 11: ...king care to position them as follows if the hood is in recycling mode the vents must be facing upwards so that they are visible Press on the top part B to insert the hood in the ventilation shaft bracket The hood is supported from the first notch 1st click You may then adjust the height of the appli ance pushing it up towards the ceiling at least 70 cm above your cooking hob When the appliance is...

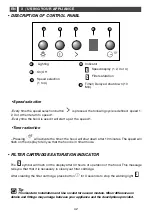
Страница 12: ...then return to speed 1 Every time the hood is used it will start up at the speed 1 Speed selection Timer selection Pressing will activate the timer the hood will shut down after 10 minutes The speed will flash on the display to tell you that the hood is in timer mode DESCRIPTION OF CONTROL PANEL Tip This Guide to Installation and Use is valid for several models Minor differences in details and fit...

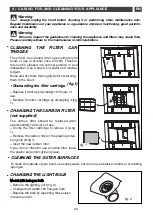
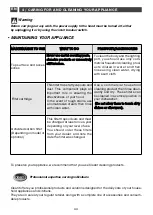
Страница 13: ...ters may cause fires Please carefully adhere to the maintenance recommendations CLEANING THE FILTER CAR TRIDGES They must be cleaned after approximately 30 hours of use or at least once a month These fil ters can be cleaned in a vertical position in your dishwasher Use a brush hot water and mild de tergent Rinse and dry them thoroughly before returning them to the hood Dismantling the filter cartr...

Страница 14: ...ted in water and then rinse using clean water drying with a soft cloth This filter traps odours and must be changed at least once a year depending on your level of use You should order these filters from your dealer and note the date the filter was changed Use a commercial household cleaning product then rinse abun dantly and dry These filters can be cleaned in a vertical position in your dishwash...

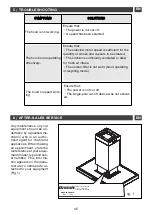
Страница 15: ...ork ing Ensure that The power is not cut off The single pole cut off device was not activat ed S SO OL LU UT TI IO ON NS S S SY YM MP PT TO OM MS S EN Any maintenance on your equipment should be un dertaken by a qualified me chanic who is an autho rised agent for the brand appliances When making an appointment state the full reference of your equip ment model type and seri al number This informa t...

Отзывы: