Braillo 300 S2.1 Скачать руководство пользователя страница 74

BRAILLO


l

B 300 S2.1

74

Inside paper guide

5.10 

Beam and Paper shoes - removal and refitting

To remove the beam and paper shoes, some other parts must be removed first. It must be done in 

this order:

1.  Remove the belt

2.  Remove the inside paper guide

3.  Remove the paper feed tractor

4.  Remove the top frame

5.  Remove magnet rack A and B
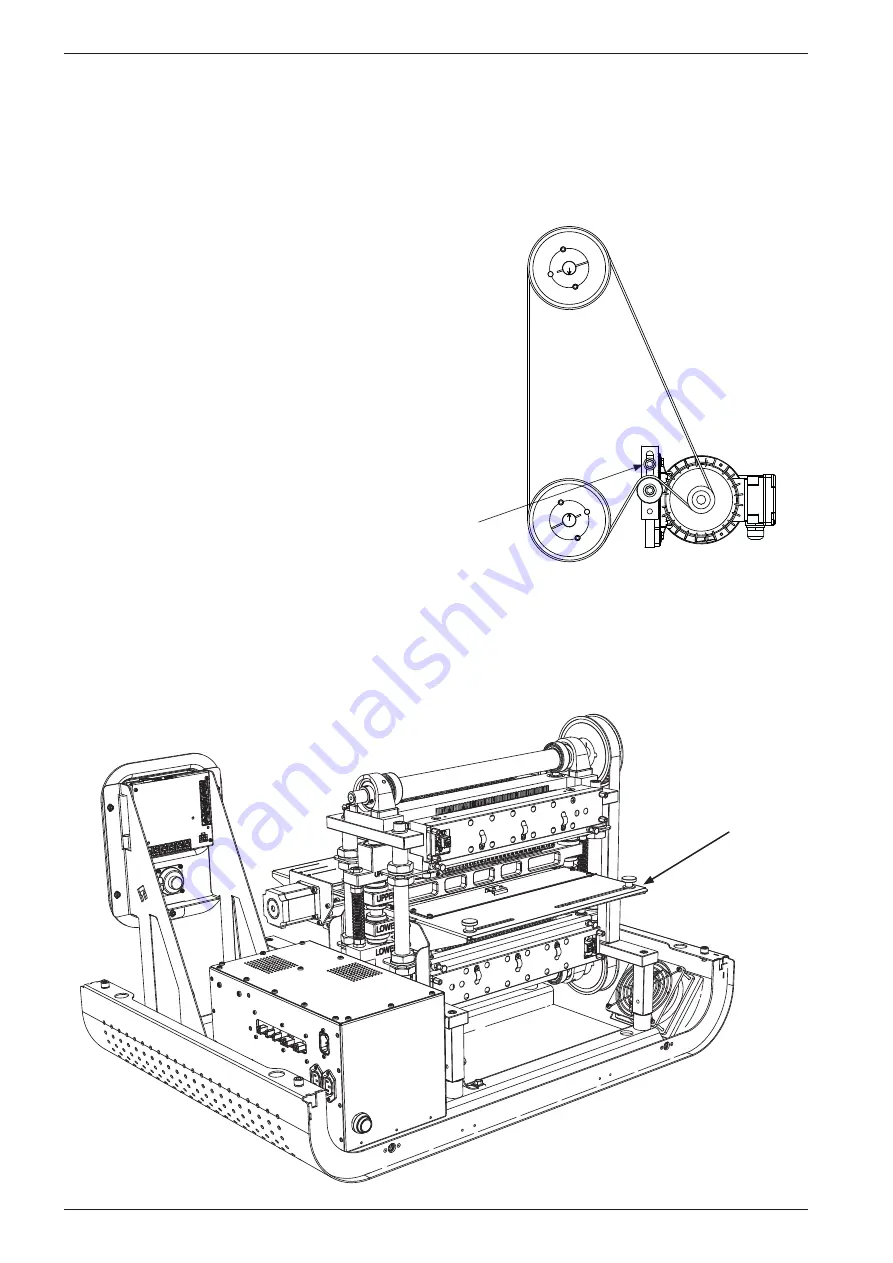
1. Remove the belt

This is done by loosening the bolt for the belt 

tensioner. When this is done, the belt can be 

lifted off the upper cogwheel. Please see figure 

to the right.

Loosen this bolt to 

take off the belt

2. Remove inside paper guide

See 

“5.19 Input paper guide - removing” on page 84

 for information on how to remove the inside 

paper guide.

Содержание 300 S2.1

Страница 1: ...Rev June 2020 User s Guide BRAILLO BRAILLO 300 S2 1...

Страница 2: ...2020 Braillo Norway AS...

Страница 3: ...he ability to change with it Our goal is to manufacture a Braille embosser that when properly maintained by following the instructions in this manual will not only last decades but will also produce B...

Страница 4: ...BRAILLOl B 300 S2 1 4...

Страница 5: ...ain menu 34 4 4 Paper layout menu 35 4 5 Service diagnostic menu 37 4 6 Date and time menu 40 4 7 Sound menu 40 4 8 Printer setup menu 41 4 9 Counters menu 44 4 10 Display messages 45 4 11 Unrecoverab...

Страница 6: ...1 Maintenance 86 6 PARTS EXPLODED VIEWS 88 6 1 Magnet rack 88 6 2 Beam 89 6 3 Paper shoe 90 6 4 Paper feed 91 6 5 Shafts belt 92 6 6 Top and bottom frame 94 7 TECHNICAL SPECIFICATIONS 96 7 1 Technical...

Страница 7: ...recommend using the correct tools which come with your printer as well as following the correct procedures which we prescribe in the manual and rein force in our training courses Additionally just as...

Страница 8: ...nel Paper direction Printer overview Please see the figure below Note that the right hand and left hand side are referred to as if you were standing behind the printer facing the opening where the pap...

Страница 9: ...require a suitable installation environment to ensure long and trouble free operation Temperature should be between 15 30 C 60 86 F and relative humidity between 40 and 60 Maintain a clean environmen...

Страница 10: ...the printer is accompanied with the following items Power cable for the printer Data cable USB Data cable ethernet shielded A small stack of paper User s guide Tool kit for service and maintenance Tes...

Страница 11: ...Stand Place the wheels under the printer one in each corner This can be done simplest by carefully sliding the printer on the pallet so just one corner comes outside the pallet Fasten the wheel Then s...

Страница 12: ...S2 1 12 2 3 Removal of the side panels The side panels can be removed by turning the quarter revolution fasteners counter clockwise Turn counter clockwise 1 4 of a revolution Pull the panel out then...

Страница 13: ...p Remove both side panels as described in section 2 3 Removal of the side panels on page 12 Loose the four bolts one revolution then slide the top a little towards the operator panel side Then lift it...

Страница 14: ...ng in the bottom plate just below the inlet on the electric unit Connect the enclosed mains power cable to the Mains inlet Note If the plug on the mains power cable is to be replaced with one that is...

Страница 15: ...d the USB input is a regular USB type B connector The WLAN is transmitting receiving via a small antenna placed close to the operator panel When connecting with the USB or the ethernet cable make sure...

Страница 16: ...printer when mounted on the S2 Stand The B300 S2 1 can optionally be delivered with the Braillo S2 Stand In that case the connections to the printer is done on the outside of the stand See the figures...

Страница 17: ...tches will disable the possibility to run the printer if the side plates are removed Then the paper feed tractor will move a little back and forth to position the paper correctly If there is no paper...

Страница 18: ...to set the printer ID 3 1 USB on Windows Make sure the printer is powered on and connected to the Windows computer via an USB device cable Type A to Type B Windows should automatically identify the p...

Страница 19: ...ple computer so any modifications to this file before set up might cause unexpected or erroneous results Contact Braillo Norway or your distributor to get the braillo pdd file The PPD file must be cop...

Страница 20: ...new printer 4 In the new dialogue select the Generic_ _Text_Only USB printer under Default tab 5 The Mac OS will try to auto identify the printer but will not succeed This is expected 6 In the Use dro...

Страница 21: ...c as possible and you might need to consult your distribution s help Make sure the printer is powered on and connected to the Linux computer via an USB device cable Type A to Type B 1 Find your distro...

Страница 22: ...argins around the text by default which might interfere with the document formatting The recommended driver on Linux is Generic Raw Queue or similar raw forwarding driver 3 4 Ethernet on Windows Befor...

Страница 23: ...tor chances are high that the editor will try to format the text before sending it to the printer If you have a preformatted file created for the Braillo printer containing control characters it might...

Страница 24: ...twork You will need the printer s IP address which can be found in menu Main Menu Warning Service diagnostic Status Software upgrade See Status Software upgrade on page 39 for more information 1 Open...

Страница 25: ...information The printer broadcasts itself using dnssd bonjour If you only have one Braillo printer on your network you can use this if your computer detects it If you have multiple Braillo printers it...

Страница 26: ...figuration access point The network name SSID is unique for this printer but the password is generated and will differ every time you start configuration mode Leave the printer in this state while you...

Страница 27: ...reless network is not discovered by the printer you can also configure it manually 1 Follow step 1 and 2 above 2 Click the Manual setup tab 3 Enter the SSID choose security and enter the password if n...

Страница 28: ...the Exit setup button on configuration web page Click the Back button in the printer display When the configuration server shuts down the printer returns to normal operation If a new wireless configu...

Страница 29: ...ng panel 2 Insert the paper between the two paper guides and then through the slit in the paper guide Insert about the length of one sheet Go to the front of the printer 3 The tractors might have to b...

Страница 30: ...Advances the paper one sheet Enters the Main menu Moves the paper 0 5 inch forwards Moves the paper 0 5 inch backwards Status information When the printer is powered up you have to press the Accept b...

Страница 31: ...own Move the cursor up Jump back to the previous menu without saving Accept or select button Jump back to the previous menu without saving Accept or select button Increase the value Decrease the value...

Страница 32: ...The printer model is always set correctly when the printer is shipped but if for some reason the main board has to be replaced you have to select the correct printer model Note The settings set by th...

Страница 33: ...If you would like to pause a print job press the Pause button When the printer is paused the button will change to Continue Press Continue to continue with the printing If you would like to cancel th...

Страница 34: ...rns view the log checking status etc 4 6 Date and time menu on page 40 Settings for date and time 4 7 Sound menu on page 40 Settings for the sound 4 8 Printer setup menu on page 41 Choose printer mode...

Страница 35: ...sides of the sheet and single sided dots on just one side of the sheet Layout Main Menu Paper Layout Layout Selects between Normal and Z fold mode Normal means that the Braille is organized on the sh...

Страница 36: ...will decrease the number of lines on each page from 0 to 9 If the maximum number of lines could be 29 and the setting 4 is selected the resulting number of lines will be 25 This function will keep th...

Страница 37: ...n approx one sheet of paper Print Test Pattern Main Menu Warning Service diagnostic Warning Print Test Pattern When entering this menu choice a warning window will appear This is to make the user awar...

Страница 38: ...ts the Signal processor X pattern without motor Will activate one and one magnet on the magnet racks Sleep relay Turn the Sleep relay on or off Alarm relay Turn the Alarm relay on or off Spare relay T...

Страница 39: ...Braillo Norway or a Braillo distributor The file must then be copied to a USB memory stick Place the memory stick in the USB type A connector on the main board See section 7 4 Main board connections...

Страница 40: ...olume setting for beep and speech Pitch Main Menu Sound Pitch Sets the pitch level for the beep Speech Main Menu Sound Speech Toggles Speech on or off Accessibility Main Menu Sound Accessibility Toggl...

Страница 41: ...at the factory and should under normal conditions never need to be changed However if for some reason the main board in the printer has been replaced you have to make sure that the correct printer mo...

Страница 42: ...ct another table use the up or down arrow and press the green Accept button Now this has become the current table It is also possible to view the translation between characters and dots in the differe...

Страница 43: ...next cell to move to it When all four numbers are set press the green Accept button to go back to the Network configu ration menu Wireless configuration To start the set up for connecting to a WLAN n...

Страница 44: ...lock off The Lock screen function is to avoid that buttons are accidental pressed To unlock the locked screen press first button 1 then button 2 4 9 Counters menu Main Menu Counters Will show two dif...

Страница 45: ...nue to resume By pressing Continue the printer will resume the printing from where it was before the error Press continue to resume Out of paper The printer has run out of paper and is waiting for pap...

Страница 46: ...Warning View Log When trying to print after a defect magnet is found and replaced the display will still show the magnet symbol in the top right hand corner This is because you have to reset the magn...

Страница 47: ...tected position problems with the paper feeding on e g power up or resetting Could be caused by e g a defect discon nected sensor or stepping motor The sensors can be tested manually on Main Menu Warn...

Страница 48: ...re Test sensors Print test pa ern Manual running View log Acessibility Speech Pitch Volume Date Time Sheet length Line length Warning Ready to Emboss Sleep Welcome Format Layout Page one up down Brail...

Страница 49: ...u Warning Service Diagnostic Warning Print Test Pattern When entering this menu choice a warning window will appear This is to make the user aware that print jobs from the computer will not be printed...

Страница 50: ...four bars across the paper indicates the magnet racks The magnet racks are named from A to D Magnet rack A and B make dots on the side of the paper facing down and magnet rack C and D makes the dots o...

Страница 51: ...m m s s m m a a g g n n e e t t r r a a c c k k b b s s h h o o r r t t p p i i v v o o t t a a r r m m s s m m a a g g n n e e t t r r a a c c k k a a t to op p v vi ie ew w The figure below is a th...

Страница 52: ...shoes up and down This movement is used both to hold the paper and to make the dots A row of dots is printed for each revolution of the shafts The shafts must rotate three times to form a complete row...

Страница 53: ...for every revolution of the eccentric shafts Inside each magnet rack there are 42 electrical magnets The magnets are controlling the long pivot arms When a dot is going to be printed the magnet is en...

Страница 54: ...igure B Now the magnet is engaged and the long pivot arm has been pulled against the magnet The short pivot arm is moving down towards the hook on the long pivot arm Figure C The long pivot arm s hook...

Страница 55: ...BRAILLOl B 300 S2 1 55 General overview Protection covers are removed Main Belt Main Motor Electric unit Magnet rack B Magnet rack A Operator panel Magnet rack D Magnet rack C On Off switch Main board...

Страница 56: ...d run the built in Test Print Depending on what kind of errors you have you should use different tests The essential thing at this stage is to find which magnet rack is causing the trouble If there is...

Страница 57: ...e are too many dots on the paper the reason might be one of the following 1 The sponge list is not pressing enough against the long pivot arm 2 The gap between the two pivot arms is too small 3 The ma...

Страница 58: ...BRAILLOl B 300 S2 1 58 Long pivot arm Support list Magnet Magnet rack board Printing pin Sponge list short pivot arm Sponge list Short pivot arm Pin guide Magnet poles Gap between pivot arms...

Страница 59: ...ack by unscrewing the four screws like shown in the figure It can be convenient to remove the input paper guide and the paper feed tractor first to get more room See section 5 16 Paper feed assembly r...

Страница 60: ...ar maintenance The magnet racks can be considered as the part of the printer that will have the greatest influence on the dot quality so it is very important to know how to deal with them Take the mag...

Страница 61: ...wo nuts holding the support list and then remove the support list Step 3 Remove the two bolts holding the pivot arm fastener and then carefully remove the pivot arm fastener The magnet rack is now dis...

Страница 62: ...arts at one at the end where the connections are It does not refer to dot number character number or column num ber Disassemble the magnet rack like described in section 5 4 Magnet rack disassembly st...

Страница 63: ...defect magnet with e g a narrow needle nose pliers Magnet Step 3 Check the magnets internal resistance if you have an ohm meter available The resist ance should be from 185 ohm to 240 ohm Any value ou...

Страница 64: ...4 Replace the defective magnet with a new magnet Note the spikes on one of the sides on the magnet These spikes must be oriented the same direction as the rest of the spikes in the mag net rack Note t...

Страница 65: ...ack disassembly step by step on page 60 Now use a damp cloth moistened with cleaning alcohol to wipe off the surfaces as described in the figure below Magnet poles on the magnets The support list The...

Страница 66: ...ivot arms This is the travelling distance for the pivot arm And it should be adjusted to about 0 8 mm using a feeler gauge Adjust the nuts on both ends of the magnet rack If the 0 8 mm feeler gauge go...

Страница 67: ...do not tighten them Slide the magnet rack horizontally away from the printer so that the magnet rack is touching the horizontal adjustment screws This will en sure that the magnet rack is in the exact...

Страница 68: ...adjustment will affect the pressure the pivot arms put on the printing pins This directly affects the shape of the printed dots To be able to adjust the magnet rack correctly it is necessary to put t...

Страница 69: ...is to loosen the four fastening bolts holding the magnet rack Then unscrew the horizontal adjustment screw a little Now slide the magnet rack outward from the print er so it touches the horizontal adj...

Страница 70: ...dot quality So the best way to find the correct level of vertical adjustment is to first decrease the pressure so the dots will be very faded and weak Then readjust the pressure up in small steps unt...

Страница 71: ...71 Adjust upwards by loosening the upper nut and then tighten the lower Do this on both ends so the magnet rack stays levelled Note Adjust in small steps only 1 4 of a revolution at a time Then test...

Страница 72: ...When adjusting the magnet racks vertically observe that magnet rack A and B must be moved upwards to increase the pressure and magnet rack C and D must be moved down wards to increase the pressure Mov...

Страница 73: ...nd Paper shoes overview Please see the figures below UPPER UPPER LOWER LOWER Upper Beam Upper Paper shoe Lower Paper shoe Lower Beam Adiprene springs Return spring blue Return spring green Plastic shi...

Страница 74: ...per guide 3 Remove the paper feed tractor 4 Remove the top frame 5 Remove magnet rack A and B 1 Remove the belt This is done by loosening the bolt for the belt tensioner When this is done the belt can...

Страница 75: ...reverse order Please note that the marking UPPER and LOWER on the paper shoes and beams should be turned to the side where the paper enters the printer 4 Remove the top frame Unscrew the bolts as ind...

Страница 76: ...igure Pull out the short pivot arms there are 42 pcs on each side 2 Pull out the shaft and replace the short pivot arm s Assembly is done in re verse order Note When putting the short pivot arms back...

Страница 77: ...indicated on the figure Note Before the parts are separated make sure that the beam is held with the printing pins hanging down Place the pin guide with the pins on a table Do not turn it upside down...

Страница 78: ...that the shafts are turned to the correct position See the marks at the end of the shafts the arrows must point directly towards each other like in the figure below Then the springs can be adjusted t...

Страница 79: ...on tighten it with the belt tightening wheel 2 and check that the arrows at the end of the shafts 1 are pointing towards each other See figure below If the marks are not aligned like in the figure it...

Страница 80: ...the figure below The timing wheel should now be placed exactly like position A in the figure below i e the mark in the middle of the opening in the wheel is placed just opposite the sensor If the timi...

Страница 81: ...he stepping motor cable connector near the step ping motor The sensors must be disconnected from the board The paper feed assembly can then be removed by loosening four nuts There is no need to remove...

Страница 82: ...to adjust the relation between the paper parking position and where the stepping motor is parking Loosen the paper feed shaft by unscrewing the two left hand screws A on the sensor wheel Note Do not...

Страница 83: ...eck if the inductive sensors are functioning by looking at the rear end where the cable enters the sensor Inside the sensor is a little LED lamp that will be lit if a magnetic object is in front of th...

Страница 84: ...guide removing To remove the Input paper guide you must loosen the four nuts like shown in the figure below There is no need to remove the nuts completely just loosen them and then lift the assembly...

Страница 85: ...he paper guide where the paper enters the printer The sensor is an infrared reflective type and it works by an infrared lamp is sending light downward if there is paper present the light will be refle...

Страница 86: ...should be able to keep the long pivot arms pressed against the support list When putting the magnet racks back in check all the magnet rack adjustments Check if the printing pins move freely and if n...

Страница 87: ...ation This should be done every 1000 running hours or approximately once a year Lubricate all items marked 1 on the figure below These are the only locations in the printer grease may be applied Use a...

Страница 88: ...Part no Name Quantity per rack 1 10 60372 Magnet rack board 42 2 1 1 2 B3985 30180 Magnet 42 3 B3985 4029C Magnet rack 1 4 B3985 40660 Support list magnet rack 1 5 B3985 40680 Sponge list 1 6 B3985 4...

Страница 89: ...1 MA500 50001 Stroke ball bearing 20 2 2 B3985 40100 Beam upper 1 2 B3985 40090 Beam lower 1 3 B3985 40102 Fastener for short pivot arm shaft 2 4 B3985 40670 Sponge list for short pivot arm 2 5 B3985...

Страница 90: ...er assembly 30 64630 Paper shoe lower assembly Pos Part no Name Quantity per shoe 1 MA510 10003 Retaining ring 4 2 MA500 50001 Stroke ball bearing 20 2 3 B3985 40913 Spacer 2 4 B3985 4095C Paper shoe...

Страница 91: ...Paper feed tractor assembly Pos Part no Name Quantity 1 MA540 20400 Paper feed tractors a pair with left and right 1 2 10 61966 Paper feed sensor no 1 1 3 10 61967 Paper feed sensor no 2 1 4 B3975 308...

Страница 92: ...in the third hole and screw it in wards until the wheel is loose Direction of rotation 6 5 Shafts belt Parts shaft belt Pos Part no Name Quantity 1 30 64606 Shaft complete with bearings 2 2 MA505 2000...

Страница 93: ...t exploded view Pos Part no Name Quantity per shaft 1 MA500 20002 Main bearing with housing not part of 30 64606 2 2 MA443 30001 Nut KM5 2 3 MA500 10002 Bearing outer eccentric 6205 2Z 2 4 15 69000 Ma...

Страница 94: ...5 Pos Part no Name Quantity per frame 1 MA510 10002 Locking ring 22 4 2 MA500 50002 Stroke ball bearing 12 2 3 B3985 42000 Frame 1 4 B3985 40912 Spacer 22 2 5 B3985 40130 Push rod steel 12x56 not par...

Страница 95: ...BRAILLOl B 300 S2 1 95 Frame complete...

Страница 96: ...tandard medium 6 or 8 dot Paper weight 120 180 g m recommended 150 g m Printing speed 300 characters per second or a maximum of 900 printed pages per hour based on a 12 inch sheet Electrical Voltage S...

Страница 97: ...tlet External equipment outlet Alarm output 24V Spare output 24V Step motor driver 24V Magnet racks 24V Main board 7 2 Electric unit overview The electric unit contains connections fuses and power sup...

Страница 98: ...box Remember to disconnect the mains cable first Unscrew all screws To release the power supply place a screw driver here and pull the latch downwards To get more room to inspect and replace the fuse...

Страница 99: ...mains fuses is placed under transparent lids All the fuses are 5 x 20 mm and can be of glass or ceramic type Mains 10 AT Board 3 15 AT Spare 1 1 AT Spare 2 1 AT Magnet rack A 3 15 AT Magnet rack B 3...

Страница 100: ...feed 1 Signals for stacker Red USB Type A so ware upd Ethernet USB Type B 24V 7 4 Main board connections The main board is placed just behind the operator panel Stacker not in use Speaker Data for Ma...

Страница 101: ...herever needed If there is a command on the other pages it will be skipped All page formatting which is done on the front page will also format the back of the same sheet It is for example not possibl...

Страница 102: ...027 065 050 048 1B 41 32 30 10 5 027 065 050 049 1B 41 32 31 11 0 027 065 050 050 1B 41 32 32 11 5 027 065 050 051 1B 41 32 33 12 0 027 065 050 052 1B 41 32 34 12 5 027 065 050 053 1B 41 32 35 13 0 02...

Страница 103: ...052 1B 4D 30 34 5 1 5875 027 077 048 053 1B 4D 30 35 6 1 9050 027 077 048 054 1B 4D 30 36 7 2 2225 027 077 048 055 1B 4D 30 37 8 2 5400 027 077 048 056 1B 4D 30 38 9 2 8575 027 077 048 057 1B 4D 30 3...

Страница 104: ...0 step Step mm ASCII HEX 0 0 0000 027 084 048 048 1B 54 30 30 1 0 6350 027 084 048 049 1B 54 30 31 2 1 2700 027 084 048 050 1B 54 30 32 3 1 9050 027 084 048 051 1B 54 30 33 4 2 5400 027 084 048 052 1B...

Страница 105: ...his is due to the double sided printing of the printer This command makes the printer to start printing the rest of the text After this the paper position will be the same as it had when this volume o...

Страница 106: ...rized by Braillo Norway A S or product not installed or maintained in accordance with Braillo Norway s instructions Customs and duties Incidents involving Force Major for example flooding earth quake...

Страница 107: ...has used reasonable care in preparing the information included in this document it may contain technical or other inaccuracies omissions and typographical errors Please contact us should you find som...

Страница 108: ...BRAILLOl B 300 S2 1 108...

Страница 109: ...Ol B 300 S2 1 109 7 8 Address and phone number Braillo Norway AS Wessels veg 100 7502 Stj rdal Norway Phone 47 74 84 04 40 Email service service braillo com Email sales sales braillo com Web www brail...

Отзывы: