background image


3.0 Introduction 


This chapter explains how to connect your printer, load media (and 
ribbon, if equipped for thermal transfer), and print a configuration label.  


3.1  Connecting the Printer


3.1.1 Power 

Connection 


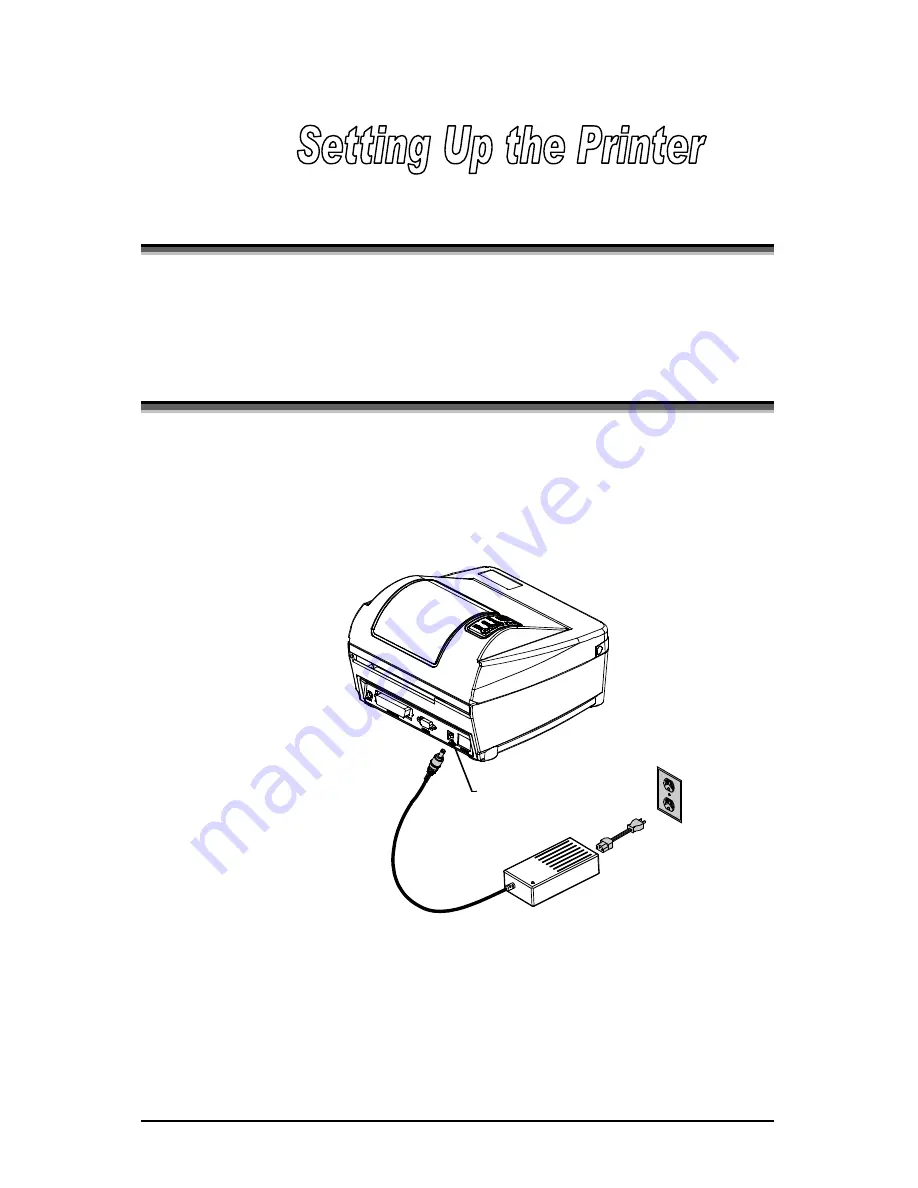
The printer is powered by an external power supply that connects as 
shown below. 


Ensure that the 
power supply 
shipped with your 
printer is compatible 
with your electrical 
service.


Power
Connection

110/220 VAC

(Auto Ranging)


BP-1244/BP-1344 7 

Содержание BP-1244

Страница 1: ...BP 1244 BP 1344 Operator s Manual DO NOT PRINT ...

Страница 2: ...DO NOT PRINT ...

Страница 3: ...s not expressly granted In no event will Licensor or its suppliers be liable for any damages or loss including direct incidental economic special or consequential damages arising out of the use or inability to use the Firmware Software Information in this document is subject to change without notice and does not represent a commitment on the part of Brady Worldwide Inc No part of this manual may b...

Страница 4: ...ares under sole responsibility that this product conforms to the following standards or other normative documents EMC EN 55022 1993 Class A EN 50024 1998 Safety This product complies with the requirements of EN 60950 A11 1997 Gost R FCC This device complies with FCC CFR 47 Part 15 Class A Note This equipment has been tested and found to comply with the limits for a Class A digital device pursuant ...

Страница 5: ... surface To protect your printer from overheating make sure all openings on the printer are not blocked Do not place the printer on or near a heat source Do not use your printer near water or spill liquid into it Be certain that your power source matches the rating listed on your printer If you are unsure check with your dealer or with your local power company Do not place the power cord where it ...

Страница 6: ......

Страница 7: ...8 3 1 3 Interface Cables 8 3 2 Adjusting the Media Sensor 9 3 3 Loading Media 12 3 3 1 Loading Media for Peel Configuration 14 3 4 Loading Ribbon 15 3 5 Flash Memory Expansion 17 Using the Front Panel 4 0 Introduction 19 4 1 Lights 19 4 2 Buttons 20 4 3 Normal Mode Button Functions 20 4 4 Printer Setup Mode Button Functions 21 4 4 1 Printer Setup Menu List 22 4 4 2 Menu Items and Values 23 4 4 3 E...

Страница 8: ...base Configuration Dot Check Label 37 4 7 2 Test Label 39 Maintenance and Adjustments 5 0 Introduction 41 5 1 Cleaning the Printhead 42 5 2 Media Width Adjustment 43 5 3 Ribbon Width Adjustment 44 5 4 Fine Printhead Adjustment 45 5 5 Printhead Replacement 46 5 6 Darkness Adjustment 47 5 7 Resetting to the Factory Defaults 47 5 8 Downloading Firmware and Fonts 48 Troubleshooting 6 0 Introduction 49...

Страница 9: ...Appendix B Embedded Fonts and Barcodes B 1 Appendix C Warranty Information C 1 iii ...

Страница 10: ...ii ...

Страница 11: ...ses a unique front panel design to simplify operation while its RS232 serial and parallel interfaces allow easy connection to your host system Thermal Transfer Model This manual provides all the information necessary to operate the printer To print labels or tags simply refer to the instructions included with the software you have chosen to create the labels A Windows printer driver can be found o...

Страница 12: ...or 300 DPI Printhead model dependant AGFA Scalable Font Engine Memory 1 MB FLASH memory 2 MB DRAM Memory Interfaces This printer is equipped with an RS 232 serial interface and a Centronics parallel interface Operational Simple Media Loading Media Tearbar Fan fold media compatible from rear of printer 1 25mm internal media supply core External media supply stand 2 BP 1244 BP 1344 ...

Страница 13: ...ics The FLASH memory cartridges cannot be used in conjunction with the ILPC option ILPC option The International Language Print Capability consisting of one of the following CG Times western European Scalable font Kanji Gothic B Scalable font Simplified Chinese GB Scalable font Present Sensor option The Present Sensor allows the printer to be configured for one up printing With the sensor installe...

Страница 14: ...4 BP 1244 BP 1344 ...

Страница 15: ...ackaging materials i e tape and foam that were placed in the printer for shipment Complete the following steps prior to connecting power or attempting to load media Ensure that the arrow on the box is pointing up and then open the box Remove the packing foam cardboard divider and power supply box Lift the printer from the box and remove the packing foam emove the printer from the plastic bag R Not...

Страница 16: ...supply Any special or additionally purchased items Additional Requirements The following items are necessary for generating labels from your printer Contact your customer support representative for advice on which media and software may best be suited for your application Serial or parallel cable Applicable media Applicable software 6 BP 1244 BP 1344 ...

Страница 17: ...er and print a configuration label 3 1 Connecting the Printer 3 1 1 Power Connection The printer is powered by an external power supply that connects as shown below Ensure that the power supply shipped with your printer is compatible with your electrical service Power Connection 110 220 VAC Auto Ranging BP 1244 BP 1344 7 ...

Страница 18: ...ces are shown below contact your distributor for part numbers and ordering information The printer can also be connected to the host s parallel interface with a Centronics parallel cable In addition the printer has this unique feature when connected via both the serial and the parallel interface the printer will automatically connect to the first port serial or parallel that transmits valid data A...

Страница 19: ...eeds to be positioned so that the printer can detect the presence of media and the label top of form TOF The table outlines the suggested sensor positions for the various media types Media Sensor Adjustment Media Type Suggested Media Sensor Position TOF Sensing Continuous Near the center of the media Continuous Die cut Near the center of the label Gap Notched Near the center of the notch Gap Refle...

Страница 20: ...illustrates the measurement of notched media Note Reflective marks are placed on the underside of the media Media Movement Notch Left Justified Measurement The sensor uses Reference Letter designators that correspond to the following TOF mark distances The TOF Mark s Distance from the Media Edge Reference Letter inches millimeters A 180 4 6 B 500 12 7 C 750 19 1 D 1 00 25 4 E 1 25 31 8 F 1 50 38 1...

Страница 21: ... Setting Window Setting Window 2 Use a finger to move the Bottom Slide until your selected Reference Letter appears in the Setting Window of the slide 3 Use a finger to move the Top Slide until your selected Reference Letter appears in the Setting Window of the slide Note The Top and Bottom Slides must be positioned over the same Reference Letter for proper media sensor function 4 Proceed to Loadi...

Страница 22: ...ndle 2 Insert the Media Spindle with media into the External Media Stand 3 Slide the Media Guide Flange against the Roll Media 4 Position the External Media Supply so it is square to the back of the printer Route the media through the back of the printer 12 BP 1244 BP 1344 ...

Страница 23: ...ss the Feed button several times to position the media and ensure proper tracking If the printer does not correctly sense the top of each label it may be necessary to perform the Calibration Procedure Section 4 6 Note The printer is factory set to use 4 inch media and ribbon if thermal transfer equipped When using a different width of media ribbon please refer to Chapter 5 BP 1244 BP 1344 13 ...

Страница 24: ...els from the backing Route the Media Backing over the Platen and Peel Bar and behind the Peel Roller and Fascia as shown below 6 Push the Peel Lever back to the Closed position 7 Close the printhead carrier assembly and press down until it locks into place 8 Close the cover and press the Feed button several times to feed the media and ensure proper tracking The labels will separate automatically a...

Страница 25: ...bs and an Empty Core onto the other hub Ribbon Empty Core Slide a Ribbon onto a Hub and an Empty Core onto a Hub Push in and lift to remove the Hubs 4 Push the Printhead Latch down and raise the Printhead Carrier Assembly 5 Slide the Media Type Switch into the Transfer position Media Type Switch Direct Transfer BP 1244 BP 1344 15 ...

Страница 26: ...ough the printhead carrier assembly as shown below Note Ensure the inked side of the ribbon faces the media and NOT the printhead 7 The Media Type setting within the printer s setup must be set to Thermal Transfer to print using a ribbon See Section 4 4 16 BP 1244 BP 1344 ...

Страница 27: ...he printer 2 Using a coin flathead screwdriver or similar object insert it into the Slot on the underside of the printer and gently pry the Expansion Cover from the printer 3 Position the Flash Memory Expansion Assembly oriented with its connector facing down as shown and gently insert it into the Expansion Bay until the assembly is firmly seated Note When using a blank expansion module for the fi...

Страница 28: ...18 BP 1244 BP 1344 ...

Страница 29: ... consists of three lights and three dual function buttons The functions of these lights and controls are listed below 4 1 Lights Both the POWER and PAUSED lights will be on during power up initialization or warm reset BP 1244 BP 1344 19 ...

Страница 30: ...4 4 Calibration Allows the printer to calibrate the media for sensing of the Top of Form See Section 4 6 4 3 Normal Mode Button Functions In Normal Mode the printer s buttons control normal operations such as Pause Feed and Cancel as well as the test and reset functions by using button combinations Button Combinations push buttons simultaneously Prints the Test Label see Section 4 7 2 Performs a w...

Страница 31: ...up Mode not be entered while in Peel Mode or with the optional Present Sensor enabled Depending on label size this can cause unpredictable results If at any time you wish to discard your changes and revert back to the previous values simply turn off power to the printer Notes Printer and cutter faults are disabled during but can still occur while printing test labels Factory Defaults can be restor...

Страница 32: ...OF GAIN item hold for 12 flashes etc Menu Items Values Menu Item Numbers 1 TRANSFER MEDIA TYPE 2 EDGE SENSOR TYPE 3 NO PRESENT SENSOR 4 NO CUTTER EQUIPPED 5 127 SOP ADJUST 0 005 in 6 127 PRESENT ADJUST 0 005 in 7 9600 BAUD RATE bps 8 8 DATA BITS 9 STD CONTROL CODES 10 100 CONT FORM LENGTH 0 01 in 11 3 OOS MAXVOLT 0 1 Volts 12 12 TOF GAIN 13 10 TOF DELTA 0 1 Volts 14 0 TOF LOW 0 1 Volts 15 416 LABE...

Страница 33: ...l Present Sensor Assembly Possible Values NO YES 4 CUTTER EQUIPPED Enables Disables the optional Cutter Assembly Possible Values NO YES 5 SOP ADJUST This sets the point to begin printing relative to the top of form label s edge as detected by the media sensor Possible Values Range 0 255 default 128 0 close to edge 255 farthest from edge 6 PRESENT ADJUST This command specifies an additional amount ...

Страница 34: ...6 default 2 Units 0 1 volt 12 TOF GAIN Sets Top of Form TOF Gain value Possible Values Range 0 15 default 10 13 TOF DELTA Sets minimum change in the sensor reading required to recognize a Gap or Mark Possible Values Range 0 50 default 10 Units 0 1 volt 14 TOF LOW Sets the minimum sensor reading for paper Edge or mark Reflective Possible Values Range 0 50 default 0 Units 0 1 volt 15 LABEL WIDTH Set...

Страница 35: ...dge to leading edge distance of two successive labels Must be set when LABEL ALIGNMENT is set to Yes Possible Values 0 999 default 100 Units 01 inch 20 STOP LOCATION Sets convenient stop locations for different printer configurations Possible Values HOST printer uses host values of SOP and Present Distance PEEL sets stop location just behind the peel bar CUT sets stop location at the cutter blade ...

Страница 36: ...d the button while powering up the printer Continue to hold the button until the PAUSED light turns off then release 2 Press and hold the button and count 7 flashes of the FAULT light then release The following printout should be showing 3 Press the button once to increment to the 19200 bps value The following printout should be showing 4 At this point you will accept the current values for test a...

Страница 37: ...131 TRAN______________ 255 REFL______________ 149 RIBN______________ 87 TEMP______________ 48 VOLT______________ 223 CONFIGURATION THERMAL TRANSFER SERIAL PORT SELECTED 19 2 8BITS EDGE CONT FORM LENGTH__ 0 PRESENT ADJUST____ 127 SOP ADJUST________ 127 TOF LOW___________ 0 0 TOF DELTA_________ 10 10 TOF GAIN__________ 12 10 OOS MAXVOLT_______ 3 3 LABEL ALIGNMENT___ NO ALIGN LENGTH______ 100 STOP LO...

Страница 38: ...le values YES AUTO and NO which are covered in the following sections 4 5 1 Label Alignment YES In this mode the operator must supply an ALIGNMENT LENGTH value The ALIGNMENT LENGTH value is measured from label leading edge to label leading edge of two successive labels This value can be sent via the host computer or entered by using the Menu Setup Mode The ALIGNMENT LENGTH must be as accurate as p...

Страница 39: ...se labels are not rewound because of physical rewind limits that prevent ribbon and paper jamming FORCED ALIGNMENT with Present Sensor Enabled While the label length is measured the printer will pause illuminating the PAUSE LED after each movement The operator must press the Pause button for alignment to continue This allows the operator to remove any labels as required Labels should not be forcib...

Страница 40: ...inthead and the edge sensor or where label wastage at power up is a concern Label Alignment is not recommended for label stock lengths greater than 6 5 or for label stock containing 2 or more form lengths Label Stock Label Alignment Setting Continuous NO 6 5 or less YES or AUTO 6 5 or more NO Multiple form length NO 30 BP 1244 BP 1344 ...

Страница 41: ...tion cause them to stop with a gap on the edge sensor the alignment function can result in wasted labels Set Label Alignment to AUTO press and hold FEED till paper moves for automatic Label Alignment Length measurement OR Re measure Label Alignment Length use Menu Setup to set new length ensure desired length has been set Obtaining a slightly different label Alignment Length measurement Using labe...

Страница 42: ...ment OR Measure Label Alignment Length use Menu Setup to set new length ensure desired length has been set Label Alignment is incorrect Pressing FEED successively results in a label length longer than actual 1 inch Label Alignment Length is not correct The default Label Alignment Length is 1 00 and will result in this behavior when any larger label length is used without setting the appropriate le...

Страница 43: ... host computer is not providing a Present Distance shorter than is required for the Tear Bar Use the Menu Setup to modify the Present Adjust value Tear Mode selected but label stop position present position is too far forward Another present position has been determined OR The Present Adjust value is not correct Ensure the host computer is not providing a Present Distance longer than is required f...

Страница 44: ...es and revert back to the previous calibration simply turn off power to the printer Before calibrating be sure the media sensor is set for the appropriate media type see Section 4 4 2 also be sure the printhead is latched down and the cover is closed Notes Printer and cutter faults are disabled during and but can still occur while printing test labels Factory Defaults can be restored see Section 5...

Страница 45: ...e button The printer will flash the FAULT light until it has finished analyzing the material 3 Place a sample of the media backing or position the reflective mark over the media sensor close the printhead and then press the button The printer will flash the FAULT light until it has finished analyzing the material 4 Remove all media or backing from the media sensor close the printhead and then pres...

Страница 46: ...re calibrating be sure the media sensor is set for the appropriate media type see Section 4 4 2 also ensure that the printhead is latched down and the cover is closed To perform the Auto Media Calibration complete the following steps 1 Load the desired media 2 Hold the button while powering up the printer Continue to hold the button until the PAUSED light turns off then release 3 Next press the bu...

Страница 47: ...024 2001 19 29 236 VER E4204 04 06 08 24 01 BOOT 83 2329 04A CODE 83 2325 04F FONT 83 2337 01A CPLD 592157 01C INTERNAL FLASH MODULE PRESENT SYSTEM RAM CHECKS____ GOOD SYSTEM RAM SIZE___ 2015 KBYTES SYSTEM RAM AVAIL__ 1244 KBYTES REG POWER SUPPLY__ YES INPUT VALUES PAPER_____________ 255 DARKNESS__________ 131 TRAN______________ 255 REFL______________ 149 RIBN______________ 87 TEMP______________ 4...

Страница 48: ...he printhead is in need of replacement Good and Faulty Dot Check Labels are shown below Good Test Label Even pattern consistency indicates that the printhead is operating normally Faulty Test Label Streaks in the pattern indicate a dirty or faulty printhead see Chapter 5 38 BP 1244 BP 1344 ...

Страница 49: ...uate the current printer setup for print quality and label tracking and positioning To print the Test Label With the printer loaded with media at least 4 inches wide and ribbon if printing in thermal transfer simultaneously press the buttons BP 1244 BP 1344 39 ...

Страница 50: ...40 BP 1244 BP 1344 ...

Страница 51: ... the power off Rotate the platen roller and clean it thoroughly with solvent and a cotton swab After every roll of media Peel Off Roller Rotate the peel off roller and clean it thoroughly with solvent and a cotton swab After every roll of media Media Path Solvent After every roll of media Peel Tear Bar Solvent As needed Media Sensor Air blow Monthly Exterior Mild detergent or desktop cleaner As ne...

Страница 52: ... outlet before cleaning the printhead 1 Turn off the printer and open the cover 2 Push the Printhead Latch down and raise the Printhead Carrier Assembly Allow the Printhead to cool 3 Using a Cotton Swab dipped in isopropyl alcohol rub the Cotton Swab along the Printhead 42 BP 1244 BP 1344 ...

Страница 53: ... to media widths To perform the media width adjustment 1 Load media into the printer Print a label and examine it 2 If the printing appears too light on the right hand side of the label see example below then move the Thumbwheel to the right counterclockwise Print another label and examine it making additional adjustments as necessary The light print on the right side of this test label indicates ...

Страница 54: ...media ribbon widths based on the table below Ensure that the Ribbon Tension Adjustment Knob is turned fully to the clockwise or counterclockwise position The knob will no longer turn once it is in the proper position do not force or over turn Ribbon Size Ribbon Width Direction of Rotation Narrow 1 2 inches Clockwise Wide 2 4 inches Counterclockwise Continue turning the Ribbon Tension Adjustment Kn...

Страница 55: ...eed further adjusting however with different types and thickness of media some adjustment may be necessary To adjust the printhead turn the Set Screw until optimum print quality is obtained some trial and error may be necessary Do not over tighten the Set Screw Note If equipped it is not necessary to remove the Ribbon Handler Assembly if equipped An access hole in the assembly is provided for acce...

Страница 56: ...vided for access 1 Turn off the printer 2 Loosen the Printhead Screw until it is free from the printhead Carefully unlatch the printhead carrier assembly and remove the printhead 3 Remove the printhead cables from the back of the printhead Replacement 1 Connect the printhead cable to the new printhead 2 Position the printhead in the printhead carrier assembly ensure that the printhead cable is not...

Страница 57: ...arkness Adjustment can shorten printhead life If you need to increase the print contrast by a large amount instead increase the Heat value and or slow the Print Speed through your software 5 7 Resetting to the Factory Defaults With the printer off press and hold the F1 F2 and F3 buttons while turning the printer on Continue to hold the buttons down until the PAUSED light turns off The printer will...

Страница 58: ...validated The printer will then perform a cold reset and print a Configuration Label to verify the new firmware version If the download was unsuccessful the Fault Indicator will illuminate and the printer will warm reset The previous firmware programming will not be affected unless substantial firmware data structure changes have occurred If the printer fails to warm reset it may be necessary to t...

Страница 59: ...ne 1 800 643 8766 Fax 1 414 358 6767 Email tech_support bradycorp com 6 1 Troubleshooting Tips The following table lists the symptoms and the associated page numbers of the topics covered in the troubleshooting section Problem Situation Page Unacceptable print quality 50 The Printer does not print or prints several labels at once 50 The ribbon does not advance 50 Skips every other label 51 Unable ...

Страница 60: ...The media is not calibrated see Chapter 4 If equipped the Adjustable Media Sensor may need to be repositioned see Chapter 3 The media sensor or media sensor circuitry may be defective call for service The ribbon does not advance The printer advances paper but ribbon does not advance The ribbon is installed incorrectly Open the printhead and make sure that the inked side faces the paper With most r...

Страница 61: ...to print in rotation 4 The characters are formatted outside the dimensions of the label Check that the row column values provide enough room for the height of the characters or bar code to be printed Prints light on the right side of the label The media width adjustment is set for a narrower media width than is actually being used see Chapter 5 The printhead is not properly aligned call for servic...

Страница 62: ...oaded properly see Chapter 5 When loading media be certain that the media hub and media guide is against the media and that gaps or marks in the labels are in line with the media sensor If equipped the Adjustable Media Sensor may need to be repositioned see Chapter 3 The media sensor or media sensor circuitry may be defective call for service Tracking Problems The media is not loaded properly see ...

Страница 63: ... AC Input Power 100 to 240 VAC 50 60 Hz Printer Specifications Print Type Thermal Transfer Print Speed BP 1244 1 4 IPS 25 4 101 6 mm s 4IPS requires optional power supply BP 1344 1 4 IPS 25 4 101 6 mm s Resolution BP 1244 203 dpi 8 dots mm BP 1344 300 dpi 11 8 dots mm Tear Bar Tear up DRAM Memory 2MB FLASH Memory 1MB BP 1244 BP 1344 53 ...

Страница 64: ...n Width Range 1 0 4 3 25 110 mm Communications Interface RS 232 DB 9 and Centronics Parallel Baud Speed 600 to 38 400 bps Handshaking Xon Xoff CTS DTR Parity Even Odd or None Stop Bits 1 or 2 Data Bits 7 or 8 Fonts 9 Bit Map fonts Rotated 0 90 180 270 degrees Imbedded Bar Codes Code 39 Interleaved 2 of 5 Code 128 A B C Codabar LOGMARS UPC A UPC E UPC 2 5 EAN 8 EAN 13 EAN 2 5 UPC Random Weight Code...

Страница 65: ...ickness 010 0025 F Notch opening width 50 20 G Distance from the edge of the media to the media sensor aperture left justified 175 125 H Reflective mark width 2 4 10 50 I Distance between reflective marks 24 3 375 5 J Reflective mark length 25 10 1 Units of measure are in inches 2 The reflective black mark must be carbon based placed on the backside of the stock and the reflectance shall be less t...

Страница 66: ...56 BP 1244 BP 1344 ...

Страница 67: ...08 6C Ctrl M CR 13 0D 45 2D M 77 4D m 109 6D Ctrl N SO 14 0E 46 2E N 78 4E n 110 6E Ctrl O SI 15 0F 47 2F O 79 4F o 111 6F Ctrl P DLE 16 10 0 48 30 P 80 50 p 112 70 Ctrl Q DC1 17 11 1 49 31 Q 81 51 q 113 71 Ctrl R DC2 18 12 2 50 32 R 82 52 r 114 72 Ctrl S DC3 19 13 3 51 33 S 83 53 s 115 73 Ctrl T DC4 20 14 4 52 34 T 84 54 t 116 74 Ctrl U NAK 21 15 5 53 35 U 85 55 u 117 75 Ctrl V SYN 22 16 6 54 36 ...

Страница 68: ...AF 207 CF 239 EF É 144 90 176 B0 Ò 208 D0 240 F0 Æ 145 91 177 B1 D 209 D1 241 F1 Æ 146 92 2 178 B2 Ê 210 D2 242 F2 ô 147 93 3 179 B3 Ë 211 D3 3 4 243 F3 ö 148 94 180 B4 È 212 D4 244 F4 ò 149 95 Á 181 B5 213 D5 245 F5 û 150 96 Â 182 B6 Í 214 D6 246 F6 ù 151 97 À 183 B7 Î 215 D7 247 F7 ÿ 152 98 184 B8 Ï 216 D8 248 F8 Ö 153 99 1 185 B9 217 D9 249 F9 Ü 154 9A 186 BA 218 DA 250 FA Ø 155 9B 187 BB 219 D...

Страница 69: ...oportional font each character will take up a different amount of space when printed Font Valid ASCII Characters decimal Use with Record Structure Type 0 32 127 255 1 32 168 171 172 225 255 2 32 168 171 172 225 255 3 32 35 38 40 58 65 90 128 142 144 146 153 154 156 157 165 168 225 255 4 32 35 38 40 58 65 90 128 142 144 146 153 154 156 157 165 168 225 255 5 32 35 38 40 58 65 90 128 142 144 146 153 ...

Страница 70: ...2 Font 3 27 14 2 Font 4 36 18 3 Font 5 52 18 3 Font 6 64 32 4 Font 7 32 15 5 Font 8 28 15 5 Font 0 96 character alphanumeric upper and lower case Font 1 145 character upper and lower case alphanumeric w descenders and ascenders Font 2 138 character alphanumeric upper and lower case Font 3 62 character alphanumeric uppercase B 2 BP 1244 BP 1344 ...

Страница 71: ...Font 4 62 character alphanumeric uppercase Font 5 62 character alphanumeric uppercase Font 6 62 character alphanumeric uppercase BP 1244 BP 1344 B 3 ...

Страница 72: ...es are selected by the number in the barcode height Larger point sizes can be obtained by increasing the height and width multipliers 48pt and 72pt fonts are generated by doubling the 24pt and 36pt fonts respectively see the Programmer s Manual for more information B 4 BP 1244 BP 1344 ...

Страница 73: ...position G g EAN 8 7 Yes 48 57 Numeric only H h Health Industry Bar Code Varies M 43 32 36 39 42 43 45 57 65 90 I i Codabar Varies No 36 43 45 58 65 68 J j I 2 of 5 with modulo 10 checksum Varies M 10 48 57 Numeric only K k Plessey Up to 14 M 10 48 57 Numeric only Option is Last Character for Second M 11 Checksum L l I 2 of 5 with modulo 10 checksum bearer bars 13 M 10 48 57 Numeric only M m 2 dig...

Страница 74: ...values W1C DataMatrix with Byte Count Specified Yes All 8 bit values W1d QR Code Auto format Varies Yes Alphanumeric W1D QR Code Manual format Varies Yes Single byte or Kanji double byte W1f Aztec Varies Yes All 8 bit values W1F Aztec with Byte Count Specified Yes All 8 bit values W1T TCIF Linked Barcode 3 of 9 TLC39 Varies No Alphanumeric W1z MicroPDF417 Varies Yes All 8 bit values W1Z MicroPDF41...

Страница 75: ...Barcode A Code 3 of 9 Barcode B UPC A Barcode C UPC E Barcode D Interleaved 2 of 5 Barcode E Code 128 Barcode F EAN 13 Barcode G EAN 8 Barcode H Health Industry Barcode HIBC BP 1244 BP 1344 B 7 ...

Страница 76: ...d 2 of 5 w module 10 checksum Barcode K Plessey Barcode L Interleaved 2 of 5 w module 10 checksum and shipping bearer bars Barcode M 2 Digit UPC addendum Barcode N 5 Digit UPC addendum Barcode O Code 93 Barcode p Postnet B 8 BP 1244 BP 1344 ...

Страница 77: ...Barcode Q UCC EAN Code 128 Barcode R UCC EAN Code 128 KMART NON EDI Barcode S UCC EAN Code 128 Random Weight BP 1244 BP 1344 B 9 ...

Страница 78: ...epen Barcode u UPS MaxiCode Barcode v FIM Barcode z PDF 417 Bar Code W1c DataMatrix Bar Code W1d QR Code Bar Code W1f Aztec Bar Code W1z MicroPDF417 Bar Code W1T TCIF Linked Barcode 3 of 9 TLC39 B 10 BP 1244 BP 1344 ...

Страница 79: ... for a period of 365 days from the date of shipment by Brady Expendable and or consumable items or parts such as lamps fuses labels and ribbons are not covered under this warranty This warranty does not cover equipment or parts which have been misused altered neglected handled carelessly or used for purposes other than those for which they were manufactured This warranty also does not cover loss d...

Страница 80: ...ust be issued before the product can be returned To open an RMA please call the Brady Technical Service Department at 1 800 643 8766 Please include your RMA number on the outside of the box and on the shipping document Include a contact name action desired a detailed description of the problem s and examples when possible with the defective unit Brady shall not be responsible for any loss or damag...

Страница 81: ...s or lost profits arising out of or relating to Brady s products or the performance or a breach thereof even if Brady has been advised of the possibility thereof Brady s liability if any to the purchaser or to the customer of the purchaser hereunder shall in no event exceed the total amounts paid to Brady hereunder by the purchaser for a defective product In no event shall Brady be liable to the p...

Страница 82: ...C 4 BP 1244 BP 1344 ...

Отзывы: