background image

Installation

 LVAD3

Bradley 

• 215-1851 Rev. A; ECN 17-08-002 

4/17/2017 

7

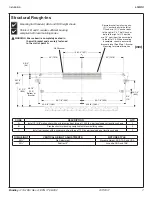
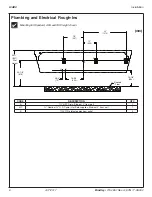
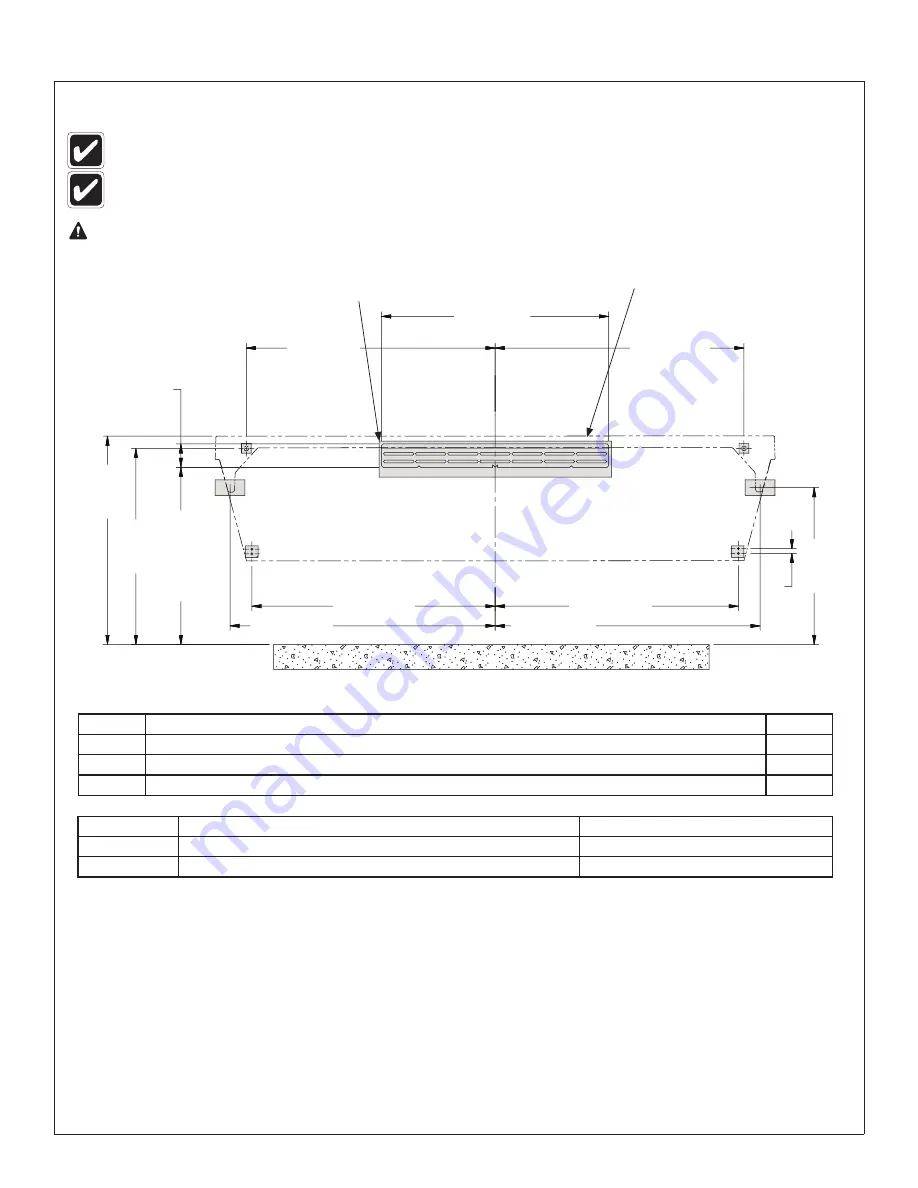
Mounting for Standard, ADA and TAS height shown.

Structural Rough-Ins

Points A, B and C require sufficient backing 
compliant with local building codes.

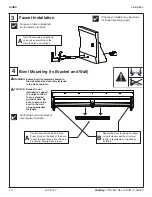
WARNING  Ensure bowl is completely seated in 

the wall bracket and securely fastened 

to the wall at point A.

(mm)

31-1/2" 

(800)

A

A

B

B

CL

28-1/2" 

(723) 

Bottom of 

Bracket

CODE

DESCRIPTION

QTY.

A

Install (1) 3/8" wall anchor with a minimum pull-out force of 1,000 lbs. per local codes at locations shown

2

B

Provide structural backing compliant with local building codes.

2

C

Install wall anchor with a minimum pull-out force of 100 lbs. per local codes at locations shown

2

Wall Bracket

RIM HEIGHT

VERTICAL HEIGHT ADJUSTMENTS 

FIXTURE STYLE

33½"

No Adjustment

Standard Height, ADA, TAS and CSA

30½"

Subtract 3"

Juvenile, ADA and TAS

C

C

25-1/4" 

(640)

33-1/2" 

(851)

39-1/8" (993)

42-5/8" (1082)

42-5/8" (1082)

39-1/8" (993)

3/4" 
(19)

36-1/2" (927)

40" (1016)

40" (1016)

3-3/4" 

(96)

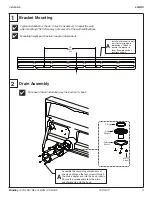
Secure bracket to wall using min. 

(2) 

³⁄₈

" anchor bolts to the left of 

C/L and min. (2) 

³⁄₈

" anchor bolts 

to the right of C/L. The (2) anchor 

bolts to the right of C/L must be 

min. 16" apart from the anchor bolts 

to the left of C/L. When mounting 

is complete, check to ensure the 

bracket is level. See Step 1: Bracket 

Mounting for more information.

Содержание Verge LVA Series

Страница 1: ...age 1 of 13 4 17 2017 LVAD3 Verge Wash Basin LVA Series with Evero Natural Quartz Material Table of Contents Components 3 4 Supplies Required 5 Dimensions 5 6 Rough Ins 7 8 Overflow Plug Assembly 9 Drain Assembly 9 Faucets and Optional Soap Valve 10 Bowl Mounting 10 Strainer and P trap 11 Adjust Temperature 11 Access Panel 12 Cleaning and Maintenance 13 ...

Страница 2: ... minimum pull out rating of 1 000 pounds IMPORTANT Read this entire installation manual to ensure proper installation When finished with the installation file this manual with the owner or maintenance department Compliance and conformity to local codes and ordinances is the responsibility of the installer Product warranties may be found under Products on our Web site at www bradleycorp com Separat...

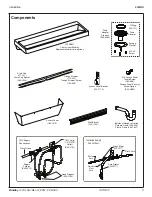
Страница 3: ... 2480 Wall Bracket 140 1153 Access Panel 186 1913 Drain Cap 111 141 Drain Cap Spacer 269 2540 Trough Strainer 173 040 Trough Strainer Screw 160 353 Access Panel Bracket 140 1172 10 Access Panel Thumb Screw 160 536 Access Panel Security Screw Option S45 2880 TMV Valve 1 2 NPTM Outlet S45 2701 Hose Prepack S45 2730 Supply Fittings S45 2510 TMV Supply Connections Plastic Hose Supply Fittings S45 2511...

Страница 4: ...er Optional Transformer Plug In Transformer Option PT for IR DCD Faucet S53 337 Plug in transformer option PT includes Transformer S53 338 Adapter S53 339 and Grounding Kit S53 349 for CAP DCA Faucets IR DCG Faucet S53 350 Plug In Transformer Option PT for IR DCG Faucet 153 486 Adapter included with faucet TMV S45 2872 TL S45 2871 Adapter included with faucet TMV S45 2872 TL S45 2871 Adapter S45 2...

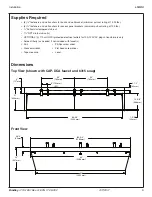
Страница 5: ... panel brackets minimum pull out rating of 100 lbs hot cold or tempered stub out 1 NPT drain stub out s OPTIONAL 3 110 volt GFCI protected electrical outlets for 100 120 VAC plug in transformers only Screen filter s as needed if not included with faucet s Drill Crescent wrench Tape measure 6 152mm 3X 21 533mm 5 127mm 30 762mm 1 5 8 40mm 2 1 2 64mm 80 2032mm 89 3 4 2280mm 20 507mm 3 3 4 95mm 86 3 4...

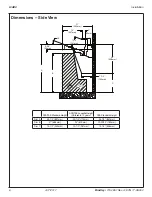
Страница 6: ...B 14 357mm 3 3 4 95mm C 20 508mm 21 534mm 20 7 1 2 190mm 7 1 2 191mm 2 50mm ADA TAS Standard Height ADA TAS Juvenile Height Children 6 12 years CSA Standard Height Dim A 33 1 2 851mm 30 1 2 775mm 33 1 2 851mm Dim B 27 686mm 24 610mm 29 29 32 760mm Dim C 13 1 2 343mm 10 1 2 267mm 13 1 2 536mm ...

Страница 7: ...cking compliant with local building codes 2 C Install wall anchor with a minimum pull out force of 100 lbs per local codes at locations shown 2 Wall Bracket RIM HEIGHT VERTICAL HEIGHT ADJUSTMENTS FIXTURE STYLE 33 No Adjustment Standard Height ADA TAS and CSA 30 Subtract 3 Juvenile ADA and TAS C C 25 1 4 640 33 1 2 851 39 1 8 993 42 5 8 1082 42 5 8 1082 39 1 8 993 3 4 19 36 1 2 927 40 1016 40 1016 ...

Страница 8: ... for Standard ADA and TAS height shown mm 33 851 Rim Height 18 457 A E E E H C 40 1016 CODE DESCRIPTION QTY A 1 NPT Drain Stub out 2 from wall 1 H C Nominal O D Comp Hot Cold supplies Stub out 2 from wall 1 E 110V GFI protected electrical outlet 3 12 305 15 1 8 384 16 3 4 425 2 3 4 70 24 1 8 613 Finished Floor ...

Страница 9: ...ensions For ease of drain installation lay the bowl on its back 2 Drain Assembly Install wall bracket to wall per structural rough in dimensions Check to ensure the bracket is level Example anchor locations shown A 16 406mm min C L O Ring Drain Adapter Packing Washer 10 24 Screw Assemble the remaining components as shown and thread the four screws through the drain adapter and into the basin inser...

Страница 10: ...he bowl flange into the wall bracket lip Ensure bowl is level A Secure the bowl to the wall anchors using fasteners per the structural rough in requirement supplied by installer B WARNING Ensure bowl is completely seated in the wall bracket and securely fastened to the wall at point A CAUTION Bracket is not intended to support the weight of bowl for an extended period of time Be sure to secure the...

Страница 11: ...usted to ensure delivery of a safe water temperature Water in excess of 110 F 43 C may cause scalding 6 Strainer and Drain Cap 5 LVAD1 is shown LVAD3 is similar Position drain cap over trough strainer aligning tabs into drain Push drain cap down until drain cap is flush with basin Grommets should hold drain cap securely against drain tough walls A To remove drain cap carefully slip flat screwdrive...

Страница 12: ...kets attached to the wall on the left and right sides Rotate panel up and check fitup between thumbscrews and panel slots Rotate access panel down and make adjustment to brackets if necessary Install bottom 10 fastener into brackets C Rotate access panel up and secure by rotating thumbscrews to the closed position E To open access panel rotate thumb screw slightly push panel up and swing access pa...

Страница 13: ...ons and always use a soft cloth or sponge to avoid damaging the finish Stubborn Stains To remove stains from stainless steel use a stainless steel cleaner and polish such as Ball stainless steel cleaner or a soft abrasive Always follow the manufacturer s instructions and apply in the same direction as the polish lines NOTICE Never use ordinary steel wool or steel brushes on stainless steel Always ...

Отзывы: