Save JPG file & AVI file
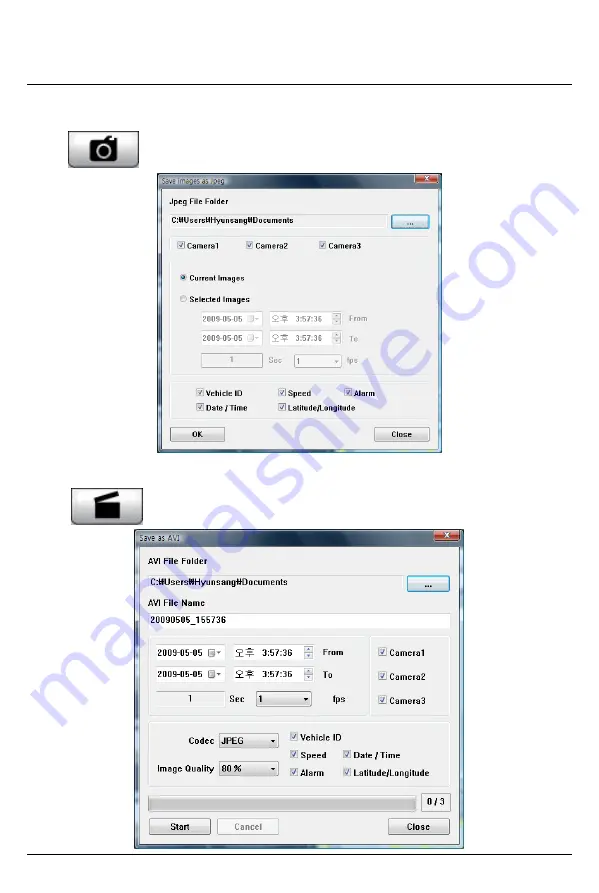
Pause the playback and click ‘Save Image’ icon to make a JPG file.
Pause the playback and
Click ‘Save AVI’ icon to make an AVI file.
‘Save Image’ icon
‘Save AVI’ icon
27
Страница 1: ...e Drive Recorder please ensure that you read and understand this USER GUIDE Please store the USER GUIDE in an easily accessible location Before connecting and installing this Drive Recorder please ref...
Страница 2: ......
Страница 3: ...interference will not occur in a particular installation If this equipment does cause harmful interference to radio or television reception which can be determined by turning the equipment off and on...
Страница 4: ...TO QUALIFIED SERVICE PERSONNEL WARNING TO PREVENT FIRE OR ELECTRIC SHOCK HAZARD DO NOT EXPOSE THIS APPLIANCE TO RAIN OR MOISTURE Caution Install the product where it does not block driver s visibilit...
Страница 5: ...signal is installed in the vehicle e g Other GPS devices such as a certain type of wireless activated alarms MP3 and CD players and camera alarms using GPS 4 If you are using a receiver connected by c...
Страница 6: ...the provided SD card 6 You should have a set of the following items with each VTR400 order 3 GPS Antenna module 4 Remote Controller 5 Audio Video output cable 6 Power Cable 8 Wire Splice clip 5pcs 7...
Страница 7: ...SD Door Audio Video Output External MIC input BUZZER Internal Microphone Camera 1 2 Input Remote Control Input GPS Input Power Input Alarm Car Signal Input Turn left Turn right Brake Speed pulse Rear...
Страница 8: ...E CONTROLLER 8 Record LED BLUE LED Overwrite LED RED LED SHUTTER BUTTON PLAY BUTTON PANIC BUTTON Audio Video Output Cable Video out 1 Video out 2 Audio out 1 Note The same screen will be shown through...
Страница 9: ...9 INTRODUCTION Power Car Signal Input FUSE 250V 3A Red Black Ground BLUE Alarm1 Yellow Alarm3 White Speed pulse Green Alarm2...
Страница 10: ...or flag the Event area as Alarm1 3 G senor Motion detection or PANIC button in the continuous recording file which can be easily searched for during playback The alarms can also be displayed on the vi...
Страница 11: ...uring event recording RED LED Overwriting The red LED will be turned on when start overwriting Buzzer FUNCTION MAIN UNIT 11 Beep sound will occur when event panic recording starts this can be turned o...
Страница 12: ...LED will turn on and slowly blink simultaneously After boot is complete the Blue LED will remain on Blue LED light means VTR400 is now ready for the event recording or has started the Normal recordin...
Страница 13: ...LIVE VIEW CAM1 CAM2 CAM3 Activated Record Mode System NTSC Quality Super Overwrite ON G Sensor Level X 3 Y 3 Z 3 G Sensor Calibration Firmware Version 2 3 1 Current Time 14 50 07 23 JAN 2013 Normal N...
Страница 14: ...ded at the first time the VTR400 is used Press and hold panic and shutter button simultaneously more than 2 sec for calibration Press any single button to escape Park vehicle on a flat surface with at...
Страница 15: ...uring the panic recording VTR400 doesn t make a separate panic file during the continuous recording It will mark the panic area by PANIC button in the continuous recording file which can be easily sea...
Страница 16: ...d hold SHUTTER PLAY button Move to the next file Press and hold PANIC PLAY button PLAY PAUSE Press PLAY button SLOW PLAY Press PLAY button more than 1seconds Return to record mode Press and hold SHUTT...
Страница 17: ...Viewer may not function properly OS Windows 2000 Windows XP Windows Vista Windows 7 CPU Pentium4 2 6GHz or higher RAM 512MB or higher Interface SD Memory Card Reader HDD Free space Install 20MB or hig...
Страница 18: ...ht click the DRIVEREC4 drive and select Open 3 Double click SETUP EXE in the pcsw folder 4 Select the language and then follow the dialog box 5 The PCViewer icon will be displayed on your desktop NOTE...
Страница 19: ...ard 1 Connect SD memory card in to the SD card reader 2 Run PC Viewer VTR400 19 3 Select File and then click Select Data Folder or Click OPEN button OPEN button 4 Select SD memory card folder at the f...
Страница 20: ...Windows setting However it can be changed with this PC viewer setting menu To see the better quality playback pictures on your PC check Deblocking box To set PC Viewer select File and then click PC Vi...
Страница 21: ...Button All Button The Event file list recorded by G sensor Motion detection or Alarm1 3 The Panic file list recorded by pressing the PANIC button The Continuous record file list The Snapshot file save...
Страница 22: ...ing PLAYBACK SCREEN Playback position indicator The Yellow mark indicates there is an Event triggered by the G sensor Alarm1 3 or the PANIC button 22 The icon name can be changed in the setting menu E...
Страница 23: ...Sing View CH1 CH2 CH3 CH4 Quad View Playback buttons Pause Next Image Previous Image X0 5 1 Play X2 4 8 16 Fast Forward X0 5 1 Reverse X2 4 8 16 Fast Reverse 4x4 Multi View Thumb nail function Zoom In...
Страница 24: ...1024x768 mode Enter Return to the previous mode Enter Full screen mode Alt Enter Return to the previous mode Enter Playback speed control Ctrl F 0 5 1 Reverse playback speed control Ctrl B 0 5 1 Paus...
Страница 25: ...ould be connected to the Internet The playback position will be shown on the map with an arrow The blue markings show the route taken Double click the blue mark to change the video playback position t...
Страница 26: ...to change the playback position Click right button of mouse to go back to single Quad image playback mode 8 Click Close button to quit the event playback Click Close to finish the event playback Then...
Страница 27: ...Save JPG file AVI file Pause the playback and click Save Image icon to make a JPG file Pause the playback and Click Save AVI icon to make an AVI file Save Image icon Save AVI icon 27...
Страница 28: ...Print Report Print image icon 11 Pause the playback and click Print Image icon Input Print Title Print Comment using Keyboard Total Print Comment window allows up to 7 lines total 28...
Страница 29: ...button in the print preview windows for printing Print Title Print Comment G sensor graph map will be printed on the first page Click 2x2 and then click Print to print 4 images in one page 29 To prin...
Страница 30: ...e files to the PC Backup icon Check Load Event Normal Panic Log Memo data first before clicking the Backup icon The selected files will be listed in the correlating backup windows OR Check Backup All...
Страница 31: ...ecording data or all event recording data in SD card will be automatically deleted to make free space on the SD Before clicking Init SD card button or before changing the Record Mode make sure to back...
Страница 32: ...gs Record Mode To record Camera2 or Camera3 Camera4 check Use box To record Audio check Record Audio box To use Motion Detection as an Event check Motion box per camera 32 To record by Motion Detectio...
Страница 33: ...76 or 15fps 720x480 Pre record time is 5 15sec if total frame rate is 25fps 720x576 or 30fps 720x480 Post record time is 5 300sec Overwrite Overwrite The image data is overwrites the oldest files when...
Страница 34: ...sor sensitivity value is too high like 5 it becomes too sensitive so it will detect even a light impact or light turn If G sensor sensitivity value is too dull so it might no detect a notable incident...
Страница 35: ...le ID Type in your Vehicle ID Password Enter 4 numbers from 1000 to 9999 as a password Search on system function Playback on a car will not work after setting the password Buzzer Beep sound ON OFF whe...
Страница 36: ...ir shop regarding this connection To receive the speed from the car using the White Speed pulse line select the speed pulse type of your car If you don t know the speed pulse type of your car select R...
Страница 37: ...VTR400 from any software errors Drive Recorder Settings Caution Once the record setting ischanged all recorded data in SD card will be removed automatically Select Backup YES or NO before all of the r...
Страница 38: ...15 Click About icon to check the version product information About icon Drive Recorder Settings 38...
Страница 39: ...recording was triggered LOG DATA will be recorded during driving even if there are no events The total log data size can not exceed 1 240MB The unit overwrites the oldest data when 48MB is reached Us...
Страница 40: ...ect a log file and click Google Earth button STEP1 Install the Google Earth on your PC It is free of charge http earth google com STEP2 Check the log file STEP3 Click Google Earth button Then the rout...
Страница 41: ...locations or other points of interest add driving routes to compare with the actual route taken and it lets you save it all within Google Earth for easy and free data management You can learn more abo...
Страница 42: ...while the unit is upgrading It will also Beep continuously Upgrading the unit usually takes about 2 to 3 minutes Warning Do not turn off the power during upgrading If the upgrade fails the VTR400 uni...
Страница 43: ...PC Viewer Run setup exe and install the new PC Viewer X X X X Note After installation the new PC Viewer initialize the SD card The new software will automatically be copied to pcsw folder at SD card...
Страница 44: ...44 Recording Storage Time Table NTSC Note This is a guideline only Actual results may very depending on a variety of factors Video signal image etc...
Страница 45: ...45 Recording Storage Time Table PAL Note This is a guideline only Actual results may very depending on a variety of factors Video signal image etc...
Страница 46: ...cording Continuous recording ON OFF Event recording ON OFF Quickly OFF Event recording during continuous recording mode 5seconds ON OFF Quickly OFF SHUTTER recording ON OFF Quickly OFF During Overwrit...
Страница 47: ...mage Audio 5 sec Main memory 4GB SDHC support 32GB SDHC GPS External GPS Module G Sensor Internal 3 axis G Sensor RTC Internal battery Car Signal Brake Left Turn Right Turn Speed Pulse Alarm Input 3 D...
Страница 48: ...LIMITED WARRANTY This product is supplied with 1 year warranty The Warranty excludes products That have been misused including accidental damage and damage caused by normal wear and tear In the unlike...
Страница 49: ...or 24V selectable Connect to the fuse box It should be connected to a battery circuit The ground cable should be connected to car chassis Input Voltage 12V 32V Output Voltage 12V 32V Same with input v...