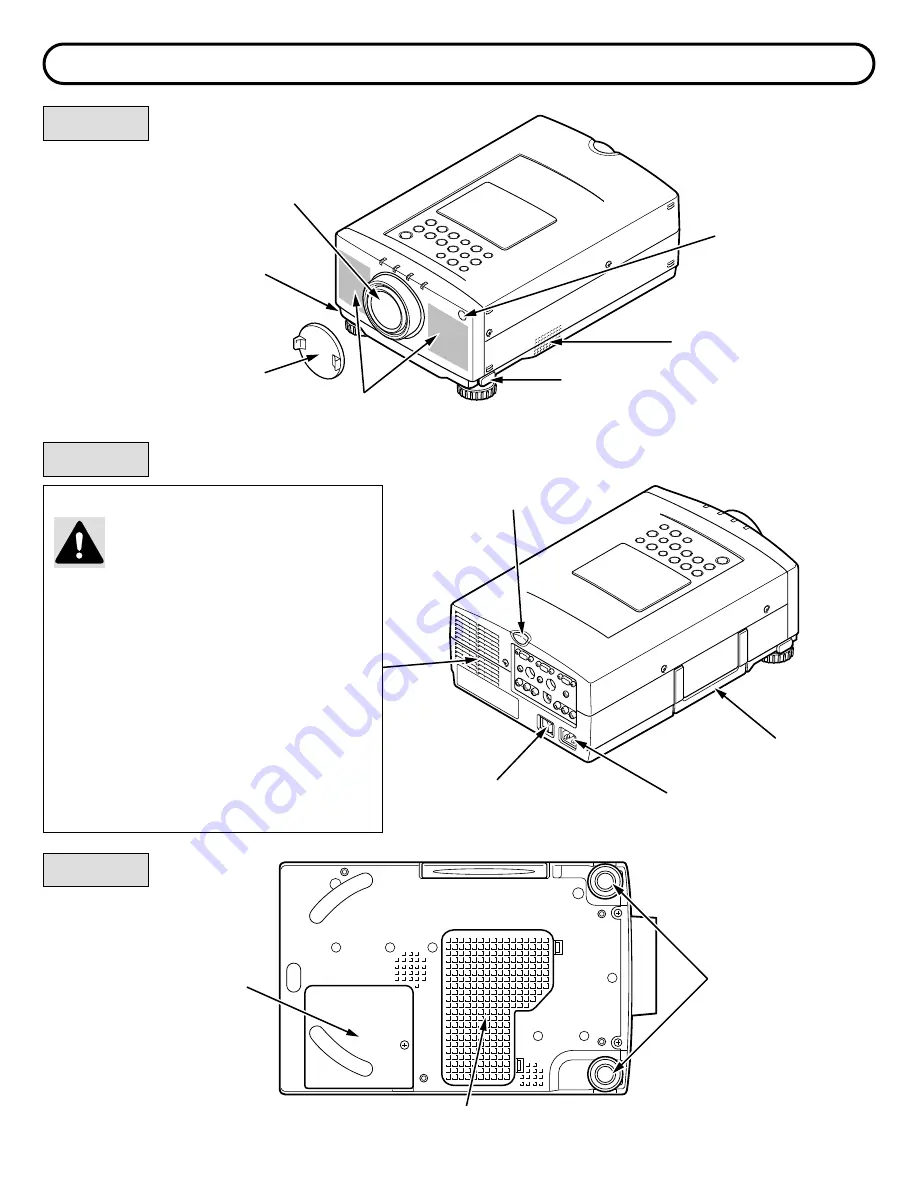
BOXLIGHT MP-25t Скачать руководство пользователя страница 7

– 7 –

DESCRIPTION

SPEAKERS

INFRARED
REMOTE
RECEIVER

PROJECTION LENS

FEET LOCK BUTTON

FEET LOCK
BUTTON

REMOVABLE
LENS COVER

INFRARED
REMOTE
RECEIVER

MAIN ON/OFF
SWITCH

CARRYING
HANDLE

POWER CORD
CONNECTOR

LAMP COVER

ADJUSTABLE
FEET

AIR INTAKE VENT

AIR INTAKE
VENT

FRONT

REAR

EXHAUST VENT

CAUTION HOT AIR !
Air blown from the exhaust vent is hot.
Observe the following when handling your
projector or choosing a location to install it.

¡

Keep heat-sensitive objects away from the
exhaust port.

¡

If you set the projector on top of a metallic
surface, the surface will become hot because
of the hot air exhaust. Be careful when
handling.

¡

Do not touch the cabinet near to the exhaust
vent area, and especially screws and metallic
parts. These parts will become hot while the
projector is used.

BOTTOM

Содержание MP-25t

Страница 1: ...USER S GUIDE BOXLIGHT MP 25t...

Страница 2: ...lens as possible eye damage could result Be especially careful that children do not stare directly into the beam If the Projector will not be used for an extended time unplug the new Projector from t...

Страница 3: ...ector yourself as opening or removing covers may expose you to dangerous voltage or other hazards Refer all servicing to qualified service personnel Unplug this projector from wall outlet and refer se...

Страница 4: ...ION 24 MENU OPERATION 25 26 USING THE PROJECTOR 27 46 TO TURN ON THE PROJECTOR 27 TO TURN OFF THE PROJECTOR 27 DIRECT OPERATION 27 MODE SELECT 27 SOUND VOLUME ADJUSTMENT 28 SOUND MUTE FUNCTION 28 ZOOM...

Страница 5: ...esolutions between 800 x 600 and 1024 x 768 are compressed to 800 x 600 The projector cannot display screen resolutions above 1024 x 768 If your computer s screen resolution is higher than 1024 x 768...

Страница 6: ...to work with single phase power systems having a grounded neutral conductor To reduce the risk of electrical shock do not plug into any other type of power system Consult your authorized dealer or se...

Страница 7: ...ON HOT AIR Air blown from the exhaust vent is hot Observe the following when handling your projector or choosing a location to install it Keep heat sensitive objects away from the exhaust port If you...

Страница 8: ...OM LIGHT This projector is basically designed to project on a flat projection surface This projector can be focused from 4 6 1 4 m 35 4 10 8 m Use the illustration below as an example when positioning...

Страница 9: ...eight position feet is locked 3 Turn the adjustable feet and adjust picture position and tilt UP UP DOWN DOWN ADJUSTABLE FEET FEET LOCK BUTTONS CAUTION IN CARRYING OR TRANSPORTING THE PROJECTOR Do not...

Страница 10: ...itor can be connected to the HDB15 pin VGA terminal on the projector Connect the monitor to this terminal using a monitor cable not provided CONNECTING TO THE COMPUTER AUDIO INPUT JACKS 1 and 2 Connec...

Страница 11: ...ITOR OUT EXT SP CONTROL PORT 2 CONTROL PORT 1 AUDIO 2 STEREO STEREO AUDIO 1 STEREO 8 COMPUTER MONITOR CABLE NOT PROVIDED COMPUTER OUTPUT AUDIO OUTPUT SERIAL PORT INPUT AUDIO CABLE NOT PROVIDED COMPUTE...

Страница 12: ...UTPUT AUDIO OUTPUT ADB PORT INPUT COMPUTER AUDIO INPUT 1 or 2 AUDIO CABLE NOT PROVIDED MOUSE CABLE FOR ADB PORT NOT PROVIDED COMPUTER INPUT 1 or 2 MONITOR OUTPUT VGA MAC ADAPTER NOT PROVIDED VGA CABLE...

Страница 13: ...COMPUTER IN 2 MONITOR OUT EXT SP CONTROL PORT 2 CONTROL PORT 1 AUDIO 2 STEREO STEREO AUDIO 1 STEREO 8 CONTROL PORT OUTPUT 1 or 2 COMPUTER COMPUTER OUTPUT AUDIO OUTPUT SERIAL PORT INPUT PS 2 PORT INPUT...

Страница 14: ...1 or 2 AUDIO CABLE NOT PROVIDED VGA CABLE PROVIDED MOUSE CABLE FOR ADB PORT NOT PROVIDED The Macintosh PowerBook requires the use of the PowerBook Video Adapter shipped with the PowerBook TO POWERBOOK...

Страница 15: ...MONITOR OUTPUT JACK This jack will contain the video information of the selected program source video only If you select program source Computer 1 or Computer 2 there is no signal Connect video input...

Страница 16: ...IN 1 COMPUTER IN 2 MONITOR OUT EXT SP CONTROL PORT 2 CONTROL PORT 1 AUDIO 2 STEREO STEREO AUDIO 1 STEREO 8 VIDEO EQUIPMENT Video Cassette Recorder DVD Player Video Disc Player Satellite TV Tuner L R A...

Страница 17: ...If you use external speaker system connect stereo type external speaker jack Internal speaker sound is disconnected when speaker jack is connected COMPUTER IN 1 COMPUTER IN 2 MONITOR OUT EXT SP CONTR...

Страница 18: ...CONTROLS TOP CONTROLS TOP CONTROLS MODE SELECT AUTO IMAGE NORMAL MENU ZOOM FOCUS VOLUME ON OFF 3 1 o 0 2 i u y t 4 TOP OF THE PROJECTOR LAMP REPLACE LAMP READY WARNING TEMP q w e r FRONT INDICATORS F...

Страница 19: ...ns o MODE BUTTON Used to select source Computer 1 Computer 2 or Video 1 Input 0 MENU BUTTON This button will activate the MENU operation Use this button the POINT UP DOWN LEFT RIGHT buttons and the SE...

Страница 20: ...ect a mouse cable to the projector NOTE Control port 2 connector can be also used as serial port 2 AUDIO INPUT JACKS Used to connect an audio input to the projector 3 VIDEO INPUT JACK Used to connect...

Страница 21: ...ation Wireless mouse is usable when PC mouse pointer is displayed on the screen When the menu or indicator of the projector is displayed on the screen instead of the PC mouse pointer the wireless mous...

Страница 22: ...t to normal picture adjustment preset by factory 4 POINTING PAD POINT UP DOWN LEFT RIGHT BUTTON When in use as a remote for the projector To select an item on the MENU that you want to adjust To selec...

Страница 23: ...the projector Receiver window whenever pressing the buttons Maximum operating range for the remote control is about 16 4 5m and 60 front and rear of the projector To insure safe operation please obser...

Страница 24: ...BUTTON MODE SELECT MODE BUTTON MODE BUTTON SOUND VOLUME VOLUME and BUTTONS VOLUME and BUTTONS SOUND MUTE NOT AVAILABLE MUTE BUTTON ZOOM ZOOM and BUTTONS ZOOM BUTTON POINT UP DOWN BUTTON FOCUS FOCUS a...

Страница 25: ...TON POINT LEFT RIGHT BUTTONS SELECT BUTTON POINT UP DOWN BUTTONS SELECT BUTTON MENU BUTTON POINT LEFT RIGHT BUTTON SELECT REAR CLICK BUTTON POINT UP DOWN BUTTON SELECT REAR CLICK BUTTON MENU BUTTON PO...

Страница 26: ...TTON POINT LEFT RIGHT BUTTONS SELECT BUTTON POINT LEFT RIGHT UP DOWN BUTTONS SELECT BUTTON MENU BUTTON POINT LEFT RIGHT BUTTON SELECT REAR CLICK BUTTON POINT LEFT RIGHT UP DOWN BUTTON SELECT REAR CLIC...

Страница 27: ...ING INDICATOR continues to flash follow the procedures below 1 Press LAMP POWER ON OFF button to OFF 2 Check the air filter for dust accumulation 3 Remove dust with vacuum cleaner See AIR FILTER CARE...

Страница 28: ...ress FRONT CLICK button The size of image is reduced by degrees Compress function To pan the image press POINT UP DOWN LEFT RIGHT POINTING PAD button s The image move to the direction indicated pannin...

Страница 29: ...nother dialog box MODE DISPLAY will appear 3 Press the POINT DOWN BUTTON and a red arrow will appear 4 Move the arrow to the mode you want computer 1 computer 2 or video 1 to use by pressing the POINT...

Страница 30: ...ute and then press the SELECT REAR CLICK BUTTON The mute display is changed On from Off and mute the sound 7 To quit the MENU point to Quit and then press the SELECT REAR CLICK BUTTON LANGUAGE ADJUSTM...

Страница 31: ...ipment to the PROJECTOR and turn them on projector first 2 Set MODE SELECT to VIDEO MODE 3 Press the MENU BUTTON and the MAIN MENU DISPLAY dialog box will appear 4 Press the POINT LEFT RIGHT BUTTON s...

Страница 32: ...em later To store the settings move the arrow to Stored and then press the SELECT REAR CLICK BUTTON When you have stored the settings OK is displayed for confirmation 8 Move the arrow to Yes and then...

Страница 33: ...he MAIN MENU DISPLAY dialog box will appear 2 Press the POINT LEFT RIGHT BUTTON s to select SCREEN and press the SELECT REAR CLICK BUTTON Another dialog box SCREEN ADJUST DISPLAY will appear 3 Press t...

Страница 34: ...TER MODE 1 or 2 This shows the current display mode initially detected by the projector in the system window And Current mode display appears NOTE 1 If the projector cannot discriminate or detect the...

Страница 35: ...0 640 x 480 640 x 480 800 x 600 800 x 600 800 x 600 800 x 600 800 x 600 800 x 600 800 x 600 800 x 600 800 x 600 800 x 600 800 x 600 832 x 624 1024 x 768 1024 x 768 1024 x 768 1024 x 768 1024 x 768 102...

Страница 36: ...R CLICK BUTTON The auto image function is started now It will take about 10 seconds 7 To store the settings move the arrow to Stored and then press the SELECT REAR CLICK BUTTON When you have stored th...

Страница 37: ...and then press the SELECT REAR CLICK BUTTON The stored settings are permanently held even if the MAIN ON OFF is switched off 9 To quit the MENU move the arrow to Quit and then press the SELECT REAR C...

Страница 38: ...REAR CLICK BUTTON When you have stored the settings OK is displayed for confirmation 6 Move the arrow to Yes and then press the SELECT REAR CLICK BUTTON The stored settings are permanently held even i...

Страница 39: ...enables you to recall the setting for a specific computer when you need it 1 Press the MENU BUTTON and the MAIN MENU DISPLAY dialog box will appear 2 Press the POINT LEFT RIGHT BUTTON s to select PC...

Страница 40: ...CT REAR CLICK BUTTON When you have reset the settings OK is displayed for confirmation Move the arrow to Yes and then press the SELECT REAR CLICK BUTTON You can adjust the settings again if needed 13...

Страница 41: ...adjust the settings again if needed 22 To quit the MENU move the arrow to Quit and then press the SELECT REAR CLICK BUTTON 23 If you quit the MENU without storing the settings in the memory the param...

Страница 42: ...ssing the POINT UP DOWN BUTTON s Press the SELECT REAR CLICK BUTTON Another dialog box PC ADJUSTMENT DISPLAY will appear 5 To quit the MENU point to Quit and then press the SELECT REAR CLICK BUTTON 6...

Страница 43: ...educed by degrees Compress function 7 To pan the image press POINT UP DOWN LEFT RIGHT POINTING PAD BUTTON s The image move to the direction indicated panning function 8 To cancel Digital Zoom mode pre...

Страница 44: ...e Display Zoom Focus Display Normal Display No show Display CEILING When this function is in the On position the top bottom and the left right picture reverse capability lets you project from a ceilin...

Страница 45: ...SETTING DISPLAY will appear 3 Press the POINT DOWN BUTTON and a red arrow will appear 4 Move the arrow to an item you want to set by pressing the POINT UP DOWN BUTTON s 5 If you want to change the set...

Страница 46: ...OINT UP DOWN BUTTON s to select Lamp age and then press the SELECT REAR CLICK BUTTON When you reset the lamp replace monitor lamp replace monitor reset is displayed for confirmation 5 Move the arrow t...

Страница 47: ...Y PICTURE IMAGE USE THE PROJECTOR IN THE CLEAN ENVIRONMENT USAGE IN THE CLEAN ENVIRONMENT IS RECOMMENDED When used under the dusty or smoky conditions dust may accumulate on the liquid crystal panel a...

Страница 48: ...and disconnect the lamp cover 4 Remove 2 screws with a screwdriver and pull out the lamp assembly by grasping the handle 5 Replace the lamp assembly 6 Tighten 3 screws to secure the lamp cover to the...

Страница 49: ...fore you power up the projector Power the equipment back up in this order Projector monitor computer 6 If the problem still exists check the following chart Plug the projector into an AC outlet Turn t...

Страница 50: ...mouse setting on your computer Turn on the projector before you turn on the computer Wireless mouse function does not work Try these Solutions SERVICE WARNING High voltages are used to operate this p...

Страница 51: ...stem PAL SECAM NTSC NTSC4 43 and PAL M H sync 15 100 KHz V sync 50 100 Hz Adjustable from 30 to 300 76 2 cm to 762 cm 300 1 750 TV lines F1 8 2 1 lens with f48 4 mm 62 8 mm Motor zoom and focus 4 6 1...

Страница 52: ...T CORPORATION shall have not further obligation under the foregoing limited warranty if the Product has been damaged due to abuse misuse neglect accident unusual physical or electrical stress unauthor...

Отзывы: