background image

3

IMPORTANT SAFETY INSTRUCTIONS

All the safety and operating instructions should be read before
the product is operated.

Read all of the instructions given here and retain them for later
use.  Unplug this projector from AC power supply before
cleaning.  Do not use liquid or aerosol cleaners.  Use a damp
cloth for cleaning.

Do not use attachments not recommended by the
manufacturer as they may cause hazards.

Do not place this projector on an unstable cart, stand, or table.
The projector may fall, causing serious injury to a child or
adult, and serious damage to the projector.  Use only with a
cart or stand recommended by the manufacturer, or sold with
the projector.  Wall or shelf mounting should follow the
manufacturer's instructions, and should use a mounting kit
approved by the manufacturers.

Do not expose this unit to rain or use near water... for
example, in a wet basement, near a swimming pool, etc...

Slots and openings in the back and bottom of the cabinet are
provided for ventilation, to insure reliable operation of the
equipment and to protect it from overheating.

The openings should never be covered with cloth or other
materials, and the bottom opening should not be blocked by
placing the projector on a bed, sofa, rug, or other similar
surface.  This projector should never be placed near or over a
radiator or heat register.

This projector should not be placed in a built-in installation
such as a book case unless proper ventilation is provided.

This projector should be operated only from the type of power
source indicated on the marking label.  If you are not sure of
the type of power supplied, consult your authorized dealer or
local power company.

Do not overload wall outlets and extension cords as this can
result in fire or electric shock.  Do not allow anything to rest on
the power cord.  Do not locate this projector where the cord
may be damaged by persons walking on it.

Never push objects of any kind into this projector through
cabinet slots as they may touch dangerous voltage points or
short out parts that could result in a fire or electric shock.
Never spill liquid of any kind on the projector.

Do not attempt to service this projector yourself as opening or
removing covers may expose you to dangerous voltage or
other hazards.  Refer all servicing to qualified service
personnel.

Unplug this projector from wall outlet and refer servicing to
qualified service personnel under the following conditions:
a. When the power cord or plug is damaged or frayed.
b. If liquid has been spilled into the projector.
c. If the projector has been exposed to rain or water.

d. If the projector does not operate normally by following the

operating instructions.  Adjust only those controls that are
covered by the operating instructions as improper
adjustment of other controls may result in damage and will
often require extensive work by a qualified technician to
restore the projector to normal operation.

e. If the projector has been dropped or the cabinet has been

damaged.

f. When the projector exhibits a distinct change in

performance-this indicates a need for service.

When replacement parts are required, be sure the service
technician has used replacement parts specified by the
manufacturer that have the same characteristics as the
original part.  Unauthorized substitutions may result in fire,
electric shock, or injury to persons.

Upon completion of any service or repairs to this projector, ask
the service technician to perform routine safety checks to
determine that the projector is in safe operating condition.

This projector is equipped with a
grounding type AC line plug.
Should you be unable to insert the
plug into the outlet, contact your
electrician.  Do not defeat the
safety purpose of this grounding
type plug.

Follow all warnings and instructions marked on the projectors.

For added protection to the projector during a lightning storm,
or when it is left unattended and unused for long periods of
time, unplug it from the wall outlet.  This will prevent damage
due to lightning and power line surges.

An appliance and cart combination
should be moved with care.  Quick
stops, excessive force, and uneven
surfaces may cause the appliance
and cart combination to overturn.

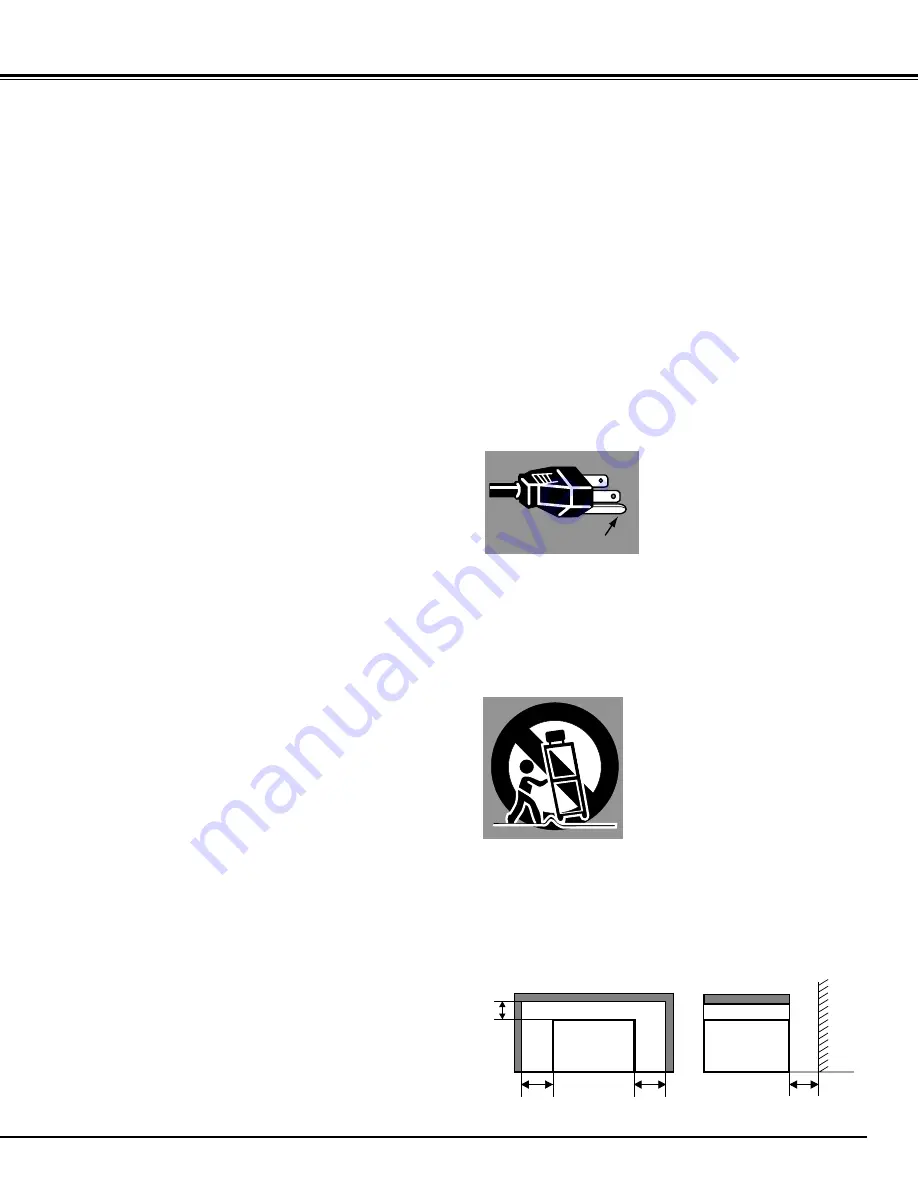
If the projector is to be built into a compartment or similarly
enclosed, the minimum distances must be maintained.  
Do not cover the ventilation slot on the projector.  
Heat build-up can reduce the service life of your projector, and
can also be dangerous.  

GROUND

20cm

50cm

50cm

50cm

PROJECTOR

(FRONT)

PROJECTOR

(SIDE)

WALL

Содержание CP-11t

Страница 1: ...USER S GUIDE BOXLIGHT CP 11t...

Страница 2: ...ing this manual to familiarize yourself with the operating procedures so that you will receive maximum satisfaction from the many features included in your new projector This owner s manual will acqua...

Страница 3: ...ector yourself as opening or removing covers may expose you to dangerous voltage or other hazards Refer all servicing to qualified service personnel Unplug this projector from wall outlet and refer se...

Страница 4: ...STMENT 27 PICTURE SCREEN ADJUSTMENT 28 SELECTING VIDEO MODE 29 SELECTING COLOR SYSTEM 29 PICTURE SCREEN ADJUSTMENT 29 PICTURE IMAGE ADJUSTMENT 30 ADJUSTING THE PICTURE IMAGE MANUALLY 30 NORMAL FUNCTIO...

Страница 5: ...x 768 reset it to a lower resolution before you connect the projector Automatic Multiscanning System This projector automatically tunes to most personal computers currently distributed by simply conne...

Страница 6: ...attention should be taken Do not put a flammable object near this vent Keep heat sensitive objects away from the exhaust vent Do not touch this area especially screws and metallic parts This area will...

Страница 7: ...ghting in order to provide the best image ADJUSTABLE FEET Picture tilt and projection angle can be adjusted by rotating the ADJUSTABLE FEET Projection angle can be adjusted to 10 degrees Lift the fron...

Страница 8: ...ase power systems having a grounded neutral conductor To reduce the risk of electrical shock do not plug into any other type of power system Consult your authorized dealer or service station if you ar...

Страница 9: ...ector CAUTION WHEN CARRYING OR TRANSPORTING THE PROJECTOR Do not drop or bump the projector otherwise damages or malfunctions may result When transporting the projector use a carrying case recommended...

Страница 10: ...video output from the video equipment to this terminal Refer to P11 COMPUTER INPUT MONITOR OUTPUT TERMINAL Terminal HDB15 PIN Connect the display output terminal of the computer to COMPUTER INPUT term...

Страница 11: ...of the Projector Use either the VIDEO jack or S VIDEO jack When the both jacks are connected the S VIDEO jack has priority over the VIDEO jack Video Audio Output S VIDEO Output Audio Input VIDEO CABLE...

Страница 12: ...Audio Output Audio Input To each terminal of your computer To the Monitor NOTE When connecting the cable the power cords of both the projector and the external equipment should be disconnected from A...

Страница 13: ...OFF OFF OFF OFF OFF OFF OFF OFF OFF OFF 1 2 3 4 5 6 ON 1 DIP ON OFF 2 3 4 5 6 CONTROL PORT AUDIO OUT AUDIO IN MONITOR OUT COMPUTER IN Use one of these Control Cables corresponding with the terminal o...

Страница 14: ...t goes on And when the button is pressed more than 1 minute or the button is released light goes off Laser light is emitted with the RED light which tells the laser beam being emitted The laser emitte...

Страница 15: ...y and be sure the battery terminals are in contact with the pins in the compartment Remote Control Batteries Installation 1 2 3 MUTE BUTTON Used to mute sound P21 ZOOM BUTTON Used to adjust zoom P20 F...

Страница 16: ...Used to select focus adjust P20 This indicator is lit in green when the projector is ready to be turned on This indicator is dim when the projector is turned on And bright when the projector is in sta...

Страница 17: ...adjust through ON SCREEN MENU 1 2 3 5 4 You can control and adjust this projector through the ON SCREEN MENU Refer to the following pages to operate each adjustment on the ON SCREEN MENU 1 MOVING THE...

Страница 18: ...the image Refer to P28 AUTO IMAGE MENU Used to adjust Fine sync Total dots and Picture Position automatically Refer to P27 MENU BAR IN COMPUTER MODE Press MENU BUTTON while in Computer mode SYSTEM MEN...

Страница 19: ...G ON OFF THE PROJECTOR When the TEMPERATURE WARNING indicator flashes red the projector is automatically turned off Wait at least 5 minutes before turning the projector on again If the TEMPERATURE WAR...

Страница 20: ...Reduce the upper width with the KEY STONE button or the POINT UP button Reduce the lower width with the KEY STONE button or the POINT DOWN button Zoom Focus Keystone If the picture has keystone disto...

Страница 21: ...NT Press the FREEZE button on the Remote Control Unit to freeze the picture on screen This function is cancelled when the FREEZE button is pressed again or any other function button is pressed Press t...

Страница 22: ...projector may provides the messages below The projector cannot discriminate or detect the input signal from the computer Adjust and set the computer system manually Refer to page 24 There is no signa...

Страница 23: ...800 x 600 53 674 85 06 SVGA 5 800 x 600 48 08 72 19 SVGA 6 800 x 600 37 90 61 03 SVGA 7 800 x 600 34 50 55 38 SVGA 8 800 x 600 38 00 60 51 SVGA 9 800 x 600 38 60 60 31 SVGA 10 800 x 600 47 90 71 92 SV...

Страница 24: ...her dialog box Where to reserve Menu will appear In this dialog box you can store the parameter into the area from Mode 1 to Mode 5 When memorizing the new computer parameter select the Mode with the...

Страница 25: ...Adjustment of the horizontal or vertical picture position When the image is not centered on the screen adjust each of those items Horizontal Vertical Adjustment of the clamp level When the image has a...

Страница 26: ...se contrast From 0 to 63 Press POINT LEFT button to adjust the image darker and press POINT RIGHT button to adjust brighter From 0 to 63 Close the PICTURE IMAGE ADJUSTMENT Menu Move the arrow to the i...

Страница 27: ...age 27 to adjust Picture Position Terminates the PICTURE IMAGE ADJUSTMENT Menu Move the arrow to the item and then press the SELECT button Starts the adjustment on the item set to On Adjust the pictur...

Страница 28: ...n To expand the image size press the D ZOOM button or the SELECT button The image is magnified by degrees Compress function To compress the image size press the D ZOOM button or the RIGHT CLICK button...

Страница 29: ...ecessary to select a specific broadcast signal format among PAL SECAM NTSC NTSC 4 43 PAL M or PAL N PAL SECAM NTSC NTSC4 43 PAL M PAL N Move the arrow to the Mode and press the SELECT button PICTURE S...

Страница 30: ...TURE IMAGE ADJUSTMENT Menu Move the arrow to the item and press POINT RIGHT LEFT button Indicates the level of the item Press POINT LEFT button to lighten the image and press POINT RIGHT button to dee...

Страница 31: ...lamp replacement monitor timer by using this function Refer to page 34 Lamp age SELECTING LANGUAGE Press the MENU button and the ON SCREEN MENU will appear Press POINT LEFT RIGHT buttons to select LAN...

Страница 32: ...a Personal Computer installation of the mouse driver not supplied is required Make sure that the mouse driver is properly installed in your computer And make sure that the mouse port of the computer c...

Страница 33: ...power off and disconnect the AC power cord from the AC outlet Turn the projector upside down and remove the Air Filters by pulling the latches upward 1 2 The Removable Air Filters prevent dust from a...

Страница 34: ...acement Monitor Timer when the Lamp Assembly is replaced When the Lamp Replacement Monitor Timer is reset the LAMP REPLACEMENT indicator stops lighting Turn the projector on and press the MENU button...

Страница 35: ...EADY indicator will light green again and the projector may be turned on by pressing the power ON OFF button Check the TEMPERATURE WARNING indicator If the indicator flashes red the projector cannot b...

Страница 36: ...5m Problem Try these Solution Wireless Mouse function does not work Check the cable connection between the projector and the computer Check the mouse setting on your computer Turn the projector on bef...

Страница 37: ...re Storage Temperature Accessories LCD Panel System The specifications are subject to change without notice F 1 7 2 0 lens with f 33 2mm 43 1mm Motor zoom and focus 4 6 35 4 1 4 m 10 8 m 150 W RCA Typ...

Страница 38: ...HT CORPORATION shall have no further obligation under the foregoing limited warranty if the Product has been damaged due to abuse misuse neglect accident unusual physical or electrical stress unauthor...

Отзывы: