BOXLIGHT CINEMA 20HD Скачать руководство пользователя страница 19

19

BEFORE OPERATION

TURNING ON PROJECTOR

Connect the projector's AC Power Cord into an AC outlet.  LAMP
Indicator lights RED, and READY Indicator lights GREEN.

Press POWER ON-OFF button on Top Control or on Remote
Control Unit to ON.  LAMP Indicator dims, and Cooling Fans
start to operate. Preparation Display appears on a screen and
count-down starts. Signal from PC or Video source appears after
30 seconds.
Current Input position is also displayed on screen for 5 seconds. 

2

3

TURNING OFF PROJECTOR

Press POWER ON-OFF button on Top Control or on Remote
Control Unit, and a message "Power off?" appears on a screen.  

Press POWER ON-OFF button again to turn off projector. LAMP
Indicator lights bright and READY Indicator turns off.  After
projector is turned off, Cooling Fans operate (for 90 seconds).
During this "Cooling Down" period, this appliance cannot be
turned on.

1

2

TO MAINTAIN LIFE OF LAMP, ONCE YOU TURN
PROJECTOR ON, WAIT AT LEAST 5 MINUTES BEFORE
TURNING IT OFF.

TURNING ON / OFF PROJECTOR 

When WARNING TEMP. Indicator flashes red, projector is automatically turned off.  Wait at least 5 minutes before turning on
projector again.
When WARNING TEMP. Indicator continues to flash, follow procedures below:
1. Press POWER ON-OFF button to turn the projector off and disconnect AC Power Cord from an AC outlet.
2. Check Air Filters for dust accumulation.
3. Clean Air Filters.  (See "AIR FILTER CARE AND CLEANING" section on page 39.)
4. Turn the projector on again.

If WARNING TEMP. Indicator should still continue to flash, call Boxlight Corporation at 1-800-762-5757 or 360-779-7901.

1

Complete peripheral connections (with Computer, VCR, etc.)
before turning on projector.  (Refer to "CONNECTING TO
PROJECTOR" on pages 11~13 for connecting that equipment.)

3

When projector has cooled down, READY Indicator lights
GREEN again and you can turn projector on.  After cooling down
completely, disconnect AC Power Cord.
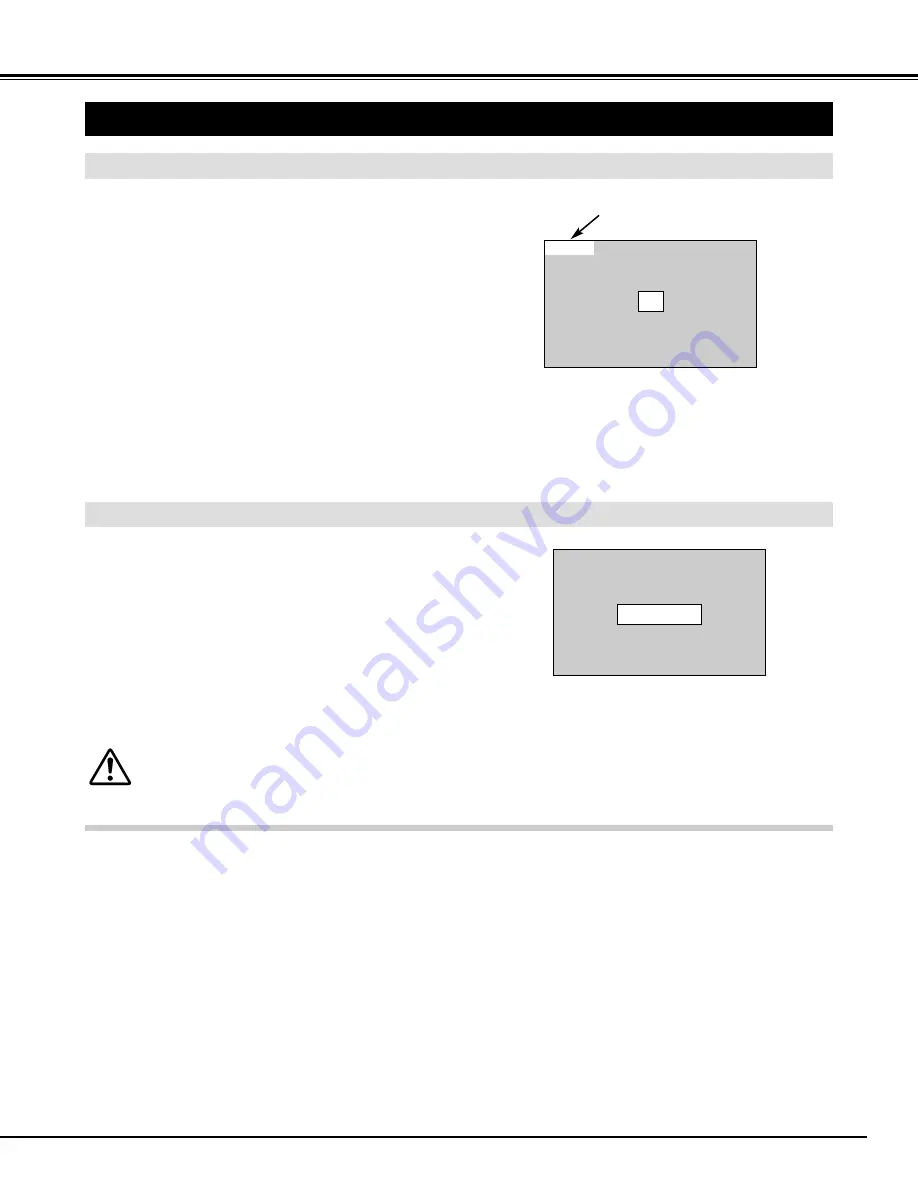
30

Preparation Display disappears after 30 seconds.

Power off?

Message disappears after 4 seconds.

When “Power Management” function is ON, projector detects signal interruption and turns off Projection Lamp automatically.
Refer to “Power Management” on page 37.

NOTE : When “On start” function is ON, this projector is turned

on automatically by connecting AC Power Cord to an
AC outlet.  (Refer to pages 37, 38.)

Input 1

Input position

Содержание CINEMA 20HD

Страница 1: ...CINEMA 20HD HOME THEATER PROJECTOR USER S GUIDE...

Страница 2: ...section of the end of this booklet If the problem still persists contact BOXLIGHT TO THE OWNER SAFETY PRECAUTIONS WARNING TO REDUCE THE RISK OF FIRE OR ELECTRIC SHOCK DO NOT EXPOSE THIS APPLIANCE TO R...

Страница 3: ...abinet slots as they may touch dangerous voltage points or short out parts that could result in a fire or electric shock Never spill liquid of any kind on the projector This projector should be operat...

Страница 4: ...o frequency energy and if not installed and used in accordance with the instructions may cause harmful interference to radio communications However there is no guarantee that interference will not occ...

Страница 5: ...LEVEL ADJUSTMENT 28 PICTURE SCREEN ADJUSTMENT 30 SELECTING INPUT SOURCE 31 SELECTING VIDEO SYSTEM 32 PICTURE IMAGE ADJUSTMENT 33 IMAGE LEVEL SELECT 33 IMAGE LEVEL ADJUSTMENT 34 PICTURE SCREEN ADJUSTM...

Страница 6: ...o PC Adjustment No complicated setup is necessary and projection is always precise Digital Zoom for Computer Digital Zoom function adjusts image size to approx 1 4 49 times of original image size allo...

Страница 7: ...and automatically controls operating power of Cooling Fans FRONT OF CABINET LAMP COVER ADJUSTABLE FEET AND FEET LOCK LATCHES This projector is equipped with cooling fans for protection from overheati...

Страница 8: ...on CAUTION For safety unplug AC Power Cord when an appliance is not used When this projector is connected to outlet with AC Power Cord an appliance is in Stand by Mode and consumes a little electric p...

Страница 9: ...quality It is recommended to limit ambient lighting in order to provide best image Min Zoom Max Zoom 100 77 12 7 3 9m 150 115 19 1 5 8m 200 154 25 6 7 8m 250 192 32 0 9 8m 300 231 38 4 11 7m 400 308 5...

Страница 10: ...lens and cabinet When this projector is not in use for an extended period put it into case dust cover supplied with this projector ADJUSTABLE FEET Picture tilt and projection angle can be adjusted by...

Страница 11: ...output to one of these terminals Refer to P12 COMPUTER INPUT TERMINALS DIGITAL ANALOG This projector has input and output terminals on its back for connecting computers and video equipment Refer to f...

Страница 12: ...TER AUDIO IN 1 or 2 COMPUTER IN ANALOG Cables used for connection Cable or adapter is not supplied with this projector Audio Cable stereo NOTE When connecting cable power cords of both the projector a...

Страница 13: ...not supplied with this projector Video Cable RCA x 1 or RCA x 3 BNC Cable S VIDEO Cable Audio Cable RCA x 2 NOTE When connecting cable power cords of both the projector and external equipment should...

Страница 14: ...U BUTTON Used to select MENU operation P17 18 INPUT BUTTON MUTE BUTTON Used to mute sound P21 AUTO PC ADJ BUTTON Used to operate AUTO PC Adjustment function P23 FREEZE BUTTON Used to freeze picture P2...

Страница 15: ...s Installation 1 2 3 Operating Range Point Remote Control Unit toward projector Receiver Window whenever pressing any button Maximum operating range for Remote Control Unit is about 16 4 5m and 60 in...

Страница 16: ...ife of projection lamp draws to an end P40 Flashes red when internal projector temperature is too high P39 Used to select input source P22 Used to select an item or adjust value in ON SCREEN MENU They...

Страница 17: ...ate each adjustment on ON SCREEN MENU 2 MOVING POINTER 3 SELECT ITEM Move pointer see below or adjust value of item by pressing POINT button s on Top Control or on Remote Control Unit Select item or s...

Страница 18: ...ure image Contrast Brightness Color Tint Color management Auto picture control Color temp White balance R G B Sharpness Gamma Noise Reduction Progressive Refer to P34 36 FOR VIDEO SOURCE Press MENU BU...

Страница 19: ...ally turned off Wait at least 5 minutes before turning on projector again When WARNING TEMP Indicator continues to flash follow procedures below 1 Press POWER ON OFF button to turn the projector off a...

Страница 20: ...corrected by KEYSTONE adjustment KEYSTONE ADJUSTMENT 1 Press KEYSTONE button on Remote Control Unit or select Keystone on SETTING menu Refer to page 37 Keystone dialog box appears 2 Correct keystone d...

Страница 21: ...appears on screen for a few seconds button to increase volume and button for decreasing Mute Press MUTE button on Remote Control Unit to cut off sound To restore sound to its previous level press MUTE...

Страница 22: ...ve the red arrow pointer to Input 1 and then press SELECT button Source Select Menu will appear 1 2 Input 1 INPUT MENU Move the pointer to either Digital or Analog and then press SELECT button 3 When...

Страница 23: ...e provided in this projector and PC system can be also selected manually PC ADJUSTMENT AUTO PC ADJUSTMENT Auto PC Adjustment function is provided to automatically adjust Fine sync Total dots and Pictu...

Страница 24: ...frame pointer to PC ADJUST Menu icon 1 2 Press POINT DOWN button to move the red frame pointer to item that you want to adjust and then press SELECT button Adjustment dialog box will appear Press POIN...

Страница 25: ...PC ADJUST MENU Quit Other icons operates as follows 3 To store adjustment parameters move the red frame pointer to Store icon and then press SELECT button Move the red arrow pointer to any of Mode 1 t...

Страница 26: ...43 59 SXGA 4 1280 x 1024 64 20 70 40 62 50 58 60 63 90 60 00 63 34 59 98 XGA 1 1024 x 768 XGA 2 1024 x 768 XGA 3 1024 x 768 XGA 4 1024 x 768 48 36 60 00 68 677 84 997 XGA 6 1024 x 768 60 023 75 03 XG...

Страница 27: ...this projector Standard Picture level with improved halftone for graphics Real User preset picture adjustment in IMAGE ADJUST Menu P28 29 IMAGE 1 4 IMAGE SELECT Menu icon IMAGE LEVEL SELECT DIRECT Se...

Страница 28: ...Color management function can be used to adjust the level phase and gamma of the selected display colors on the screen and to replace these colors with other colors if required The projector lets you...

Страница 29: ...ill be cleared and the effect of the setting adjustment for that line on the projected images will be momentarily canceled 4 CANCEL COLOR SELECTION MODE The mode will return to the pointer mode even i...

Страница 30: ...20p HDTV 1035i HDTV or 1080i HDTV is selected on PC SYSTEM Menu P23 This projector cannot display any resolution higher than 1280 X 1024 If your computer s screen resolution is higher than 1280 X 1024...

Страница 31: ...e pointer to Video or Y Pb Cb Pr Cr and press INPUT Menu icon Move the pointer red arrow to Input 2 and press SELECT button Source Select Menu Input 3 INPUT MENU INPUT Menu icon Move the pointer red a...

Страница 32: ...NTSC4 43 PAL M PAL N Projector automatically detects incoming Video signal and adjusts itself to optimize its performance When Video System is 1035i or 1080i select system manually first If projector...

Страница 33: ...projector Standard Picture level adjusted for picture with fine tone Cinema User preset picture adjustment in IMAGE ADJUST Menu P34 36 IMAGE 1 4 IMAGE SELECT Menu icon IMAGE LEVEL SELECT DIRECT Select...

Страница 34: ...ed The image that was being projected when the button was pressed will be paused and the COLOR MAN AGEMENT POINTER will appear Use the POINT buttons to move the pointer to a section of the paused imag...

Страница 35: ...r temp Press either POINT LEFT button or POINT RIGHT button to Auto picture control position that you want to select Off L1 or L2 Off Auto picture control OFF position L1 Auto picture control LEVEL 1...

Страница 36: ...ut mode select 16 9 and select Full on this SCREEN Menu to provide better quality Full Move the red frame to the function and press SELECT button SCREEN MENU SCREEN Menu icon Provides image to fit scr...

Страница 37: ...et and then press SELECT button Setting dialog box appears Blue back When this function is On this projector will produce a blue image instead of video noise on screen when any input source is unplugg...

Страница 38: ...on is On projector is automatically turned on just by connecting AC Power cord to a wall outlet Note Be sure to turn projector off properly refer to section TURNING OFF PROJECTOR on P19 If projector i...

Страница 39: ...r a service station 3 AIR FILTER Pull up and remove Turn off the projector and disconnect AC power cord from AC outlet Turn the projector upside down and remove Air Filter 2 used by pulling latches up...

Страница 40: ...ction Lamp of this projector draws to an end the LAMP REPLACE indicator lights yellow If this indicator lights yellow replace the projection lamp with a new one promptly ORDER REPLACEMENT LAMP Replace...

Страница 41: ...kup of the unit and replacement of the lamp Additionally check carefully to ensure that there are no broken shards or pieces of glass around the projector or coming out from the cooling air circulatio...

Страница 42: ...ds READY indicator lights green again and the projector may be turned on by pressing Power ON OFF button Check WARNING TEMP indicator If indicator flashes red the projector cannot be turned on See TUR...

Страница 43: ...ned and manufactured to meet rigid U L safety standards against risk of fire casualty and electrical hazards The CE Mark is a Directive conformity mark of the European Community EC SERVICE WARNING Hig...

Страница 44: ...F 10 C 60 C User s Guide AC Power Cord Wireless Wired Remote Control Transmitter and Batteries Remote Control Cable Video Cable RCA x 1 Audio Cable RCA x 2 S Video Cable Control Serial port Cable Pro...

Страница 45: ...lied 1 2 3 4 5 8 7 6 Pin Configuration CONTROL PORT CONNECTOR CLK DATA GND GND R X D GND RTS CTS T X D GND GND ADB GND GND PS 2 Serial ADB 1 2 3 4 5 6 7 8 COMPUTER INPUT 1 TERMINAL DIGITAL Terminal DV...

Страница 46: ...46...

Страница 47: ...47...

Страница 48: ...ve no further obligation under the foregoing limited warranty if the Product has been damaged due to abuse misuse neglect accident unusual physical or electrical stress unusual physical and electrical...

Отзывы: