background image

Item Description

Qty

A

Button Head Hex Screw M8 X 60

6

B

Button Head Hex Screw M10 x 100

2

C

Button Head Hex Screw M10 x 75

2

D

Button Head Hex Screw M8 X 20

4

E

Flat Washer M8

10

F

Button Head Hex Screw M10 x 25

3

G

Lock Nut M10

4

H

Flat Washer M10

11

I

End Cap 3/4”

2

Hardware

Included


5mm

6mm

17mm

Not Included

Utility knife or scissors to cut nylon ties

Tools

A

B

C

D

E

F

G

H

I

7

Содержание SelectTech 4.1

Страница 1: ...Assembly Manual Manual en Espa ol Latino Americano http www bowflex com SelectTech 4 1 Bench...

Страница 2: ...record the following information Serial Number ________________________________ Date of Purchase ____________________ To register your product warranty go to www bowflex com register Or call 1 800 605...

Страница 3: ...given Incorrect assembly can lead to injury Do not try to change the design or functionality of this equipment This could compromise the safety of this equipment and will void the warranty If replace...

Страница 4: ...arts Do not put fingers or other objects into moving parts of the exercise equipment Always wear rubber soled athletic shoes when you use this equipment Do not use the equipment with bare feet or only...

Страница 5: ...hes turntheboltsandnutstotheright clockwise totighten andthe left counterclockwise toloosen unlessinstructedotherwise 4 Whenattaching2pieces carefullyliftandlookthroughtheboltholestohelpinserttheboltt...

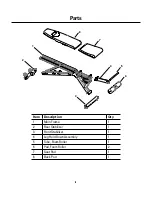
Страница 6: ...Parts Item Description Qty 1 Main Frame 1 2 Rear Stabilizer 1 3 Front Stabilizer 1 4 Leg Hold Down Assembly 1 5 Tube Foam Roller 1 6 Pad Foam Roller 2 7 Seat Pad 1 8 Back Pad 1 1 2 3 4 5 6 7 8 6...

Страница 7: ...C Button Head Hex Screw M10 x 75 2 D Button Head Hex Screw M8 X 20 4 E Flat Washer M8 10 F Button Head Hex Screw M10 x 25 3 G Lock Nut M10 4 H Flat Washer M10 11 I End Cap 3 4 2 Hardware Included 5mm...

Страница 8: ...Assembly Step 1 Attach Front and Rear Stabilizers 2 1 3 H C F G H H X3 6 mm X2 6 mm X2 8...

Страница 9: ...Assembly Step 2 Attach Seat Pad to Main Frame 7 D E 5 mm X4 9...

Страница 10: ...Assembly Step 3 Attach Back Pad to Main Frame 8 E A X6 5 mm 10...

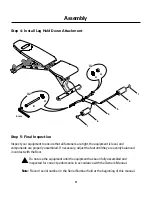
Страница 11: ...ipment is level and components are properly assembled If necessary adjust the feet until they are evenly balanced in contact with the floor Do not use the equipment until the equipment has been fully...

Страница 12: ...Correctly adjust and safely engage all Positional Adjustment Devices Keep your body weight centered on the bench while exercising Bench Positions Flat 30 45 90 Decline with Seat raised 12...

Страница 13: ...ine The Owner s Manual for each dumbbell model describes the variety of exercises available to enhance your workout routine Dumbbell stands for the SelectTech dumbbells are also available separately T...

Страница 14: ...r the equipment removed from service until the repair is made Only manufacturer supplied components can be used to maintain and repair the equipment Maintenance Warranty Who Is Covered This warranty i...

Страница 15: ...epair or inspection at your expense Standard ground shipping of any warranty replacement parts will be paid by Nautilus Inc For products purchased from a retailer you may be asked to contact your reta...

Страница 16: ...Nautilus Bowflex Schwinn Fitness Universal 8001601 020413 B EN...

Отзывы: