


Advanced Options
⇒
Setup Flash Mode
⇒
Multi Trigger
The multi trigger mode allows the pack to fire a multiple number of times following a single
trigger signal. The number of times the pack will fire can be set in the range 2 – 50. In
addition, the time between firing may also be set between 0.1 and 9.9 seconds.
Note that the user must ensure that the pack will recharge within the time specified as
otherwise it will not be READY and hence will not fire as expected.
Selection and adjustment is performed using the
⇑⇓
to scroll,
⇒
to select. The > character
changes to * when an item is ready to change.
Advanced Options
⇒
Reset Job Counter
The QuadX pack has two flash counters. The total flash counter, which can not be modified
by the user and the job counter. Both counters increment on every attempted flash.
The job counter may be used to record the number of flashes over a particular period by
resetting it’s value to zero before a session and then reading the value after the session.
To view the Job Counter select :
Advanced Options
⇒
Reset Job Counter
To reset the job counter press
⇓
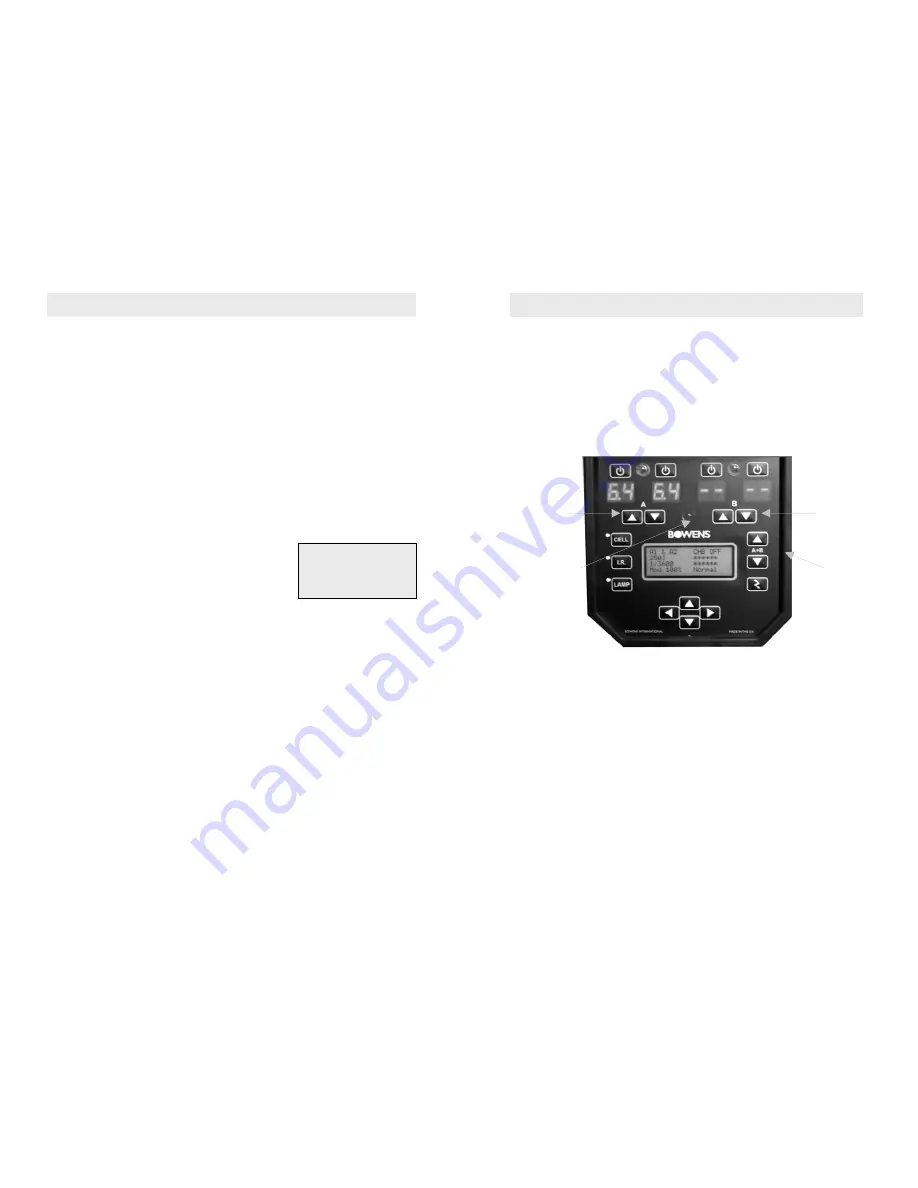
The QuadX displays information about the power available at each socket by means of 4
RED numeric displays. In addition, this information is converted to Ws data and shown on
the LCD.
Each red numeric display is aligned with an associated outlet socket. Most of the QuadX
controls are aligned with the associated socket.
Looking at the sloping control panel area, from the handle there are 4 On/Off toggle
switches. These switch the sockets On or Off
if
a socket is fitted.
The red numeric display will show
- -
when Off and will be blank if there is no socket fitted
.
Beneath the red displays are two pairs of adjustment buttons. These control the power
available from the channel socket pairs A1/A2 and B1/B2.
To the left, there are three toggle controls to switch the photocell, I.R remote and modelling
On or Off.
To the right, there are two adjustment buttons to simultaneously raise or lower the power
from channels A & B, keeping them in ratio. Beneath these buttons is the Open Flash test
button.
Beneath the LCD are 4 menu navigation buttons.
HINT : Remember QuadX always displays the relative power for each socket,
automatically adjusting the levels as sockets are turned On or Off
.
QuadX 3000 Control Guide
Channel A
Adjust
Channel B
Adjust
Channel
A/ B Adjust
READY
LIGHT
7.0
Advanced Options Menu
FLASH COUNTER MENU
Press Down to Reset
Job Counter 000006
Pack Total 000010


