
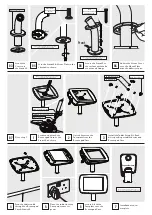

Locate & lock the
Faceplate onto the
Bouncepad Case.
6
Secure the Static60 to
the surface with the 4x
countersunk fixings.
B5
Join the Static60 & Mount Plate in the
orientation shown.
B3
Locate the
Cover onto
the Static60.
B4
Mount Plate Cover
Locate and attach the
Bouncepad Case to the
Static60 as shown.
1
M4 Split Washer
Case Washer
M4x20mm Buttonhead screw
Adhere the Mount Cover
onto the Mount Plate
with the adhesive tabs.
Go to step 1.
B6
B7
Front
Front
Install the Tablet Setup Kit. Each
kit is specific per tablet device and
Bouncepad Case.
3
1x Cable Clip
4x Tablet Supports
4x Corner Pieces
Feed the tablet cable
through the Bouncepad
Case & Static60.
4
Place the tablet into the
Case and connect to
power.
5
Tighten screw(s) using hand tools, using electric
tools may damage your Bouncepad.
Tighten screw(s) using hand tools, using electric
tools may damage your Bouncepad.
Tighten screw(s) using hand tools, using electric
tools may damage your Bouncepad.
M4x10mm
Countersunk
Screw
No.8
Countersunk, Self
tapping Screw
Unlock & remove the
Faceplate from the
Bouncepad Case.
2
7
Installation is now
complete.
*We recommend recording the key number so
you can purchase additional keys in the future.
Key number here
T20 Pin Torx Driver Bit