background image

-28-

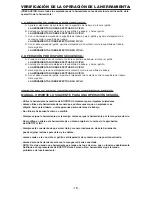
VÉRIFICATION DU SYSTÈME DE DÉCLENCHEMENT :

ATTENTION : retirer toutes les attaches de fixation de l’outil avant de procéder à une vérification du 

fonctionnement de celui-ci.

1. SYSTÈME DE SÉCURITÉ À LA VOLÉE :

A. Enfoncer l’élément palpeur sur la surface de travail sans actionner la détente.

  L’APPAREIL NE DOIT PAS SE DÉCLENCHER 
B.
 Éloigner l’appareil de la surface de travail et appuyer sur la détente.

  L’APPAREIL NE DOIT PAS SE DÉCLENCHER 
C.
 Éloigner l’appareil de la surface de travail et appuyer sur la détente. Presser l’élément palpeur 

  sur la surface de travail. 

  L’APPAREIL DOIT SE DÉCLENCHER 
D.
 Sans actionner la détente, appuyer l’élément palpeur sur la surface de travail, puis appuyer 

  sur la détente. 

  L’APPAREIL DOIT SE DÉCLENCHER 

2. SYSTÈME DE SÉCURITÉ AU COUP-PAR-COUP :

A. Appuyer l’élément palpeur sur la surface de travail sans actionner la détente.
  L’APPAREIL NE DOIT PAS SE DÉCLENCHER 
B.
 Éloigner l’appareil de la surface de travail et actionner la détente.
  L’APPAREIL NE DOIT PAS SE DÉCLENCHER  
  
Relâcher la détente; elle doit revenir à sa position initiale.
C. Appuyer sur la détente, et appuyer l’élément palpeur sur la surface de travail.  
  L’APPAREIL NE DOIT PAS SE DÉCLENCHER  
D.
 Détente libre, appuyer l’élément palpeur sur la surface de travail.  Actionner la détente. 
  L’APPAREIL DOIT SE DÉCLENCHER 

EN SUPPLÉMENT DES AUTRES AVERTISSEMENTS CONTENUS DANS CE 

MANUEL, OBSERVEZ LES RÈGLES SUIVANTES POUR OPÉRER EN TOUTE 

SÉCURITÉ

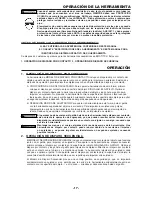
• Utiliser cet outil pneumatique BOSTITCH uniquement pour éjecter des éléments d’assemblage.
• Ne jamais utiliser l’outil de telle manière qu’un élément d’assemblage peut être dirigé vers vous-
  même ou vers d’autres personnes présentes dans la zone de travail.
• Ne pas utiliser l’outil comme un marteau
• Porter toujours l’outil par la poignée, jamais par le nez.
• Ne pas altérer ou modifier cet outil par rapport à sa forme originale sans l’agrément de BOSTITCH, INC.
• Toujours avoir présent à l’esprit qu’une manipulation ou une utilisation inadéquate de cet outil 
  peuvent causer des blessures. 
• Ne jamais attacher ou maintenir la détente en position déchenchée.
• Ne jamais laisser le cloueur connecté au tuyau d’air sans surveillance.
• Ne pas utiliser cet outil s’il n’est pas pourvu d’une ÉTIQUETTE D’AVERTISSEMENT (WARNING 
  LABEL) lisible.
• Cesser d’utiliser un outil qui perd de l’air ou ne fonctionne pas correctement. Notifier votre  
 concessionnaire BOSTITCH si votre outil continue à mal fonctionner.

Содержание IC60-1

Страница 1: ...S CONTACT YOUR BOSTITCH REPRESENTATIVE OR DISTRIBUTOR ANTES DE OPERAR ESTA HERRAMIENTA TODOS LOS OPERADORES DEBERÁN ESTUDIAR ESTE MANUAL PARA PODER COMPRENDER Y SEGUIR LAS ADVERTENCIAS SOBRE SEGURIDAD Y LAS INSTRUCCIONES MANTENGA ESTAS INSTRUCCIONES CON LA HERRAMIENTA PARA FUTURA REFERENCIA SI TIENE ALGUNA DUDA COMUNÍQUESE CON SU REPRESENTANTE DE BOSTITCH O CON SU DISTRIBUIDOR LIRE ATTENTIVEMENT L...

Страница 2: ...es and accessories LIMITED WARRANTY BOSTITCH Fastening Systems BOSTITCH warrants to the original retail purchaser that this product is free from defects in material and workmanship and agrees to repair or replace at BOSTITCH s option any defective product within 1 year from the date of purchase This warranty is not transferable It only covers damage resulting from defects in material or workmanshi...

Страница 3: ...jury Do not pull trigger or depress contact arm while connected to the air supply as the tool may cycle possibly causing injury Always disconnect air supply 1 Before making adjustments 2 When servicing the tool 3 When clearing a jam 4 When tool is not in use 5 When moving to a different work area as accidental actuation may occur possibly causing injury LOADING TOOL When loading tool 1 Never place...

Страница 4: ...trip mechanism while keeping the trigger pulled thus driving a fastener each time the work is contacted This will allow rapid fastener placement on many jobs such as sheathing decking and pallet assembly All pneumatic tools are subject to recoil when driving fasteners The tool may bounce releasing the trip and if unintentionally allowed to recontact the work surface with the trigger still actuated...

Страница 5: ...s of wear in pneumatic tools A filter will help to get the best performance and minimum wear from the tool The filter must have adequate flow capacity for the specific installation The filter has to be kept clean to be effective in providing clean compressed air to the tool Consult the manufacturer s instructions on proper maintenance of your filter A dirty and clogged filter will cause a pressure...

Страница 6: ...in the slot on the nose Note The canister is adjusted correctly for 1 1 2 nails when 1 3 4 45 appears in the window of the canister bottom NOTE Use only nails recommended by BOSTITCH for use in BOSTITCH IC60 Series nailers or nails which meet BOSTITCH specifications Canister bracket Window Canister bottom IN 1 3 4 2 2 1 4 2 1 2 2 3 4 3 3 1 4 MM 45 50 57 65 70 75 83 LOADING THE IC60 1 EYE PROTECTIO...

Страница 7: ...ct trip until the nose touches the work surface and then pull the trigger to drive a fastener Do not press the tool against the work with extra force Instead allow the tool to recoil off the work surface to avoid a second unwanted fastener Remove your finger from the trigger after each operation B RAPID FASTENER OPERATION To operate the tool in this manner hold the tool with the contact trip point...

Страница 8: ...TOOL MUST NOT CYCLE D With finger off the trigger press the contact trip against the work surface Pull the trigger THE TOOL MUST CYCLE IN ADDITION TO THE OTHER WARNINGS CONTAINED IN THIS MANUAL OBSERVE THE FOLLOWING FOR SAFE OPERATION Use the BOSTITCH pneumatic tool only for the purpose for which it was designed Never use this tool in a manner that could cause a fastener to be directed toward the ...

Страница 9: ...OR SEALS When repairing a tool make sure the internal parts are clean and lubricated Use Parker O LUBE or equivalent on all O rings Coat each O ring with O LUBE before assembling Use a small amount of oil on all moving surfaces and pivots After reassembly add a few drops of BOSTITCH Air Tool Lubricant through the air line fitting before testing AIR SUPPLY PRESSURE AND VOLUME Air volume is as impor...

Страница 10: ...ect socket and plug Replace quick disconnect fittings Worn piston O ring Replace O ring check driver Tool dry lacks lubrication Use BOSTITCH Air Tool Lubricant Damaged pusher spring Replace spring Low air pressure Check air supply system to tool Loose magazine nose screws Tighten all screws Fasteners too short for tool Use only recommended fasteners Bent fasteners Discontinue using these fasteners...

Страница 11: ...the driving end several redressings will be possible before this maximum depth is reached DIRECTIONAL EXHAUST DEFLECTOR Loosen screw as shown Adjust to desired exhaust direction and tighten screw ACCESSORIES AVAILABLE BC602 1 pint BOSTITCH Air Tool Lubricant BC603 1 pint BOSTITCH Winter Formula Air Tool Lubricant BC604 1 quart BOSTITCH Air Tool Lubricant 100679 O Ring lube 1 lb can 9R195381 Assemb...

Страница 12: ...tablecidos para clavos grapas y accesorios auténticos de BOSTITCH GARANTÍA LIMITADA BOSTITCH Fastening Systems BOSTITCH garantiza al comprador minorista original que este producto está libre de defectos en el material y la mano de obra y acuerda reparar o reemplazar a opción de BOSTITCH todo producto defectuoso en el plazo máximo de 1 año de la fecha de compra Esta garantía no es transferible Cubr...

Страница 13: ...ramienta esté conectada al suministro de aire ya que la herramienta puede ciclarse posiblemente causando lesiones Siempre desconecte el suministro de aire 1 Antes de efectuar ajustes 2 Al hacerle servicio a la herramienta 3 Al despejar un atascamiento 4 Cuando la herramienta no esté en uso 5 Al mudarse de un área distinta de trabajo ya que se puede activar accidentalmente posiblemente causando les...

Страница 14: ...IE DE HERRAMIENTAS DISPARO POR CONTACTO El procedimiento de operación común para las herramientas de Disparo por Contacto es que el operador hace contacto con el objeto a ser clavado para activar el mecanismo de disparo manteniendo halado el gatillo Esto permite la rápida colocación de sujetadores en muchos trabajos tales como entablado pisos y el ensamble de paletas Todas las herramientas neumáti...

Страница 15: ... Un filtro puede ayudar a obtener el mejor rendimiento y el desgaste mínimo de la herramienta El filtro debe tener una capacidad de flujo adecuada para la instalación en particular El filtro debe ser mantenido limpio para que sea eficaz en proveer aire comprimido limpio a la herramienta Consulte las instrucciones del fabricante para el debido mantenimiento de su filtro Un filtro sucio y atascado c...

Страница 16: ...nister bottom Canister cover Canister latch Feed pawl Door Canister bracket Canister bottom Canister cover Canister latch Feed pawl Door Canister bracket Canister bottom Canister cover Canister latch Feed pawl Door Tapa del cargador Pestillo del cargador Soporte del cargador Parte inferior del cargador Puerta Trinquete de alimentación Canister bracket Window Canister bottom IN 1 3 4 2 2 1 4 2 1 2 ...

Страница 17: ... superficie del objeto a clavar usando fuerza extra En vez de eso permita que la herramienta recule de la superficie del objeto para evitar un segundo sujetador indeseado Quite el dedo del gatillo después de cada operación B OPERACIÓN RÁPIDA DE SUJETADOR Para operar la herramienta de esta forma hale el gatillo con la herramienta separada del objeto a ser clavado Para impulsar los sujetadores golpe...

Страница 18: ...ador de contacto contra la superficie de trabajo LA HERRAMIENTA NO DEBE EFECTUAR SU CICLO D Con el dedo alejado del gatillo presione el disparador de contacto contra la superficie de trabajo Hale el gatillo LA HERRAMIENTA SÍ DEBE EFECTUAR SU CICLO ADEMÁS DE LAS OTRAS ADVERTENCIAS CONTENIDAS EN ESTE MANUAL OBSERVE LO SIGUIENTE PARA UNA OPERACIÓN SEGURA Utilice la herramienta neumática de BOSTITCH ú...

Страница 19: ...bricadas Utilice Parker O LUBE o su equivalente en todos los anillos en O Cubra cada anillo en O con O LUBE antes de ensamblar Utilice una cantidad pequeña de aceite en todas las superficies y pivotes móviles Después del rearmado añada unas cuantas gotas del Lubricante para Herramientas Neumáticas de BOSTITCH mediante la conexión de la línea de aire antes de probar la herramienta PRESIÓN Y VOLUMEN...

Страница 20: ...de desconectado rápido Anillo en O de pistón desgastado Reemplazar el anillo en O verificar el impulsor Herramienta seca necesita lubricación Utilice el Lubricante para Herramientas Neumáticas de BOSTITCH Resorte de empuje dañado Reemplazar el resorte Baja presión de aire Verifique el sistema de suministro de aire a la herramienta Tornillos flojos en la nariz del cargador Apriete todos los tornill...

Страница 21: ...rar la punta de impulsión es posible que sea necesario efectuar varias rectificaciones hasta que se logre la profundidad máxima DEFLECTOR DE ESCAPE DIRECCIONAL Afloje el tornillo según se muestra Ajuste a la dirección de escape deseada y apriete el tornillo 3 8 9 5mm maximum limit of driver recessed into piston Do not exceed this limit NOTE WHEN DRESSING IS REQUIRED USE 015 025 x 45 CHAMFER 38 64m...

Страница 22: ...les accessoires agrafes et clous garantis d origine BOSTITCH GARANTIE LIMITÉE BOSTITCH Fastening Systems BOSTITCH garantit à l acheteur d origine de ce produit qu il ne comporte aucun défaut de matériau ou de fabrication et s engage à réparer ou à remplacer tout produit défectueux selon sa discrétion jusqu à un 1 an suivant la date d achat Cette garantie n est pas transférable Elle couvre uniqueme...

Страница 23: ...anisme de contact tant que l outil est connecté à la source d air car celui ci peut se déclencher et donc provoquer des blessures Toujours désaccoupler l appareil de sa source d énergie 1 avant tout réglage 2 lors de l entretien 3 lors d un désenrayage 4 à la fin de l utilisation 5 lors du déplacement vers une nouvelle zone de travail car un déclenchement accidentel peut se produire et causer des ...

Страница 24: ...l opérateur à placer le nez de l appareil sur la surface de travail pour activer l élément palpeur tout en appuyant sur la détente enfonçant ainsi un élément d assemblage chaque fois que la surface de travail entre en contact avec le palpeur Cette méthode permet un travail de fixation rapide pour beaucoup de travaux tels que pose de revêtements et fabrication de plate formes et de palettes Tous le...

Страница 25: ...eur rendement et une usure minimale du pistolet Le filtre devra avoir une capacité de filtrage adéquate au volume d air consommé par l appareil Le filtre doit être propre pour alimenter le pistolet en air comprimé propre Consulter les instructions du fabricant concernant l entretien du filtre Un filtre sale ou bouché peut provoquer des baisses de pression et par voie de conséquence une diminution ...

Страница 26: ...bracket Canister bottom Canister cover Canister latch Feed pawl Door Canister bracket Canister bottom Canister cover Canister latch Feed pawl Door Canister bracket Canister bottom Canister cover Canister latch Feed pawl Door Couvercle Loquet du boîtier Socle du boîtier Support du boîtier Porte Cliquet d alimentation Canister bracket Window Canister bottom IN 1 3 4 2 2 1 4 2 1 2 2 3 4 3 3 1 4 MM 45...

Страница 27: ...d assemblage Ne pas presser trop fort l outil sur la surface Laisser l outil reculer de la surface de travail pour éviter l éjection d un second élément indésiré Retirer votre doigt de la détente après chaque opération B ASSEMBLAGE RAPIDE pour utiliser l outil de cette manière maintenir le palpeur de l outil dirigé vers la surface de travail mais sans la toucher Appuyer sur la détente puis appuyer...

Страница 28: ...nt palpeur sur la surface de travail L APPAREIL NE DOIT PAS SE DÉCLENCHER D Détente libre appuyer l élément palpeur sur la surface de travail Actionner la détente L APPAREIL DOIT SE DÉCLENCHER EN SUPPLÉMENT DES AUTRES AVERTISSEMENTS CONTENUS DANS CE MANUEL OBSERVEZ LES RÈGLES SUIVANTES POUR OPÉRER EN TOUTE SÉCURITÉ Utiliser cet outil pneumatique BOSTITCH uniquement pour éjecter des éléments d asse...

Страница 29: ...tions vérifier que les pièces internes sont propres et bien lubrifiées Appliquer du lubrifiant O LUBE de Parker sur tous les joints toriques avant de procéder à l assemblage Appliquer une fine pellicule de O LUBE sur toutes les pièces mobiles et pivots Les opérations de remontage terminées veiller à mettre quelques gouttes de lubrifiant pour outils pneumatiques BOSTITCH dans le circuit d air avant...

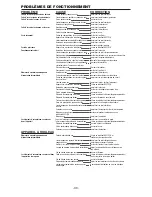
Страница 30: ...placer le joint vérifier l enfonceur Appareil sec absence de lubrification Utiliser un lubrifiant BOSTITCH Ressort du poussoir endommagé Remplacer le ressort Pression d air trop faible Vérifier le circuit régler la pression d air Vis du magasin desserrées Resserrer les vis Éléments d assemblage trop courts Utiliser les éléments d assemblage recommandés Éléments d assemblage tordus Cesser l utilisa...

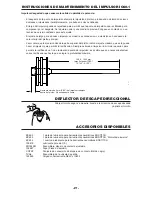
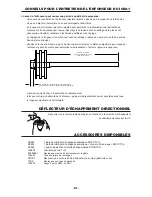
Страница 31: ...rémité de l enfonceur plusieurs redressements seront possibles avant que la longueur maximale ne soit atteinte DÉFLECTEUR D ÉCHAPPEMENT DIRECTIONNEL Desserrer la vis comme indiqué Régler en fonction de la direction d échappement souhaitée puis resserrer la vis 3 8 9 5mm maximum limit of driver recessed into piston Do not exceed this limit NOTE WHEN DRESSING IS REQUIRED USE 015 025 x 45 CHAMFER 38 ...

Страница 32: ......

Отзывы: