background image

5

SAfeTy WARNINGS SPecIfIc foR GRINdING ANd 

ABRASIve cuTTING-off oPeRATIoNS 

a) use only wheel types that are recommended for your power tool and the  

specific guard designed for the selected wheel. Wheels for which the power 

tool was not designed cannot be adequately guarded and are unsafe.

b) The guard must be securely attached to the power tool and positioned for 

maximum safety, so the least amount of wheel is exposed towards the  

operator. The guard helps to protect operator from broken wheel fragments and 

accidental contact with wheel. 

c) Wheels must be used only for recommended applications. for example: do 

not grind with the side of cut-off wheel. Abrasive cut-off wheels are intended for 

peripheral grinding, side forces applied to these wheels may cause them to shatter.

d) Always use undamaged wheel flanges that are of correct size and shape for your 

selected wheel. Proper wheel flanges support the wheel thus reducing the possibility of 

wheel breakage. Flanges for cut-off wheels may be different from grinding wheel flanges. 

e) do not use worn down wheels from larger power tools. Wheel intended for  

larger power tool is not suitable for the higher speed of a smaller tool and may burst.

AddITIoNAl SAfeTy WARNINGS SPecIfIc foR ABRASIve 

cuTTING-off oPeRATIoN

a) do not “jam” the cut-off wheel or apply excessive pressure. do not attempt 

to make an excessive depth of cut. Over stressing the wheel increases the 

loading and susceptibility to twisting or binding of the wheel in the cut and the 

possibility of kickback or wheel breakage.

b) do not position your body in line with and behind the rotating wheel. When 

the wheel, at the point of operation, is moving away from your body, the possible 

kickback may propel the spinning wheel and the power tool directly at you.

c) When wheel is binding or when interrupting a cut for any reason, switch off 

the power tool and hold the power tool motionless until the wheel comes 

to a complete stop. Never attempt to remove the cut-off wheel from the cut 

while the wheel is in motion otherwise kickback may occur. Investigate and 

take corrective action to eliminate the cause of wheel binding.

d) do not restart the cutting operation in the workpiece. let the wheel reach 

full speed and carefully reenter the cut. The wheel may bind, walk up or 

kickback if the power tool is restarted in the workpiece.

e) Support panels or any oversized workpiece to minimize the risk of wheel 

pinching and kickback. Large workpieces tend to sag under their own weight. 

Supports must be placed under the workpiece near the line of cut and near the 

edge of the workpiece on both sides of the wheel.

f)  use extra caution when making a “pocket cut” into existing walls or other 

blind areas. The protruding wheel may cut gas or water pipes, electrical wiring or 

objects that can cause kickback.

SAfeTy WARNINGS SPecIfIc foR SANdING oPeRATIoNS

a) do not use excessively oversized sanding disc paper. follow manufacturers 

recommendations, when selecting sanding paper. Larger sanding paper 

extending beyond the sanding pad presents a laceration hazard and may cause 

snagging, tearing of the disc or kickback.

SAfeTy WARNINGS SPecIfIc foR WIRe BRuShING oPeRATIoNS

a) Be aware that wire bristles are thrown by the brush even during ordinary 

operation. do not overstress the wires by applying excessive load to the 

brush. The wire bristles can easily penetrate light clothing and/or skin.

b) If the use of a guard is recommended for wire brushing, do not allow any 

interference of the wire wheel or brush with the guard. Wire wheel or brush 

may expand in diameter due to work and centrifugal forces.

c) Safety Glasses: Safety Goggles or safety glasses with side shields and a full face 

shield compliant with ANSI Z87.1 must be worn by the operator and others that 

are within 50 feet of the use of this product.

AddITIoNAl SAfeTy INfoRMATIoN

•  Do not use Type 1 flat abrasive or diamond wheels without proper Type 1 guard. 

WARNING

:  AlWAyS use safety glasses. Everyday eyeglasses are NOT safety glasses. Also 

Содержание BTE820

Страница 1: ... DE SERVICIO Y PÓLIZA DE GARANTÍA ADVERTENCIA LÉASE ESTE INSTRUCTIVO ANTES DE USAR EL PRODUCTO BTE820 www BOSTITCH com 7A 4 1 2 inch 114mm angle grinder cut off tool Meuleuse d angle outil coupant de 114 mm 4 1 2 po et de 7 A Esmeriladora angular cortar herramienta de 7 mperios y 114 mm 4 1 2 pulg ...

Страница 2: ... is unavoidable use a ground fault circuit interrupter GFCI protected supply Use of a GFCI reduces the risk of electric shock 3 Personal safety a Stay alert watch what you are doing and use common sense when operating a power tool Do not use a power tool while you are tired or under the influence of drugs alcohol or medication A moment of inattention while operating power tools may result in serio...

Страница 3: ...UCTIONS FOR ALL OPERATIONS Safety WARNINGs Common for Grinding Sanding Wire Brushing or Abrasive Cutting Off Operations a This power tool is intended to function as a grinder wire brush sander or cut off tool Read all safety warning instructions illustrations and specifications provided with this power tool Failure to follow all instructions listed below may result in electric shock fire and or se...

Страница 4: ...n starting the tool with a new or replacement wheel or a new or replacement wire brush installed hold the tool in a well protected area and let it run for one minute If the wheel has an undetected crack or flaw it should burst in less than one minute If the wire brush has loose wires they will be detected Never start the tool with a person in line with the wheel This includes the operator Further ...

Страница 5: ...s until the wheel comes to a complete stop Never attempt to remove the cut off wheel from the cut while the wheel is in motion otherwise kickback may occur Investigate and take corrective action to eliminate the cause of wheel binding d Do not restart the cutting operation in the workpiece Let the wheel reach full speed and carefully reenter the cut The wheel may bind walk up or kickback if the po...

Страница 6: ...SI S12 6 S3 19 during use Under some conditions and duration of use noise from this product may contribute to hearing loss WARNING Always use eye protection All users and bystanders must wear eye protection that conforms to ANSI Z87 1 WARNING When not in use place grinder on a stable surface where it will not move inadvertently roll or cause a tripping or falling hazard CAUTION To reduce the risk ...

Страница 7: ...g Guard Figures B C CAUTION Guards must be used with all grinding wheels sanding flap discs wire brushes cut off wheels and wire wheels The tool may be used without a guard only when sanding with conventional sanding discs The BTE820 is provided with a guard intended for use with depressed center wheels Type 27 and hubbed grinding wheels Type 27 The same guard is designed for use with sanding flap...

Страница 8: ... the guard Note Edge grinding and cutting can be performed with Type 27 wheels designed and specified for this purpose 1 4 inch 6mm thick wheels are designed for surface grinding while 1 8 inch 3mm wheels are designed for edge grinding Cutting can also be performed by using a Type 1 wheel and a Type 1 guard OPERATION SWITCHes CAUTION Hold the auxiliary handle and body of the tool firmly to maintai...

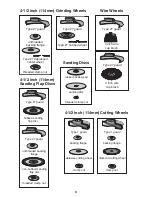
Страница 9: ...Sanding Discs Wire Wheels 3 inch wire cup brush Type 27 guard Type 27 guard 4 inch wire cup brush 4 1 2 inch 114mm Sanding Flap Discs hubbed sanding flap disc unthreaded backing flange non hubbed sanding flap disc threaded clamp nut Type 27 guard Type 27 guard 4 1 2 inch 114mm Cutting Wheels Type 1 guard backing flange abrasive cutting wheel clamp nut Type 1 guard backing flange diamond cutting wh...

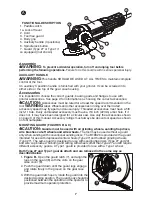
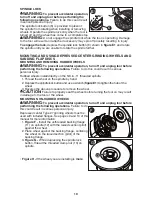
Страница 10: ... to do this could result in serious personal injury Hubbed wheels install directly on the 5 8 in 11 threaded spindle 1 Thread the wheel on the spindle by hand 2 Depress the spindle lock button and use a wrench figure E1 to tighten the hub of the wheel 3 Reverse the above procedure to remove the wheel CAUTION Failure to properly seat the wheel before turning the tool on may result in damage to the ...

Страница 11: ...laying it down Edge Grinding with grinding Wheels CAUTION Wheels used for edge grinding may break or kick back if they bend or twist while the tool is being used to do cut off work To reduce the risk of serious injury limit the use of these wheels with a standard Type 27 guard to shallow cutting and notching less than 1 2 inch 13mm in depth The open side of the guard must be positioned away from t...

Страница 12: ...pressing the spindle lock button Using Sanding Backing pads Choose the proper grit sanding discs for your application Sanding discs are available in various grits Coarse grits yield faster material removal rates and a rougher finish Finer grits yield slower material removal and a smoother finish Begin with coarse grit discs for fast rough material removal Move to a medium grit paper and finish wit...

Страница 13: ...ick up procedures During clean up children and pregnant women should be kept away from the immediate work area 3 All toys washable furniture and utensils used by children should be washed thoroughly before being used again Mounting and Using Wire Brushes and Wire Wheels Wire cup brushes or wire wheels screw directly on the grinder spindle without the use of flanges Use only wire brushes or wheels ...

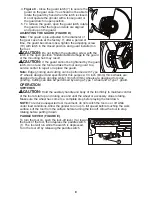
Страница 14: ... gear case hub 3 With the guard latch open rotate the guard into the desired working position The guard body should be positioned between the spindle and the operator to provide maximum operator protection 4 Figure C Close the guard latch 7 to secure the guard on the gear case You should not be able to rotate the guard by hand when the latch is closed Do not operate the grinder with a loose guard ...

Страница 15: ...T To assure product SAFETY and RELIABILITY repairs maintenance and adjustment other than those listed in this manual should be performed by authorized service centers or other qualified service personnel always using identical replacement parts Lubrication Bostitch tools are properly lubricated at the factory and are ready for use Tools should be lubricated regularly every year depending on usage ...

Страница 16: ...nue use immediately and have it serviced at a Bostitch service center or authorized servicer Circuit breaker is tripped Reset circuit breaker If the product repeatedly causes the circuit breaker to trip discontinue use immediately and have it serviced at a Bostitch service center or authorized servicer Cord or switch is damaged Have cord or switch replaced at a Bostitch Service Center or Authorize...

Страница 17: ...es not apply to products sold in Latin America For products sold in Latin America see country specific warranty information contained in the packaging call the local company or see website for warranty information To register your tool for warranty service visit our website at www bostitch com WARNING LABEL REPLACEMENT If your warning labels become illegible or are missing call 800 262 2161 for a ...

Страница 18: ...mation DANGER Indique une situation dangereuse imminente qui si elle n est pas évitée causera la mort ou des graves blessures AVERTISSEMENT Indique une situation potentiellement dangereuse qui si elle n est pas évitée pourrait causer la mort ou de graves blessures MISE EN GARDE Indique une situation potentiellement dangereuse qui si elle n est pas évitée pourrait causer des blessures mineures ou m...

Страница 19: ...ation d un outil électrique à l extérieur se servir d une rallonge convenant à une telle utilisation L utilisation d une rallonge conçue pour l extérieur réduit les risques de choc électrique f S il est impossible d éviter l utilisation d un outil électrique dans un endroit humide brancher l outil dans une prise ou sur un circuit d alimentation dotés d un disjoncteur de fuite à la terre GFCI L uti...

Страница 20: ...réparateur professionnel en n utilisant que des pièces de rechange identiques Cela permettra de maintenir une utilisation sécuritaire de l outil électrique CONSIGNES DE SÉCURITÉ POUR TOUTES LES OPÉRATIONS Avertissements de sécurité communs aux opérations de meulage de ponçage de brossage à l aide d une brosse métallique ou de coupe à la tronçonneuse a Cet outil électrique est conçu pour fonctionne...

Страница 21: ...essoire en mouvement risquerait de mordre dans la surface et de projeter l outil électrique l Mettre l outil hors tension pour tout déplacement de celui ci par l utilisateur Un contact accidentel avec l accessoire en mouvement pourrait happer les vêtements de l opérateur et projeter l accessoire contre son corps m Nettoyer régulièrement les évents de l outil électrique Le ventilateur du moteur asp...

Страница 22: ...ur la meule sélectionnée Il est impossible de bien protéger l opérateur lors de l utilisation de meules non conçues pour l outil En effet le capot protecteur sera alors inadéquat et l utilisation de la meule dangereuse b Il faut fixer solidement le capot protecteur à l outil électrique et le positionner pour maximiser la sécurité de l opérateur soit en minimisant la surface exposée de la meule en ...

Страница 23: ...avec la brosse métallique s assurer qu il n interfère pas avec la rotation de la brosse métallique à touret ou de la brosse métallique En cours de travail et sous la force centrifuge le diamètre de la brosse métallique à touret ou de la brosse métallique s accroît c Des lunettes de sécurité lunettes de sécurité ou des lunettes de sécurité avec écrans latéraux et un visage plein de bouclier conform...

Страница 24: ...ule ou d un autre accessoire sur une surface indirecte ou un rebord pourrait provoquer un mouvement brusque et soudain de l outil symboles L étiquette apposée sur votre outil pourrait comprendre les symboles suivants Les symboles et leurs définitions sont indiqués ci après V volts A volts A ampères Hz hertz W watts min minutes courant alternatif courant continue no régime nominal Construction de c...

Страница 25: ... se peut que l accessoire ait été conçu pour une utilisation avec une scie circulaire Utiliser uniquement les accessoires illustrés à la page 27 du présent mode d emploi Le régime nominal des accessoires doit toujours se situer au dessus de la vitesse de l outil tel que l indique la plaque signalétique de l outil ASSEMBLAGE DU PARE MAIN FIGURES B ET C MISE EN GARDE Il est impératif d utiliser le p...

Страница 26: ...le pratique pourrait endommager le capot protecteur ou le moyeu de montage de façon imperceptible MISE EN GARDE s il est impossible de resserrer le capot protecteur à l aide de son verrou ne pas utiliser l outil Rapporter l outil et le capot à un centre de réparation pour réparer ou remplacer le capot protecteur Remarque Le débordage et le tronçonnage peuvent s effectuer à l aide de meules de type...

Страница 27: ...t protecteur pour meule de type 27 Capot protecteur pour meule de type 27 Brosse forme coupelle de 101 6 mm 4 po Disques de ponçage à lamelles de 114 mm 4 1 2 po Disque de ponçage à lamelles avec moyeu intégré Bride tournante sur collet battu non filetée Disque de ponçage à lamelles sans moyeu Écrou de serrage fileté Capot protecteur pour meule de type 27 Capot protecteur pour meule de type 27 Dis...

Страница 28: ...antes Le non respect de cette directive risque d entraîner des blessures corporelles graves Les meules à moyeu intégré s installent directement sur la broche filetée à 11 filets de 16 mm 5 8 po de diamètre 1 Visser à la main la meule sur la broche 2 Enfoncer le bouton de verrouillage de la broche et utiliser une clé à ouverture fixe figure E1 pour serrer le moyeu de la meule 3 Pour retirer la meul...

Страница 29: ...raves limiter l utilisation de ces meules avec un pare main standard de type 27 à la coupe et à l entaillage superficiels profondeur inférieure à 13 mm 1 2 po La face ouverte du pare main doit être tournée du côté opposé à l opérateur Pour un tronçonnage plus profond avec une meule tronçonneuse de type 1 utiliser un pare main fermé de type 1 Consulter la page 27 pour obtenir de plus amples renseig...

Страница 30: ...uter Les disques de ponçage sont offerts en plusieurs grains Un grain grossier enlève la matière plus rapidement et permet un premier dégrossissage Un grain fin enlève la matière plus lentement et produit un fini plus régulier Commencer le travail avec un grain grossier pour un dégrossissage rapide Puis utiliser un papier abrasif à grain moyen puis à grain fin pour optimiser la finition Grain gros...

Страница 31: ...d enlèvement Il faut les placer dans des récipients à rebut étanches et les éliminer par la collecte des ordures ménagères Pendant le nettoyage les enfants et les femmes enceintes doivent éviter de se trouver dans la zone immédiate de travail 3 Tous les jouets meubles lavables et les ustensiles utilisés par les enfants doivent être nettoyés à fond avant de les utiliser de nouveau Assemblage et uti...

Страница 32: ...e main fermé à deux faces est requis lors de l utilisation de disques de coupe L utilisation d une bride et d un pare main inadéquats peut entraîner des blessures à la suite d un bris de meule ou d un contact avec celle ci Consulter la page 28 pour de plus amples renseignements ASSEMBLAGE du pare main fermé de type 1 AVERTISSEMENT Afin d éviter une fausse manœuvre éteindre et débrancher l outil av...

Страница 33: ...nage Un changement d angle pliera le disque et pourrait provoquer son bris 4 Soulever l outil de la surface de la pièce avant d arrêter le moteur Permettre l immobilisation complète de l outil avant de le déposer Entretien Nettoyage AVERTISSEMENT L entretien périodique doit comprendre le nettoyage à l air comprimé du carter du moteur pour éliminer la poussière et les particules métalliques ou abra...

Страница 34: ... à l attention de Product Service S assurer d indiquer toutes les informations figurant sur la plaque signalétique de l outil numéro du modèle type numéro de série etc 34 Dépannage Problème Cause possible Solution possible L appareil refuse de Cordon d alimentation Brancher l outil dans démarrer non branché une prise qui fonctionne Le fusible du circuit est grillé Remplacer le fusible du circuit S...

Страница 35: ...tion responsable de la conformité peut faire annuler le droit de lʼutilisateur dʼutiliser ce matériel Cet appareil numérique de la classe B est conforme à la norme NMB 003 du Canada GARANTIE LIMITÉE DE TROIS ANS Bostitch réparera ou remplacera gratuitement tous les outils défectueux présentant des défauts de matériau ou de fabrication pendant trois ans à compter de la date d achat garantie de deux...

Страница 36: ...DAD y la PREVENCIÓN DE PROBLEMAS Los símbolos que siguen se utilizan para ayudarlo a reconocer esta información PELIGRO indica una situación de peligro inminente que si no se evita provocará la muerte o lesiones graves ADVERTENCIA indica una situación de peligro potencial que si no se evita provocará la muerte o lesiones graves PRECAUCIÓN indica una situación de peligro potencial que si no se evit...

Страница 37: ...enredados aumentan el riesgo de descarga eléctrica e Al operar una herramienta eléctrica en el exterior utilice un cable prolongador adecuado para tal uso Utilice un cable adecuado para uso en exteriores a fin de reducir el riesgo de descarga eléctrica f Si el uso de una herramienta eléctrica en un lugar húmedo es imposible de evitar utilice un suministro protegido con un interruptor de circuito p...

Страница 38: ...e diseñada podría originar una situación peligrosa 5 Mantenimiento a Haga que una persona de reparaciones calificada realice el mantenimiento de su herramienta eléctrica y utilice piezas de repuesto idénticas solamente Esto garantizará la seguridad de la herramienta eléctrica INSTRUCCIONES DE SEGURIDAD PARA TODAS LAS OPERACIONES Advertencias de seguridad comunes para todas las operaciones de esmer...

Страница 39: ...ado El contacto accidental con el accesorio giratorio puede hacer que éste se le enganche en la ropa y lance el accesorio hacia su cuerpo m Limpie frecuentemente los orificios de ventilación de la herramienta eléctrica El ventilador del motor atraerá el polvo dentro de la cubierta y la acumulación excesiva de polvo metálico puede producir riesgos eléctricos n No use la herramienta eléctrica cerca ...

Страница 40: ...e abrasivo están diseñados para esmerilado periférico y la aplicación de fuerzas laterales sobre éstos puede provocar que se rompan d Siempre utilice bridas de disco en buen estado con la forma y el tamaño apropiados para el disco seleccionado Las bridas de disco adecuadas brindan soporte al disco además de reducir la posibilidad de que el disco se rompa Las bridas de los discos de corte pueden se...

Страница 41: ...ades de la construcción contiene productos químicos reconocidos por el Estado de California como causantes de cáncer defectos de nacimiento u otros problemas reproductivos Algunos de estos productos químicos son el plomo de las pinturas de base plomo la sílice cristalina de ladrillos el cemento y otros productos de mampostería y el arsénico y el cromo de la madera con tratamiento químico El riesgo...

Страница 42: ... cable y el amperaje nominal En caso de duda utilice el de mayor calibre Mientras menor el número del calibre mayor la capacidad del cable Calibre mînimo para cables de extensión Volts Longitud total del cable en pies 120V 0 25 26 50 51 100 101 150 0 7 6m 7 6 15 2m 15 2 30 4m 30 4 45 7m Amperaje Más de No más de AWG 6 10 18 16 14 12 1 4 5 3 2 6 A 1a DESCRIPCIÓN DE LAS FUNCIONES 1 Interruptor de pa...

Страница 43: ...rte tipo 1 para su uso con todos los discos tipo 1 El esmerilado y el corte con discos distintos a los tipos 27 y 29 requieren de otros protectores accesorios Ambos protectores el tipo 27 y el tipo 1 se colocan y se retiran de la misma forma descrita a continuación 1 Figura B Abra el cerrojo del protector 7 y alinee las lengüetas del protector 8 con las ranuras de la cubierta de la caja de engrana...

Страница 44: ...Sostenga el mango lateral y el cuerpo de la herramienta con firmeza para mantener el control de la misma durante el arranque y mientras la utiliza y hasta que el disco o el accesorio deje de girar Asegúrese de que el disco se haya detenido completamente antes de depositar la herramienta sobre una superficie NOTA Para reducir los movimientos inesperados de la herramienta no la encienda ni la apague...

Страница 45: ...amente en el eje de 15 9 mm 5 8 pulgadas con 11 hilos de rosca 1 Enrosque el disco en el eje manualmente 2 Oprima el botón de bloqueo del eje y utilice una llave Figura E1 para apretar el cubo del disco 3 Siga el procedimiento inverso para retirar el disco ADVERTENCIA Si no se asienta correctamente el disco antes de encender la herramienta ésta o el disco pueden sufrir daños Montaje de discos sin ...

Страница 46: ...perficie de trabajo permitiendo que la herramienta funcione a alta velocidad La velocidad de esmerilado es mayor cuando la herramienta opera a alta velocidad 3 Figura J Mantenga un ángulo de 20 a 30 grados entre la herramienta y la superficie de trabajo 4 Mueva continuamente la herramienta hacia adelante y hacia atrás para evitar la creación de estrías en la superficie de trabajo 5 Retire la herra...

Страница 47: ...ijar ADVERTENCIA Para evitar el funcionamiento accidental apague y desenchufe la herramienta antes de realizar las siguientes operaciones El incumplimiento de esta instrucción puede provocar graves lesiones personales NOTA Al utilizar almohadillas de respaldo para lijado se puede retirar el protector ADVERTENCIA Después de terminar las aplicaciones de lijado se debe reinstalar el protector correct...

Страница 48: ...inturas que contienen plomo las mascarillas contra el polvo de pinturas corrientes no proporcionan ese tipo de protección Consulte al distribuidor de su localidad para obtener una máscara adecuada 3 NO SE DEBE COMER BEBER o FUMAR en el área de trabajo para evitar ingerir partículas de pintura contaminada Los trabajadores deben lavarse y limpiarse ANTES de comer beber o fumar No se deben dejar artí...

Страница 49: ...ueva continuamente la herramienta hacia adelante y hacia atrás para evitar la creación de estrías en la superficie de trabajo Apoyar la herramienta sobre la superficie de trabajo sin moverla o mover la herramienta en círculos provoca quemaduras y marcas circulares sobre la superficie de trabajo 6 Retire la herramienta de la superficie de trabajo antes de apagarla Permita que la herramienta deje de...

Страница 50: ...l eje USO DE DISCOS DE CORTE ADVERTENCIA No utilice discos de esmerilado corte de bordes para aplicaciones de esmerilado de superficies porque estos discos no están diseñados para las presiones laterales producidas durante el esmerilado de superficies El resultado puede ser la rotura del disco y lesiones 1 Permita que la herramienta alcance la velocidad máxima antes de aplicarla a la superficie de...

Страница 51: ...antía autorizados visite nuestro sitio web en www bostitch com o comuníquese con nuestro Centro de atención al cliente al 800 262 2161 Todas las reparaciones realizadas en nuestros centros de mantenimiento están completamente garantizadas en relación con los materiales defectuosos y la mano de obra No podemos otorgar garantías en relación con las reparaciones ni los intentos de reparación de otras...

Страница 52: ...nombre de su proveedor más cercano GARANTÍA LIMITADA DE TRES ANOS Bostitch reparará o reemplazará sin cargo cualquier defecto ocasionado por materiales defectuosos o mano de obra durante tres años a partir de la fecha de compra en el caso de las herramientas dos años para las baterías Esta garantía no cubre fallas en las piezas que resulten del desgaste normal de la herramienta o de su utilización...

Отзывы: