Creating a Patch
8
Changing the Effect Loop Settings
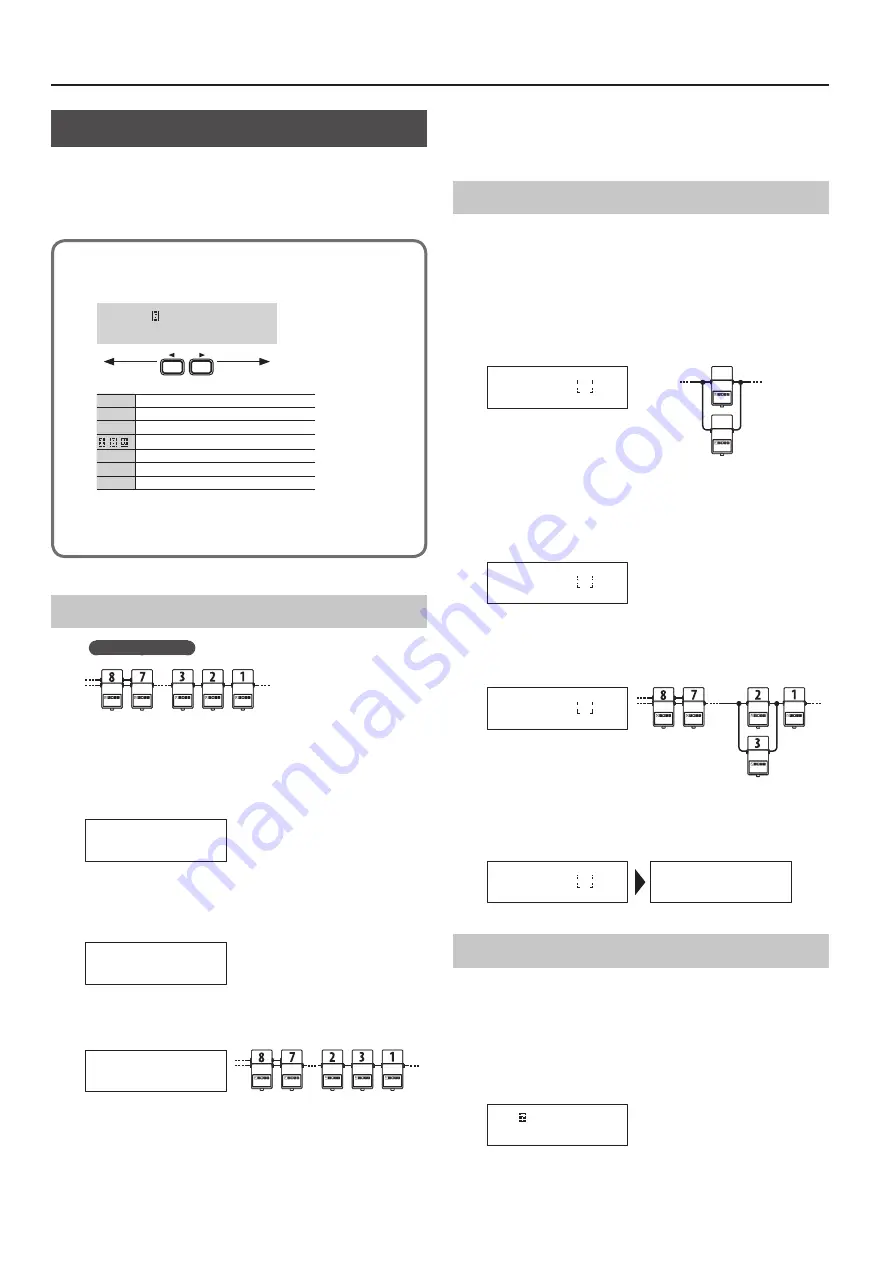
In the Loop Structure screen you can make the following settings.
5
Change the connection order of the effect loops
5
Create a parallel connection
5
Specify Carry Over
Loop Structure screen
The Loop Structure screen shows the following content.
O=8=7- -5-4-3-2-1-V-I
_
I
IN
V
Volume loop
1
–
8
Loop number
– ,
A loop for which Carry Over is specified
-
Mono
=
Stereo
O
OUT
The screen is not able to show all the content simultaneously.
You can see the remaining content by using the [
K
] [
J
] buttons
to move the cursor.
Changing the Effect Loop Connection Order
Before the change
Example:
Change the order of effect loops 2 and 3
1
In play mode, press the [DISPLAY/EXIT] button several
times to access the Loop Structure screen.
=8=7-6-5-4-3-2-1
_
2
Use the [
K
] [
J
] buttons to select the loop whose
connection you want to change.
Move the cursor to effect loop 2.
=8=7-6-5-4-3-2-1
_
3
Use the [–] [+] buttons to move the loop number.
When you press the [–] button, effect loops 2 and 3 change places.
=8=7-6-5-4-2-3-1
_
Changing the connection order of the volume loop
You can change the connection order of the volume pedal (
V
) in the
same way as for the effect loop.
Specifying mono/stereo return for effect loops 7 and 8
For the returns of effect loops 7 and 8, set the system setting
Preference to select mono-return or stereo-return (p. 12).
Making a Parallel Connection
Example:
Connect effect loops 2 and 3 in parallel
4
Use the [
K
] [
J
] buttons to move the cursor to the merge
point of the parallel connection, and press the [ENTER]
button.
Move the cursor between effect loops 2 and 4, and press the [ENTER]
button; the parallel loop is created.
IN
OUT
Split point
Merge point
=8=7-6-5-4-2-3-1
-
_
* Depending on the settings, there might be cases in which parallel
connection is not possible (p. 7).
5
Use the [
J
] button to select the loop whose connection
you want to change.
Move the cursor to effect loop 3.
=8=7-6-5-4-2-3-1
-
_
6
Use the [–] button to move the loop number.
When you press the [–] button three times to move effect loop 3,
effect loops 2 and 3 are connected in parallel.
=8=7-6-5-4-2-1-V
3
_
Cancelling a Parallel Connection
Use the [
K
] [
J
] buttons to move the cursor to the merge point of
the parallel connection, and press the [ENTER] button; the parallel
connection is cancelled.
=8=7-6-5-4-2-1-V
3
_
=8=7-6-5-4-3-2-1
_
Specifying Carry Over
Example:
You can specify Carry Over for effect loop 7
7
Use the [
K
] [
J
] buttons to select the loop for which you
want to specify Carry Over, and press the [ENTER] button.
Move the cursor to effect loop 7 and press the [ENTER] button; Carry
Over is specified.
=8= -6-5-4-3-2-1
_
* Depending on the settings, there are cases in which Carry Over
does not work (p. 7).
Содержание ES-8
Страница 22: ......


