background image

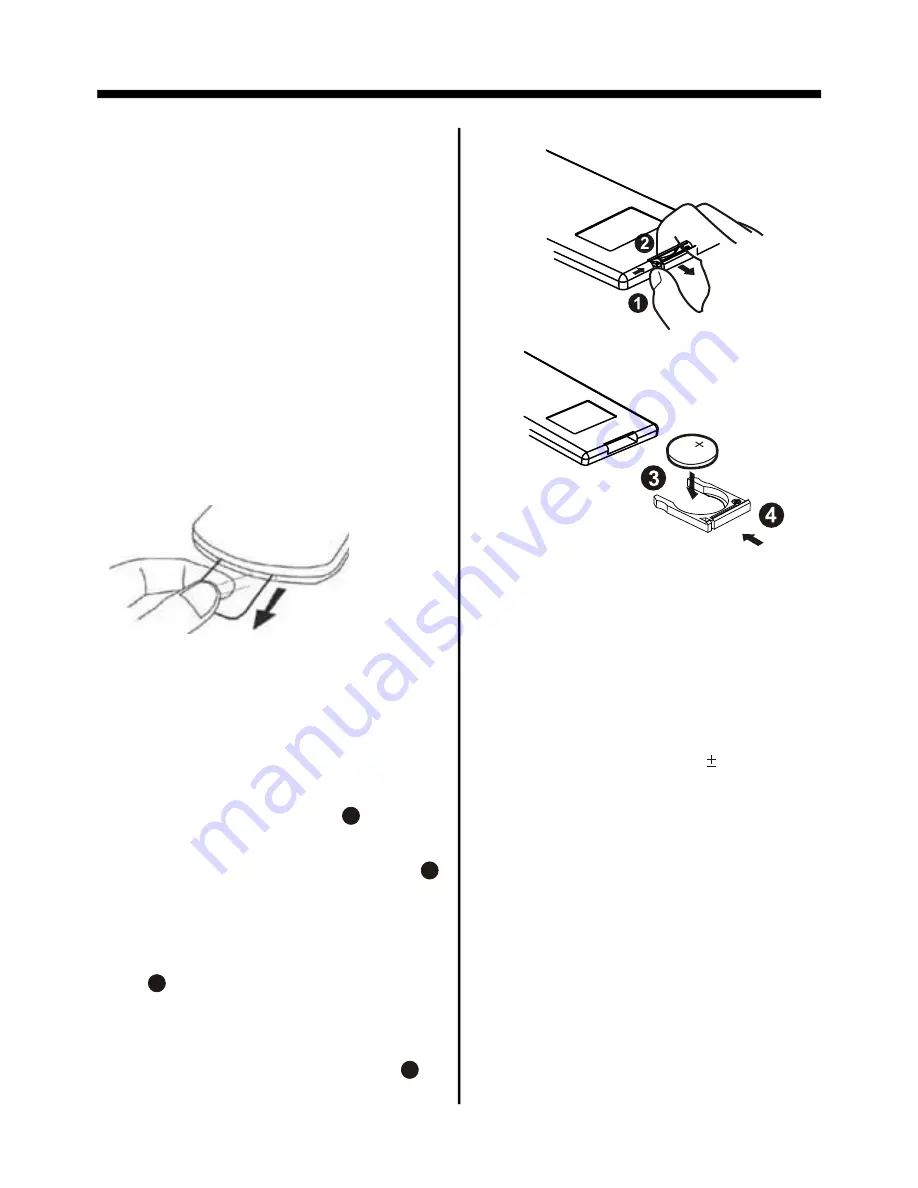
1.  First  push  to  inside  as  the  direction 

indicated  by  the  arrow  (See              )and  then 

Remove  the  battery  holder  as  the 

direction  indicated  by  the  arrow  (See            ).

2.  Replace  the  battery  Set  a  new  battery 

property  with  (+)side  up  as  illustrated

(See              ).

3.  Insert  the  battery  holder.  Push  in  the 

holder  to  the  original  position(See              ). 

1

2

3

4

INSERTING  THE  BATTERIES

REMOTE  CONTROL

-10-

PREPARING  THE  REMOTE 

CONTROL

USING  THE  REMOTE  CONTROL

1.  Face  the  remote  control  towards  the 

player  front  face  IR  mark  (remote  control 

signal  receiver).

2.  Operation  angle:    About        30  degree 

in  each  the  direction  of  the  front  of  the 

IR  mark.

3.  The  distance  between  remote  control

and  sensor  should  not  exceed  5M  .

NOTE:

The  lithium  cell  in  the  battery  comp-

artment  of  remote  control  has  been 

secured  for  transport  with  a  foil  .             

Before  initial  use  please  remove  this 

foil  so  that  the  remote  control  is  ready

for  operation  .

WARNING  :

Do  not  expose  the  batteries  to  high

temperatures  or  direct  sunlight  .

Never  throw  batteries  into  the  fire,  there

is  a  danger  of  explosion  !

Содержание BV7342T

Страница 1: ......

Страница 2: ...To ensure safety while driving and to comply with laws drivers should not watch video or operate the video device while driving ...

Страница 3: ...n Automatic memory storing program scaning Media Operation Selecting Play Mode On Screen Display Function Digital Video Special Function Multi subtitle language function Multi audio language function 20 20 21 21 23 24 25 26 26 27 28 29 30 31 2 3 4 5 6 7 8 11 11 14 14 15 15 15 16 16 16 17 18 18 19 20 20 20 Multi angle function Title menu function Media Setup Menu System Setup Language Setup Video S...

Страница 4: ...r Servicing To Qualified Personnel CAUTION This digital video Player is designed and manufactured to respond to the Region Management Information that is record ed on a digital video disc If the Region number described on the digital video disc does not correspond to the Region number of this digital video Player this digital video Player cannot play this disc REGION MANAGEMENT INFORMATION TO REDU...

Страница 5: ...hol Never use solvents such as benzine thinner or conventional record cleaners as they may mar the surface of the disc Handling and Cleaning Dirt dust scratches and warping disc will cause misoperation Do not place stickers or make scratches on discs Do not warp discs A disc should always be kept in its case when not in use to prevent from damaging Do not place discs in the following places 1 Dire...

Страница 6: ...nnot injure the passenger if there is a sudden stop like an emergency stop 30 If installation angle exceeds 30 from horizontal the unit might not give its optimum performance Avoid installing the unit where it would be subject to high temperature such as from direct sunlight or from hot air from the heater or where it would be subject to dust dirt or excessive vibration DIN FRONT REAR MOUNT This u...

Страница 7: ... pull it off towards you OPEN button 3 put it in the protective case for safe keeping PROTECTIVE CASE FRONT PANEL KEY PLATE PLASTIC FRAME KEY PLATE If you want to take CHASSIS out of the SLIDE BRACKET HOUSING first remove the PLASTIC FRAME of the both sides away then insert the two KEY PLATES into left and right sides of chassis as above illustration ...

Страница 8: ...cloth only being careful not to damage the connectors ATTACHING THE CONTROL PANEL 1 First insert the right side of the front panel into the main unit 3 Push it back to the position for playing 2 Push the right side of the front panel until it locks firmly into the main unit at one time insert the left side of the front panel into the main unit Bulge Hollow Bulge Hollow Connector ...

Страница 9: ...ECTION 7 WIRE CONNECTION IGNITION SWITCH RED WHITE WHITE BLACK GREY GREY BLACK GREEN GREEN BLACK VIOLET VIOLET BLACK YELLOW CONSTANT 12 VOLTS BLACK GROUND B BLUE AUTO ANTENNA FRONT Lch SPK REAR Lch SPK FRONT Rch SPK REAR Rch SPK BROWN B PARKING BRAKE PINK RADIO ANTENNA JACK B 12V REAR CAMERA SWITCH REAR CAMERA INPUT YELLOW GREY SUB WOOFER VIDEO IN yellow AUDIO R OUT red AUDIO L OUT white VIDEO OUT...

Страница 10: ... will improve sound quality 6 LO DX Changing of the SUBTITLE language on multi subtitle language Digital Video media In radio mode Press this button for distance reception when you are located at weak signal location depress it for stronger signal 7 REPEAT Switch the Repeat mode in media mode 8 GOTO Press this button to begin playback at a moment in the program you designate Use the number buttons...

Страница 11: ...this button to turn off the audio Press again to restore the sound to its prior volume level SEL is recorded on the Digital Video media In radio mode press shortly to scan the preset station press longer to enter into automatic memory storing function 19 ZOOM Press this button to active the ZOOM function Each press of the zoom button changes the screen in the sequence 2x 3x 4x 1 3 1 4 Use the butt...

Страница 12: ...ONTROL 1 Face the remote control towards the player front face IR mark remote control signal receiver 2 Operation angle About 30 degree in each the direction of the front of the IR mark 3 The distance between remote control and sensor should not exceed 5M NOTE The lithium cell in the battery comp artment of remote control has been secured for transport with a foil Before initial use please remove ...

Страница 13: ...switch between BASS TREBLE BALANCE FADE COLOR BRIGHTNESS CON 5 BAND Button In Radio mode press this button repeat edly to cycle through and select the desired radio band the designation of the corresponding level FM1 FM2 FM3 AM1 MW1 AM2 MW2 is shown in the TFT Control Panel 14 19 13 Control Panel 2 1 15 17 8 16 3 7 6 10 5 11 9 12 18 4 The Base of Control Panel TRAST TINT and VOLUME Long press to d...

Страница 14: ...disable the MUTE function by turning the VOL knob B In Radio Mode you can store 30 stations in memory 18 FM stations and 12 AM MW stations each band stores up to six preset stations The operation as below Store in Memory Select the frequency band Press repeatedly the button to select the desired memory key Select the station Keep the desired memory key pressed in until the station is heard again a...

Страница 15: ...on RESET button is placed on the housing and must be activated with either a ballpoint pen or thin metal object The RESET button is to be activated for the following reasons A Initial installation of the unit when all wiring is completed B All the function buttons do not operate C Error symbol on the display 16 AUX IN JACK 18 TFT Display liquid crystal display 17 USB PORT 19 SD MMC CARD SLOT ...

Страница 16: ...tor cannot display image CONTRAST 0 to 32 Adjust the contrast of the bright and dark portion TINT 0 to 32 Adjust the tint if the human skin color is unnatural Adjustable when NTSC is selected for NTSC PAL COLOR 0 to 32 Adjust the color for the picture lighter or darker BRIGHT 0 to 32 Adjust if the picture is too bright or too dark FADE F 0 10 to R 0 10 Adjust sound balance between front and rear s...

Страница 17: ... g In RADIO mode SETTING BACKGROUND In wallpaper mode you can select AUTO GREEN YELLOW RED LIGHT BLUE BLUE PINK When you select the AUTO item the player will change the background color automatically SUBWOOFER ON OFF DX LOCAL in radio mode STEREO MONO in radio mode ROCK Use the VOL to choose the equalizer mode USER JAZZ CLASSIC POP ROCK 24H CLOCK FORMAT Use the VOL to choose clock display in 12 or...

Страница 18: ...io mode press and hold for more than 2 s the button to start search for a radio station automatically You can use the buttons on the remote control to start search for a radio station automatically To tune in strong singnal FM Station only LO DX function Press the LOC DX button on the remote control to choose between the LOC and DX mode of Local and Long distance traffic news The word LOC or DX wi...

Страница 19: ...cated to the corresponding storage locations Then the station of the first storage location is set Automatic Preset Setup Scan Function In Radio mode briefly press the APS button on the remote control the radio briefly plays all the preset stations of the frequency band Retrieve a preset station press the 1 6 buttons briefly on the remote control to retrieve a station which had been stored in the ...

Страница 20: ...CD Long press the 3 INT button on the remote control to play the first 10 seconds of each track chapter on the disc Long press again to cancel this mode FOR VCD Long press the 3 INT button on the remote control the following menu will be displayed SEQ PLAY INTRO 1 Note When INTRO 1 mode is selected the first 10 seconds of each track chapter on the disc will be played Long press it again to cancel ...

Страница 21: ...he disc currently being played will be shown on the screen along with the elapsed time Digital Video TT 01 01CH 04 31 C 0 02 06 D Press OSD for fourth time Digital Video TT 01 01CH 04 31 T 0 16 00 E Press OSD for fifth time Digital Video TT 01 01CH 04 31 T 1 36 55 B Press OSD for second time A Press OSD for first time VCD TRK 1 19 PBC C 0 01 36 A B Press OSD for second time VCD TRK 1 19 PBC C 0 06...

Страница 22: ...c is playing you can switch between PBC ON and PBC off mode MONO LEFT MONO RIGHT STEREO MIX MONO For VCD during playback Press AUDIO on the remote control It is possible to switch the sound between monaural and stereo sound Notes The language number is different according to the disc Some disc only contain one language soundtrack When no different language soundtra ck are recorded will be display ...

Страница 23: ...f the image behind To avoid this turn ON the SCREENSAVER item After a short period of inactivity on the monitor the unit will substitute a moving image to avoid burn in MEDIA SETUP MENU Press SETUP button on the remote control to display the SETUP menu Select the preferred item by using the buttons and press the ENTER button to confirm When you press SETUP on the remote control the SETUP screen wi...

Страница 24: ...sing the ENTER button PASSWORD SELECTION The password must be used to make changes to the Parental Control menu below The factory default password is 0000 You will be asked for the current password Key in 0000 and then press ENTER on remote control to confirm you have the opportunity to change it and enter your new password Then when you enter the Parental Control menu you can make any changes SYS...

Страница 25: ... the cursor buttons OSD LANG TYPE SETUP Select the preferred OSD language by using the cursor buttons RESTORE SYSTEM SETUP TV SYSTEM SCREEN SAVER TV TYPE PASSWORD RATING DEFAULT OSD LANGUAGE AUDIO LANG SUBTITLE LANG MENU LANG ENGLISH GERMAN SPANISH FRENCH PORTUGUESE ITALIAN RUSSIAN LANGUAGE SETUP OSD LANGUAGE AUDIO LANG SUBTITLE LANG MENU LANG ENGLISH GERMAN SPANISH FRENCH PORTUGUESE ITALIAN RUSSI...

Страница 26: ...llow you to set the video signal brightness contrast hue and saturation HUE the hue of the video signal the color of the pictures OSD LANGUAGE AUDIO LANG SUBTITLE LANG MENU LANG ENGLISH GERMAN SPANISH FRENCH PORTUGUESE ITALIAN RUSSIAN LANGUAGE SETUP BRIGHTNESS CONTRAST HUE SATURATION SHARPNESS VIDEO SETUP 12 10 8 6 4 2 0 BRIGHTNESS CONTRAST HUE SATURATION SHARPNESS VIDEO SETUP 12 10 8 6 4 2 0 BRIG...

Страница 27: ...the dynamic range of a Dolby Digital encoded program There are 8 steps between full compression and off compression SATURATION the saturation of the video signal the vividness of the color all above can be adjusted to your tasters BRIGHTNESS CONTRAST HUE SATURATION SHARPNESS VIDEO SETUP 12 10 8 6 4 2 0 BRIGHTNESS CONTRAST HUE SATURATION SHARPNESS VIDEO SETUP 8 6 4 2 0 MEDIA SETUP MENU ...

Страница 28: ...d USB in this player 3 When the DISC and USB in this player they can not to transfer In USB Playback mode You can use the UP DOWN RIGHT or LEFT buttons to navigate and to select files to play and press ENTER to begin playback or viewing in the case of JPEG files To skip to the next or last track press the or Press the or buttons for Fast Forward or Fast Reverse playback REPEAT play modes are also ...

Страница 29: ...rd press the CH button on the remote control to choose the channel downward Add Skip Available Channels for the CH and CH Buttons In TV mode after searching channels auto matically the CH and CH buttons on the remote control can select only the channels with available signal 1 Add Availabl e Channel s Use the number buttons to select a channel without available signal then press the SKI P button o...

Страница 30: ...playback operation function is same as the operation on CD MP3 WMA Please to MP3 WMA operation for more details Change DISC to SD MMC card The operations are same as USB mode refer to see USB operation Change SD MMC card to DISC The operations are same as USB mode refer to see USB operation 28 SD MMC OPERATION INSERTING THE SD OR MMC CARD First to slide the panel a little to the right then pull it...

Страница 31: ...ct the play mode JPEG 5 Select the play mode MPEG4 6 Current song in MP3 folder WMA Mp3 MP3 ITLE SONG TRACK 03 ITLE SONG TRACK 03 001 002 003 004 004 005 006 006 007 008 007 007 001 002 003 3 4 5 6 2 1 SKIP AHEAD BACK In playback mode press the or button on front panel to skip ahead or back one item in the list Or press the or button on the remote control Fast Forward Fast Reverse Playback In play...

Страница 32: ...ication and design are subject to modification without notice due to improvements in technology Supply Voltage 12V DC 11V 15V Current Consumption Less than10 A Signal System Compositive video 1 0Vp p 75 Discs Played 1 DIGITAL VIDEO Disc 5 12 cm single sided single layer 5 12 cm single sided double layer 2 Compact Disc CD DA VIDEO CD 5 12cm disc Audio Signal Output 2ch 4ch line out Characteristics ...

Страница 33: ...ating properly due to noise The antenna cable is not connected Insert the antenna cable firmly The signals are too weak Select a station manually SYMPTOM CAUSE SOLUTION Video image appears black white The color system is set incorrectly Please switch to correct color system from menu No video image appears The unit is not connected to the parking brake detection switch Make proper connection accor...

Отзывы: