background image

ACCESS SETUP INTERFACE

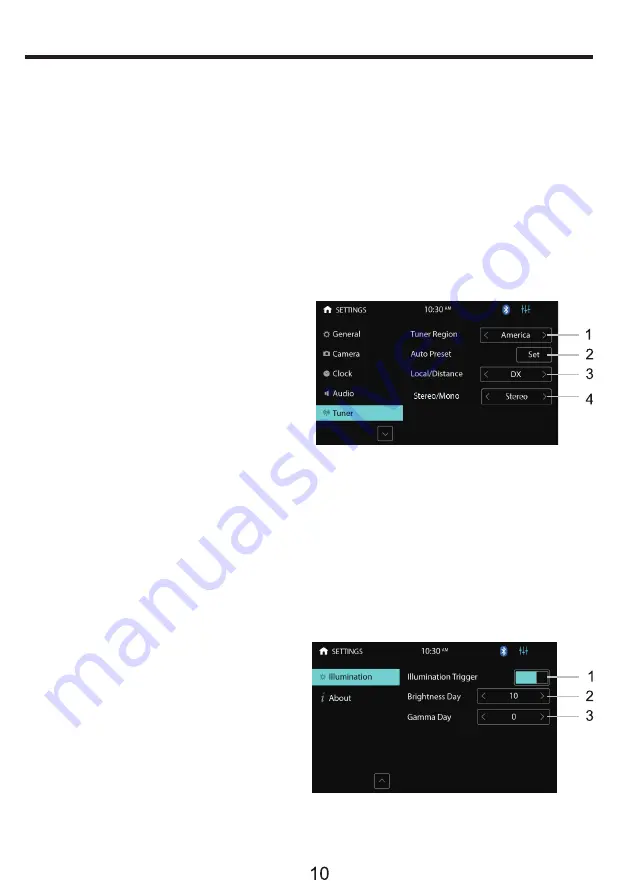
TUNER SETTINGS –Menu 5

ILLUMINATION SETTINGS –Menu 6

1. Touch to enable or disable the  

    illumination detection function. 

    When enabled and the headlights

    are turned on, the screen will

    automatically dim.
2. Touch to set screen brightness.
3. Touch to set screen contrast.

2.  Startup volume: default volume.

 If the volume at the last shutdown is less than this volume, the volume at the last  

     shutdown will be used when rebooting; 

 if the volume at the last shutdown is greater than this volume, this default volume  

     will be used when rebooting. 

1. Touch to select whether to output sound from an external amplifier.

3-11. Touch to set a particular volume level for each source.
12. Slide up or down to enter the previous or next menu interface.

1. Select America or EU region you are 

    in to receive radio stations. 
2. Perform radio search and store radio 

    stations in each radio band.
3. Select “Local” when most radio 

    stations are strong enough (e.g. in 

    urban areas). FM stations only with 

    strong signals will be received.
    Select “Distance” when most radio stations 

    are weak (e.g. in the countryside). 

    FM stations with strong and weak signals will be received.


4. Select “Stereo” to receive FM stereo broadcast.

    Select “Mono” when FM signal is weak to improve

    sound quality (stereo effect will be lost). 


Содержание ELITE BV965NV

Страница 1: ...0Bluetooth BV965NV USER MANUAL BLUETOOTH IBUILT IN NAVIGATION DVD MP3 CD AM FM RECEIVER FEATURING 6 5 165 mm WIDESCREEN TOUCHSCREEN DIGITAL TFT LCD MONITOR ...

Страница 2: ......

Страница 3: ...ayback DVD Mode Operation Media Playing CD Audio CD Source Menu USB SD Music Video Picture Bluetooth Operation Bluetooth Operation Menu Bluetooth Keypad 14 Bluetooth Call 14 Bluetooth Phonebook 15 Bluetooth Phone Call History Bluetooth Music Steaming A2DP 15 Bluetooth Pair Device Photos Camera Aux AV Menu Troubleshooting BOSS Audio Systems Multimedia Receiver It has been designed engineered and ma...

Страница 4: ...144 mm 20 70 4 F F 4 x 80W 12V Up to 32G BV965NV FM AM radio DVD fully compatible withDVD VCD CD MP3 MPEG4 JPEG AUX input AV input Video output Front Rear view camera support Format MPEG1 MPG MPEG1 MPEG2 MP2 MP2 Video file Video code Audio code GPS support Fixed front panel with 6 2 inch TFT screen USB and SD card media play support Bluetooth audio stream and hands free phone call Front rear and s...

Страница 5: ... unit without authorization To avoid damage and accidents please contact a local car audio distributor for details Do not put the unit in a moist environment or water to avoid electric shock damage and or fire due to a short circuit The mechanical drive part of the monitor uses an automatic precision transmission component Do not pull push or rotate the unit by force or impact the TFT screen to av...

Страница 6: ...Trim ring 1 1 2 8 1 1 1 Put the 2 brackets to the left and right side of the unit 2 Use the supplied screws to attach the brackets to the unit 3 Once the screws are attached the brackets can be adjusted forward or backward depending on the installation requirements Bracket Screw Bracket Screw ...

Страница 7: ...dio mode select a tuner band Select a title chapter track In radio mode select a preset station In Bluetooth phone mode enter a phone number or a special symbol 14 15 Access the disc menu 16 Display the main menu of a video disc and start playback from the beginning 17 Start pause or resume playback 18 Select a repeat play mode 19 Mute or restore volume 20 Select a preset sound mode 21 Switch the ...

Страница 8: ...A Lt Green Parking Brake Input Control 3 5mm SWC Input Speaker Outputs White Left Front White Blk Left Front Gray Right Front Gray Blk Right Front Green Left Rear Green Blk Left Rear Purple Right Rear Purple Blk Right Rear Camera Power Red Violet 12v 500 mA Red White 12v 500 mA Video Output AM FM Antenna Jack Front Camera Input Wire Harness Connector A V Input Rear Camera Input Pre Amp Audio Outpu...

Страница 9: ...dio device for audio input Connect to a USB flash drive for media play USB port AUX jack 3 5mm Connect to a GPS card to store GPS information GPS card slot Connect to a Micro SD card for media play SD card slot 8 Open to access the following button or connectors Reset AUX USB SD GPS cover Reset button 7 Press and hold to turn the unit on or off Rotate to adjust volume In power on mode press briefl...

Страница 10: ...mera Interface 9 AV INPUT Interface 10 AUX IN Interface 11 Setting Interface GENERAL SETINGS Menu 1 MAIN MENU 1 MAIN MENU 2 There are seven Setting Menus 2 Retain ACC Power Select how many seconds to delay shut down after the vehicle powers down 1 NAVI Interface 1 Touch to set wall paper for the home menu background 10 11 ...

Страница 11: ...when reversing 2 Rear Camera Touch to enable or disable the rear camera input 3 Rear Cam Pwr Touch to enable or disable power connection to the rear camera 4 Front Camera Touch to enable or disable the front camera input 5 Front Cam Pwr Touch to enable or disable power connection to the front camera 6 Rear Camera Delay Front Camera Delay Touch to delay trigger of the rear front camera view by a se...

Страница 12: ...12 12 10 AUDIO SETTINGS Menu 4 11 CLOCK SETTINGS Menu 3 a Touch to set clock mode 12 or 24 hour b Touch to set hour c Touch to set minute d Touch to set AM PM at 12 hour mode ...

Страница 13: ...n rebooting 1 Touch to select whether to output sound from an external amplifier 3 11 Touch to set a particular volume level for each source 12 Slide up or down to enter the previous or next menu interface 1 Select America or EU region you are in to receive radio stations 2 Perform radio search and store radio stations in each radio band 3 Select Local when most radio stations are strong enough e ...

Страница 14: ... to seek backwards long press to enter manual mode then press repeatedly to adjust the frequencey for fine tune 3 Short press to seek forward long press to enter manual mode then press repeatedly to adjust the frequency for fine tune 4 Short press to select the preset station long press to save the current station TUNER OPERATION 4 Touch to select whether it is necessary to display the End User Li...

Страница 15: ...ss the parking brake is applied If the parking brake wire is not installed correctly a warning message will appear DVD MODE OPERATION 16 1 Touch to select a title chapter of DVD 2 Short press to move to the previous chapter long press to rewind quickly 3 Touch to playback pause 4 Short press to move to the next chapter long press to fast forward quickly 5 Touch to enter the DVD root menu 6 Go to t...

Страница 16: ...ter 5 Touch to playback pause 6 Touch to go to the next chapter 7 Touch to enter file list page Touch the SOURCE MENU ICON 5 to access the CD track menu to view or change tracks manually Touch again to return to playback Touch the USB or SD icon in the main menu The music menu is similar to the disc music menu except there is more ID3 information on it such as song name singer USB SD MUSIC VIDEO P...

Страница 17: ...SS AUDIO BV965NV BLUETOOTH OPERATION MENU BLUETOOTH CALL 1 Bluetooth setting menu a Click to see the dialing keypad Users can dial phone numbers and make calls b Click to see the Bluetooth phonebook menu c Click to see the Bluetooth call history d Bluetooth pairing interface e Bluetooth setting menu 1 Show contact name 2 Touch to select talk through phone or through Bluetooth 3 Touch to mute or un...

Страница 18: ...phone numbers 4 Touch to show the received phone numbers 1 Skip to the previous music file 2 Start pause resume play 3 Skip to the next music file 4 Enter EQ setting menu To disconnect Bluetooth go to Device and select the currently connected device name then select Disconnect this Device To remove a Bluetooth device from from the memory go to Device and select a device name then select Forget thi...

Страница 19: ...nd audio device to the unit by the RCA jacks and touch the AV INPUT icon in the home menu AV INPUT 1 Keypad enter a number to select file 2 Skip to the previous picture 3 PLAY PAUSE Touch to start picture playing mode Touch again to pause During picture playing mode each picture will be played for 5 seconds and then automatically move to the next if the PLAY PAUSE button is not pressed 4 Skip to t...

Страница 20: ...se Corrective Action Car battery fuse blown Install new fuse with right rating Screen touch is insensitive Place of touch screen is uncalibrated Go to setup menu and set the calibration No audio output Improper audio output connection Check wiring and correct Low audio output Poor sound quality or distortion Speaker power rating not compatible with unit Connect proper speakers Check wiring Speaker...

Страница 21: ...he wiring Improper video signal connections Problem Cause Corrective Action Eject the current disc and insert the new one Cannot insert disc Disc already inside unit Use a new one in good condition Disc is scratched or warped Clean the disc Disc is dirty or wet Loss of audio music stops No GPS image Switch to the GPS interface Image has not been changed to GPS system Failed to enter the navigation...

Страница 22: ......

Страница 23: ......

Страница 24: ...nd iPhone are trademarks of Apple Inc registered in the U S and other countries BOSS Audio Systems is not affiliated with Apple Inc The Bluetooth word mark and logos are registered trademarks owned by Bluetooth SIG Inc and any use ofsuch marks by BOSS Audio Systems is under license Other trademarks and trade names are those oftheir respective owners ...

Страница 25: ...GPS USER S MANUAL BN965BLC INCLUDING MAP COVERAGE OF ALL 50 STATES AND PUERTO RICO IO S AUDIO SYSTEMS EU ...

Страница 26: ... of all maneuvers included in my route 10 Delete a favourite location 10 Delete recent locations 11 Use itineraries 11 Create an itinerary 11 Change an itinerary 11 Navigate to an itinerary 11 Manage alternative routes 12 Avoid going through specific streets or roads 12 Find an alternative when there is a roadblock ahead 12 Customizing Your NDrive 13 The speaker volume 13 The light 13 The language...

Страница 27: ...ser interface of our latest version will allow you to easily use the application improving your user experience J Main Map Screen The main map screen can be presented in 3 different modes Map view Zoom in 30 20 Tap this button to alternate between 20and30map visualization accordlnsto your preference Map scale Points ofInterest dick on the POl ftaa to see more Information Zoomout 30 landmart dlc kt...

Страница 28: ...etum to your previous loc atton with GPSspl Locator will change colorac c ordlng to signal stre Time speed and distance controls show different information by toggling among the alternative modes Estimated time left to destination Estimated time of arrival Speed limit on the current street Distance left to destination Current speed 111 6 Current time USERGUIDE_Vll A_ENG_Indash 3 ...

Страница 29: ... show on top two buttons which allow for the following actions GPS I Go back to previous screen Return to main map screen Using keyboards Whenever you want to perform a search filter results from a list or input data the keyboard will appear on screen Different keyboard layouts can be selected on Settings Here are some tips you should keep in mind 4 When searching for a street you can simply write...

Страница 30: ...tiDr1ve powered by you unu I bar I C4nflnn and J dose keyboard o Ma lf U __ _ _ NC l uet _ _ Standard keyboard Numerickeyboard Extended keyboard Mctlll C N uat _ _ Spacebar USERGUIDE_V11 4_ENG_Indash 5 ...

Страница 31: ...u Extended symbols keyboard II I I 1 I i ABC Bl rd Remove keyboard from the screen ______ l r J c nd I lnputaru I lat 8583 Input Ir lon E2 2945 DOO l 2 3 4 5 6 7 8 9 0 0 II c N 5 E W ma putJ bet East and West USERGUIDE_V11 4_ENG_Indosh ...

Страница 32: ...h you can skip that area and moote forward to the next J1 Go screen mCategory Select Category ri1 Place T Select Place Some may not enabled Ifnot applicable to aspecificcountry After performing a search or selecting a POl on the map the Go Screen will be shown This screen allows you to perform several actions based on the location you just selected r Seedetailed lnfoabout the place USERGUIDE_Vll 4...

Страница 33: ...terest POl From the main menu select Go To t and then Places Then select Around Me or In a City fVt You will see the Places grouped in categories Select the desired category or specific attributes and use the keyboard to filter your search After completing your selection click You may also select All and search for a location name within the entire database note that this will take longer 8 0 Alte...

Страница 34: ...click Navigate Navigate to a recent location From the main menu select Go To and then Recent Location r C9 After selecting the desired location from the list click on Navigate Save my favourite locations From the main menu select Go To and then Address Places or Recent Location r C9 After completing your selection click Save Alternatively simply click on a POl or any other point on the map and the...

Страница 35: ...pleting your selection click on Save The first time you try to navigate home if you haven t previously defined your home location NDrive will ask you to set that location It is possible to edit it at any time following the steps described above Stop navigating in the current route From the main menu click My Router and then Stop Navigation See an overview of my route After defining a route and dur...

Страница 36: ...u can also add a waypoint by selecting any poinl on the map and clicking the waypoint shortcut on the context bar Then you can either add it to an existing itinerary or create a new one where the selected waypoint will be included Change an itinerary After selecting the itinerary from the list to edit the itinerary s name description and icon click Edit Renamel and proceed as described in Create a...

Страница 37: ...riginal Ill Avoid going through specific streets or roads From the main menu select My Route f J and then Alternatives Click Avoid Part Of Route select the segments you wish and then click A new route will be calculated accordingly If afterwards you prefer the first route click Calculate Original Ill Find an alternative when there is a roadblock ahead From the main menu select My Route f J and the...

Страница 38: ... maintain the screen lighten at all times select ALWAYS ON To confirm click o The language From the main menu select Settings and then j fr uonal click on Language and then select from the available options To confirm click o The keyboard layout From the main menu select Settings and then n tlono l __j ange the layout between ABC QWERTY and AZERTY To confirm your choice selec The speed unit From t...

Страница 39: ...wing routing options which will influence the routing calculation 14 Fastest calculates the fastest route regardless of the distance It is highly recommended that you select this option the planned route will be not only the fastest but also more economic and pleasant since better and faster roads such as highways are given priority Shortest calculates the shortest route regardless of the quality ...

Страница 40: ...elect between 12h or 24h format to customize the Theme select between the default theme which will display red buttons or rainbow which will display colourful buttons This option will be available in v 11 2 Restore Settings select this option to restore the system to default settings Coordinates Format From the main menu select Settings and then The selected format will define the input method on ...

Страница 41: ...es or favourites You will have to connect the device to your computer using an USB cable or use a memory card reader to manage the files Know more about my software From the main menu select My NDrlve fl and then Version to consult information about your software version My Maps will show you the maps installed on your device such as version provider verify map consistency and on GPS g1 you can vi...

Страница 42: ... not know the street name or wish to navigate to the center House Number type here the house number If you do not know the house number you may select Anywhere to be taken to the nearest point in this street or Crossing Note If the house number you typed does not appear NDrive will offer you the nearest number available The GO screen This screen displays the information about the destination you s...

Страница 43: ... have created or imported See the How to section for further information Home Pre define a location you use more often such as your home work etc On the first click it will ask you to set that destination You can edit change it at any time from My NDrive menu Itineraries This is a pre defined set of destinations that you have created or imported See the How to section for further information My Ro...

Страница 44: ...gate there You may edit or change this location at any time Version Contains detailed information about the NDrive software version you own My Maps Displays a list of the maps you have installed on your device By clicking on them you have access to the following options Show shows the selected map About detailed information about the map version and its provider Check verifies map file consistency...

Страница 45: ...de Maps and Map Updates Voices Real Navigation city photos Premium Weather and more Exit Click here to exit NDrive Application J Support Visit our Support section at http www ndrive com to learn more on how to use NDrive Additional contents such as video tutorials give you a more intuitive view on how to take advantage of your application If any questions should remain consult our FAQs or alternat...

Страница 46: ......

Страница 47: ...USER S MANUAL LPCB36 REAR IEW b ll o MOUNT CAMERA DO NOT FULLY RELY ON REVERS CAMERA WHEN BACKING UP ALWAYS CHECK YOUR SURROUNDINGS BEFORE BACKING UP AUDIO SYSTEMS ...

Страница 48: ... 2 CAMERA INSTALLATION Camera should be installed in the following configuration License Plate Frame Mount Align camera frame with top set of screw holes on license plate or license plate frame Affix camera using license plate mount screws See diagram 1 Attention The camera switch is controlled by reverse gear shift License Plate Frame diagram 1 ...

Страница 49: ...NTED NOTE CAUSE SOLUTION Check that power cable is securely connected Check to insure there is a good connection between video in and monitor Check that REVERSE GEAR is engaged Check to insure correct monitor setup Check for water water stain or dust on camera lens Clean camera lens Check to insure camera is mounted and secured tightly Adjust camera mounting bracket If problems persist consult nea...

Страница 50: ...Deg C 30 70 RH9S Max White Balance Auto Minimum Illumination 0 5 LUX AGC Auto Resolution TV Lines 0420 0480 Electronic Shutter 1 60 NTSC 1 SO PAL 1 10 000 Second Effective Pixels 656 492 Above parameters can be modified without notification BOSS Audio Systems 3451 Lunar Court Oxnard CA 93030 www bossaudio com I 805 322 8794 tech support www bossaudio com support technical support ...

Страница 51: ...and innovator in the business since 1987 Our goal is for you to be completely satisfied with your purchase If for any reason you are unsatisfied please let us be the first to know Contact our Customer Care dept at 805 988 0192 WE WANT YOUR POSITIVE FEEDBACK AND REVIEWS www bossaudio com 1115 ...

Страница 52: ...IO S AUDIO SYSTEMS ...

Страница 53: ...BO S AUDIO SYSTEMS f_jJE ao s AUDIO SYSTEMS 3451 Lunar Court Oxnard CA 93030 PLACE POSTAGE HERE ...

Страница 54: ...DOP and the model number of the product requiring service Enclose a note stating the problem or issues with the product your daytime phone number email and return shipping address within the USA no P O Box please This warranty does not cover any product subjected to abuse neglect incorrect wiring water or physical damage or any attempt to repair or modify the product by anyone other than an BAS Re...

Отзывы: