background image


DVD Operation  


DVD Player 

To start DVD player, tap on DVD button from main menu screen. 

Touch Screen Menu  


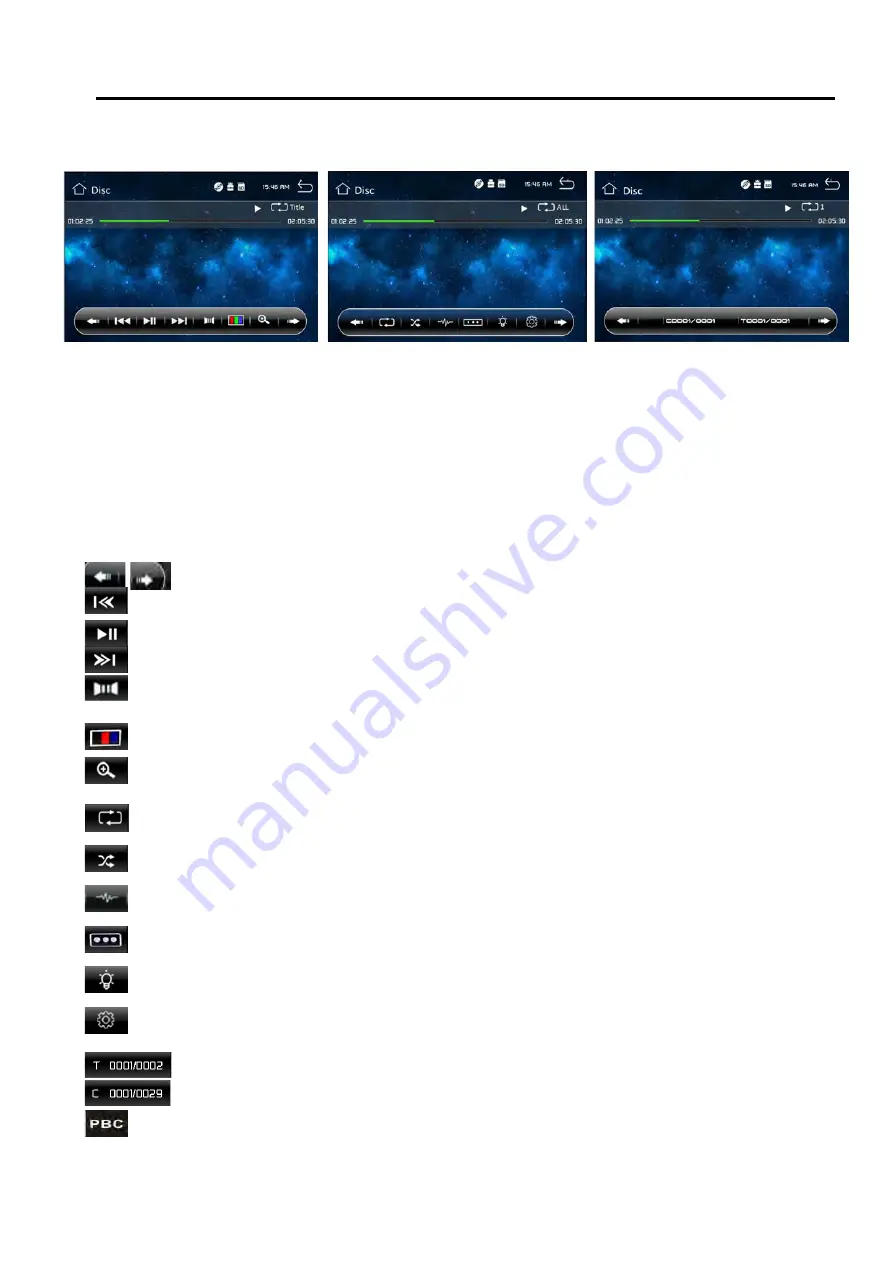
You will not see any buttons while DVD is played, buttons will appear when you tap on TFT screen. Tap 

the screen again to hide the buttons, slide the subtitle part of bottom screen to switch the following 2 

pages. 


Note

1. DVD player will automatically start playing when you insert the DVD disc. 
2. Suggest that don’t watch video if the vehicle is moving for driver's safety. 
3. DVD Player will not only play video, but picture and music files as well.  


Touch it to enter to previous/next page menu. 

   Touch it skip to the previous track 

Touch it to pause/play 
Touch it skip to the next track 

Touch it to select the sound track in the sequence of mono L => mono R =>auto L => auto R 

=>stereo.


Touch it choose brightness 

Zoom the image in or out in the sequence of ×2×3×4×5×1/2× 1/3 ×1/4 


In DVD mode, touches it chooses Repeat 1=>repeat title =>repeat all.


In VCD mode, touch it can choose REP 1 => REP DIR => REP ALL 


Touch it to turn on / off random playback. 


Touch it go to EQ mode 


Select the subtitle language 


Touch it setting the display brightness of TFT panel. 


Touch it go to setting  


   Press it to select title (only the file has many files) 

   Press it to select file 

In VCD mode touch it can choose PBC ON or OFF           


11 

Содержание BV9341

Страница 1: ......

Страница 2: ...driving 01 Accessories 02 Unit Installation 03 Wire Connection 03 Parking Brake Connection 04 Speaker connection 05 Button Description 06 Remote Control 07 Main Menu 10 Radio Operation 10 DVD Operatio...

Страница 3: ...es Package contains the following accessories for installation and operation of the unit 1 Washer Spring Washer M5 Nut 1 5 Rubber Cushion 1 2 Screw 1 6 Screw 8 3 Bolt 1 7 installation bracket 1 Left 1...

Страница 4: ...t Installation 1 Put the 2 brackets to the left and right side of the unit 2 Use screws to fix the brackets to the unit Wire Connection The Description of the Input output Interface 03 Bracket Screw 2...

Страница 5: ...n 1 In order for videos to be viewed and to comply with federal and local laws the parking brake wire must be connected to the power side of the parking brake switch Connecting the reversing line to t...

Страница 6: ...rs Always observe correct polarity Loudspeaker cables and or optional external power amplifiers must always be about 11 8 inch away from the antenna and or antenna extension parts Connect the speakers...

Страница 7: ...on unit and Press and hold for 2 seconds to turn the unit off Rotate VOL knob to increase or reduce the volume 7 SD MMC CARD Slot SD MMC card slot for Multimedia playback files only Insert a SD MMC CA...

Страница 8: ...e press to play randomly 5 ENTER Press it to confirm your selection 6 LEFT button Press it to move the cursor left 7 DOWN button Press it to move the cursor d 8 EJECT button Press it to eject the disc...

Страница 9: ...DVD USB SD mode press it to break playback press again to resume playback 16 Mute button Short press to mute the volume output press again to resume volume 17 MENU Press it to show main menu in DVD mo...

Страница 10: ...nt possible damage from battery leakage and corrosion Do not place any objects between the remote control unit and the sensor on the unit Do not drop the remote control onto the floor it will damage i...

Страница 11: ...n backward automatically Touch it to select station forward manually touch and hold this icon to select station forward automatically Touch it to select FM1 FM2 FM3 Touch it to select AM1 AM2 Touch it...

Страница 12: ...as well Touch it to enter to previous next page menu Touch it skip to the previous track Touch it to pause play Touch it skip to the next track Touch it to select the sound track in the sequence of mo...

Страница 13: ...2 1 3 1 4 Change the image playback direction Settings Operation Setting Control The BV9341 has default system setting you can customize the settings to suit your personal needs Once you change settin...

Страница 14: ...n backward or forward In DVD mode press button or button to select the previous or next track and activate fast reverse REW search or fast forward in a track press VOL button or VOL button to adjust t...

Страница 15: ...can select the preferred language for the disc menu When the selected language is recorded on the disc then this language will automatically be selected If not the first language recorded on the disc...

Страница 16: ...back view camera output The camera is used to observe the situation behind the vehicle when you are backing the car Please connect your back view camera with the back car video input And connect the r...

Страница 17: ...eakers Always observe correct polarity Loudspeaker cables and or optional external power amplifiers must always be about 11 8 inch away from the antenna and or antenna extension parts If want to displ...

Страница 18: ...remote wire to the power antenna lead one by one If the amplifiers turn off before all wires are attached use an external replay to provide remote on voltage excessive current required Nothing happen...

Страница 19: ...e ambient temperature returns to normal No sound Volume is in minimum Adjust volume to a desired level Wiring is not properly connected Check wiring connection The operation keys do not work The built...

Страница 20: ...y range Asia area FM 87 5 108MHz Step 100KHz Frequency range South America area FM 87 5 108MHz Step 100KHz Frequency range Russia area FM 87 5 108MHz Step 50KHz 65 74MHz Step 30KHz Preset memory stati...

Страница 21: ......

Отзывы: