Boss Audio Systems BV7995T Скачать руководство пользователя страница 26

LUD

SWF

POP

11:08

DISC

DVD

11-0:44:36

MOD

SEL

VOL+

VOL-

DISC Search (GOTO)

FOR DVD :

Touch the screen the GOTO range
(or press GOTO on the remote ).
Twice, the screen will display the
following message :

Title 01/01 Time -:--:--

0:10:36

You can select the item you want to
watch through TIME setting by using
numberic buttons . (E.x. 0:10:36)

FOR VCD (With PBC OFF):

Touch the screen the GOTO range
(or press GOTO on the remote ).
Once, the screen will display the
following message :

Disc Go To --:--

00:36

Use the numberic buttons to input the
time directly (E.x. : 00:36)

Touch the GOTO section , it display will
following as below :

25

DISC Operation

AUX Operation

3). You now hear the sound from the
external device played back through
the loudspeakers .

4). Touch the /- sections on
touch screen or rotate the VOL+/- on
the remote to adjust the volume level.

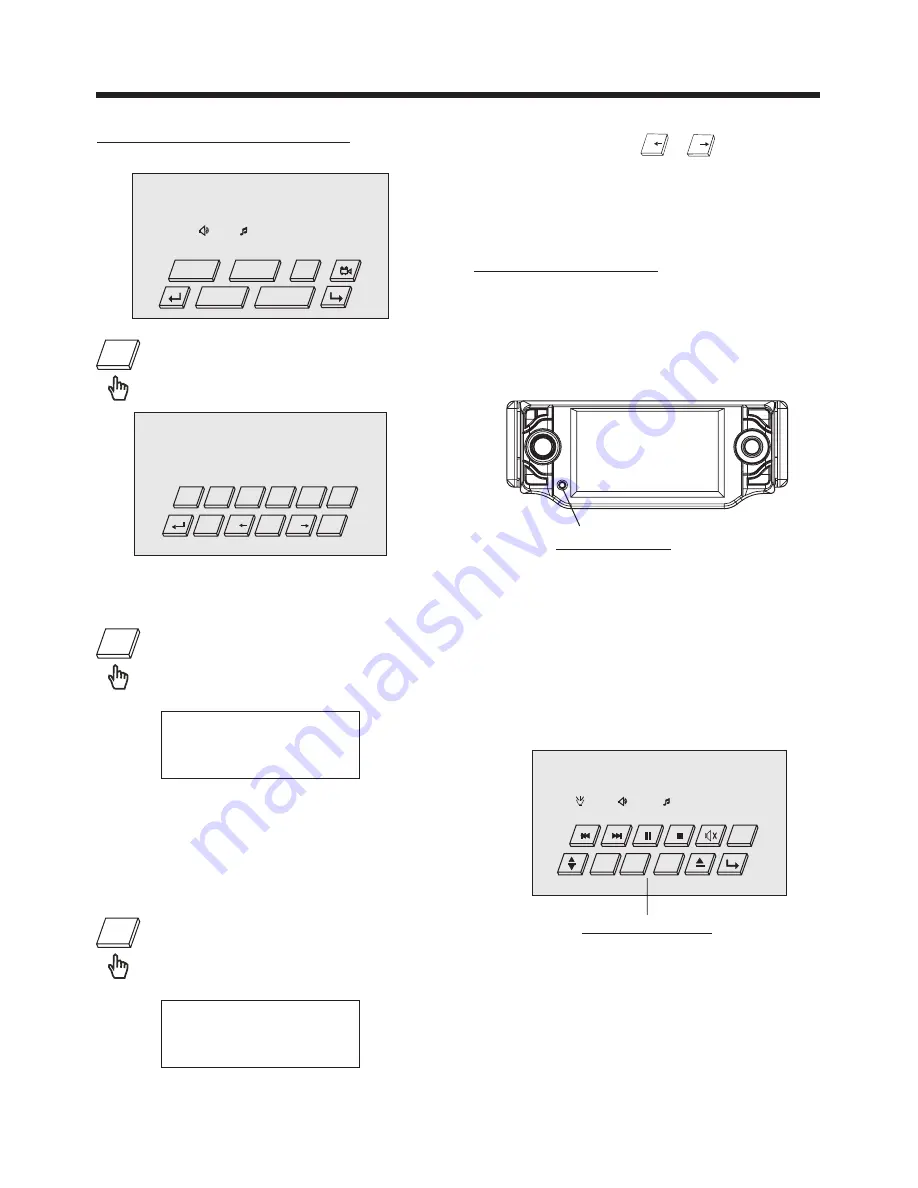
1). Please connect the external device
with stereo jack plug the Aux in socket .

To connect analogue replay devices.
Use this jack to replay sound of other
replay equipment such as DVD players,
computers, etc. Via the loudspeakers.

AUX IN

AUX Socket

Touch and hold the

/

section on

the touch screen , you can select the
title or chapter of DVD . (Only for the
DVD with title /chapter.)

Note:

7/

9/

2). Touch the MOD section on screen
or press the MOD button to select the
AUX IN connection. It will display the
following as below :

GOTO

GOTO

GOTO

DISC

SWF

POP

11:08

DVD 11-0:44:36

GOTO

SET

TITLE

SUBTITLE

AUDIO

Touch to select

Title 01 /01 , Chapter --/15

5

4

3

2

1

0

+10

9/

8

7/

6

Содержание BV7995T

Страница 1: ......

Страница 2: ...Disc Operations Adjustment Rear View Camera Setting Audio Mode Reset The Factory Setting 7 8 12 12 13 17 17 17 18 18 18 1 1 22 24 25 26 2 3 4 5 9 10 16 19 9 9 20 20 22 27 27 27 27 28 28 30 30 31 32 3...

Страница 3: ...clear the temper ature in your car becomes normal DO NOT install any receiver in locations where it may obstruct the steering wheel and gearshift lever operations as this may result in a traffic acci...

Страница 4: ...AND ANNOYING INTERFERENCE USE ONLY THE RECOMMENDED ACCESSORIES THIS DEVICE IS INTENDED FOR CONTINUOUS OPERATION This product incorporates copyright protection technology that is protected by method cl...

Страница 5: ...l rubbing alcohol Never use solvents such as benzine thinner or conventional record cleaners as they may mar the surface of the disc Handling and Cleaning Dirt dust scratches and warping disc will cau...

Страница 6: ...oes not get in the driver s way and cannot injure the passenger if there is a sudden stop like an emergency stop If installation angle exceeds 30 from horizontal the unit might not give its performanc...

Страница 7: ...ve the PLASTIC COVER of the both sides away then insert the two KEY PLATE into left and right side of chassis as above illustration DASH BOARD METAL MOUNTING STRAP HEX NUT SPRING WASHER PLAIN WASHER T...

Страница 8: ...ol panel be sure to turn off the power 1 Press the release button and the left hand side of the front panel will release FIG 1 2 Pull off the front panel FIG 2 and keep the front panel into the case F...

Страница 9: ...rol panel When you want to change the viewing angle of the operating unit to play you can touch the secion on the touch screen or press the button on the panel repeatedly to select the desired angle a...

Страница 10: ...N YELLOW RCH IN RED LCH IN WHITE GREY SUBWOOFER VIDEO OUT 2 YELLOW COAXIAL OUT BROWN WHITE B 12V REAR CAMERA SWITCH GREEN YELLOW AUX optional RCA CABLE REAR CAMERA INPUT B PARKING BRAKE FRONT RCA WHIT...

Страница 11: ...ns to skip ahead or back one track Press this button repeatedly to cycle through the various audio and video adjustments you can make VOLUME BASS TREBLE BALANCE FADER COLOR BRIGHTNESS CONTRAST and TIN...

Страница 12: ...he disc to assist in making playback selections In Radio mode press and hold this button to start the Auto Program mode during which the tuner will scan for all strong stations and assign them to the...

Страница 13: ...nt Touch Screen Key 6 MOD operating mode selection 7 Previous 2 TA Turning pre switching for traffic announcements on and off For RDS 3 AF Switch on and off and alternative frequency For RDS 1 Angle C...

Страница 14: ...access the available adjustment settings for audio and video press this knob repeatedly to cycle through and select them Tint Contrast Bright Color BG Color Volume Bass Treble Balance Fader 2 POWER O...

Страница 15: ...he SEL knob briefly in the APS DISP direction the radio briefly plays all the preset stations of the frequency band In Radio mode swing the SEL knob in direction of the APS DISP for about 2 seconds to...

Страница 16: ...or a radio station automatically 11 BUTTONS TUNE SEEK TRACK SKIP UP DOWN a In DISC USB mode if you wish to jump forwards or backwards press the SEL button 4 briefly in the or direction Note in DVD mod...

Страница 17: ...reen the VOLUME to decrease the volume level Touch screen Touch the screen the VOLUME to increase the volume level Setting Blue tooth ON OFF Touch the SEL section on the touch screen to select the Blu...

Страница 18: ...utomatically displayed on the monitor when you change the gear to the back position The monitor on the unit only Basic Operation Audio Quality Adjustment During DISC playback use your finger touch bri...

Страница 19: ...nitor as follow Setting Audio Modes It s depend on your habit to select the Audio mode A Initial installation of the unit when all wiring is completed B All the function buttons do not operate C Error...

Страница 20: ...adio Mode Touch the MOD range repeat edly on the screen to select the RADIO mode You can also press repeatedly the MOD button to select the RADIO the following information will appears on the display...

Страница 21: ...ve a station which had been stored in the memory in advance the chose number is shown on display RDS FUNCTION TA Traffic Annonuncement priority For Traffic Information In Radio mode touch the TA secti...

Страница 22: ...Radio mode touch the PTY section briefly or press and hold the MU PTY button on the front panel to select the Programme type In Radio mode touch the AF section briefly or swing and hold the SEL knob...

Страница 23: ...select the other item Touch it to select the other item Touch it for previous Touch it to select the other item it will display the following as below when the parking brake is applied 1 3 2 4 5 6 8...

Страница 24: ...n the touch screen to switch the Lound ON or OFF 23 Subwoofer Function Use your finger touch the SWF section on the screen to turn on the Subwoofer function touch it again to cancel function Note 1 In...

Страница 25: ...r on remote control to play in random Each playing 2 RDM RANDOM Function the order is different depend on the disc used for VCD Touch it again to cancel this function FOR VCD Touch the screen the INT...

Страница 26: ...hear the sound from the external device played back through the loudspeakers 4 Touch the volume sections on touch screen or rotate the VOL on the remote to adjust the volume level 1 Please connect th...

Страница 27: ...e OSD D Touch or Press for fourth time OSD DISC Operation E Touch or Press for fifth time The message on the screen will be cleared OSD TITLE ELAPSED T 01 01 C 01 38 0 02 06 TITLE REMAIN T 01 01 C 01...

Страница 28: ...btitle language When no different subtitle language are recorded will be displayed at screen left top corner on the remote Each time the button is pressed or touch number of the subtitle language chan...

Страница 29: ...4 3 Letter Box 4 3 Pan Scan TV Display Angle Mark OSD Lang Spdif Output Captions Screen Saver Last Memory LB ON ENG SPDIF RAW ON ON ON DOLBY GENERAL SETUP PAGE Go To General Setup Page Overview Of The...

Страница 30: ...k OSD Lang TV Display Angle Mark OSD Lang Spdif Output Captions Screen Saver Last Memory DOLBY GENERAL SETUP PAGE Set OSD language English French German Spanish Italian Portuguese OSD Lang English OSD...

Страница 31: ...NGE CONTROL Select DRC and adjust the dynamic range of a Doby Digital encoded program There are 8 steps between full compression and off compression GENERAL SETUP TV Display Angle Mark OSD Lang Spdif...

Страница 32: ...ack by using the cursor buttons 3 SUBTITLE LANGUAGE SETUP Select the preferred SUBTITLE language by using the cursor buttons 4 DISC MENU LANGUAGE SETUP Select the preferred DISC MENU language by using...

Страница 33: ...SPDIF OUPUT OSD LANGUAGE CAPTIONS LAST MEMORY DOWNMIX DYNAMIC TV TYPE AUDIO SUBTITLE DISC MENU PARENTAL PASSWORD NORMAL LB ON ON ENGLISH ON STEREO AUTO ENGLISH OFF ENGLISH 8 ADULT 1379 ON OFF SCR SAV...

Страница 34: ...m USB to DISC Playback Modes If you are in USB Playback mode and wish to begin playback of a disc already in the player touch the range on the touch screen or press the STOP on the remote once Then to...

Страница 35: ...will be deleted Also you can touch or press numeric button to select channel then press SKIP to add channel the screen display SAVE Dub system PAL system contain PAL DK I BG MN dub tone functions and...

Страница 36: ...isplay the following as below when the parking brake is applied Touch the RPT on the touch screen or Pressing REPEAT button on the remote repeatedly can select two kinds of repeat play mode REP ALL Pl...

Страница 37: ...Frequency Coverage 87 5 to108 MHz 87 5 to108 MHz 87 5 to107 9 MHz IF 10 7 MHz 10 7 MHz 10 7 MHz Sensitivity S N 30 dB 15 dBu 15 dBu 15dBu MW MW AM Frequency Coverage 522 to1620 KHz 522 to1620 KHz 530...

Страница 38: ...a cable is not connected Insert the antenna cable firmly The signals are too weak Select a station manually SYMPTOM POSSIBLE CAUSE SOLUTION The color system is set incorrectly No screen image appears...

Отзывы: