BOSER Technology BPF-3219 Скачать руководство пользователя страница 8


2

Ultra slim design: 55~61 mm thickness 

With streamlined mechanical layout, the BPF series panel PC has an 
ultra slim design for space-limited environment. It is not only lower 
maintenance time but also space saving considerably. 

Cost-effective Fanless Embedded System 

The BPF series Panel PC, the most slim, compact size, fanless 
embedded computer, is powered by an ultra-low powerful processor, 
VIA V4 Eden 1GHz CPU onboard, The total power consumption of the 
system is under 62W merely. It generates the best value for both power 
usage and cost saving. Without hard disk space and extra add-on 
cards, All of BPF series panel PC present an ultra slim design and 
provide a cost-effective alternation for users. I/O port feature contains 
VGA, COM, dual LAN, USB 2.0, and PS/2 connectors. Moreover, it 
reserved a CompactFlash socket for storage device. 

1.1 Major 

Features 

The BPF-3219 series come with the following features: 

¾


Ultra slim, fanless, aluminum front panel design 

¾


19” TFT color panel display w/resistive or SAW touch screen 

¾


Built-in HS-2613+VIA V4 Eden 1GHz CPU, 12V DC adapter 

¾


Onboard graphics, dual ethernet, audio controller 

¾


1 x 2.5” HDD space, 1 x slim CD-ROM space 

¾


BPF-3219-Y provides CF, 4 x COM, 3 x USB2.0, TV-Out 

¾


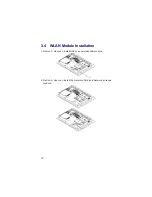
Option for Wireless LAN module 

1.2 Specifications 

z


System 

„


SBC Model


HS-2613 

„


CPU


VIA V4 Eden 1GHz CPU 

„


BIOS 

Award PnP Flash BIOS 

„


System Chipset 

VIA CX700(M) 

„


System Memory 

1 x 200-pin SO-DIMM socket DDR2 533MHz up to 1GB 

Содержание BPF-3219

Страница 1: ...BPF 3219 Ultra Slim 19 Fanless Panel PC Heavy Duty Touch Screen 12V DC Adapter...

Страница 2: ...anted permission by BOSER Technology Co Ltd BOSER Technology Co Ltd reserves the right to change or modify the contents of this document without any notice BOSER Technology Co Ltd assumes no responsib...

Страница 3: ...ckage 5 2 2 Inspection 5 Chapter 3 Hardware Installation 7 3 1 Open the Cover 7 3 2 HDD CD ROM Installation 8 3 3 SBC Installation 11 3 4 WLAN Module Installation 12 3 5 Wallmount Installation 13 Chap...

Страница 4: ...mpleted on a sample of the equipment identified below Equipment Class Information Technology Equipment Product Model Series BPF 3219 This Product Complies With EN55022 Class A for Radiated emissions E...

Страница 5: ...cord is damaged in anyway Do not insert objects into openings Do not immerse product in water or permit liquids to spill inside Turn off power when unattended or not in use Unplug product before movin...

Страница 6: ...e with use The expected operating lifetime of the backlight time to reach 50 initial brightness is 30 000 hours assuming continuous lit state at 25 degrees C Actual lifetime before replacement is abou...

Страница 7: ...e parking field and more it has a built in VIA V4 Eden 1GHz CPU is response to demands of cost effective panel system All of BPF series Panel PC Support resistive SAW touch screens highly expandable i...

Страница 8: ...panel PC present an ultra slim design and provide a cost effective alternation for users I O port feature contains VGA COM dual LAN USB 2 0 and PS 2 connectors Moreover it reserved a CompactFlash soc...

Страница 9: ...1 x Slim CD ROM space Storage 1 x Type II CF socket Watchdog Timer Software programmable time out intervals from 1 255 sec or 1 255 min External I O 4 x COM 3 x USB2 0 PS 2 KB MS 2 x LAN VGA TV Out C...

Страница 10: ...8 0 x 38 0 x 6 1 cm Cut Out Size LxH 43 4 x 34 9 cm Operation Temperature 0 45 degrees C Storage Temperature 20 70 degrees C EMC FCC CE Front Panel Protection IP65 compliance Power Supply 12V DC in 60...

Страница 11: ...e board and exercise extremely careful to prevent any damages to the board from static Integrated circuits will sometimes come out from socket during shipment Examine all integrated circuits particula...

Страница 12: ...6 This page intentionally left blank...

Страница 13: ...are Installation This chapter illustrates how to install components into the Panel PC system External interface please refers to system board s manual 3 1 Open the Cover 1 Remove screws from the back...

Страница 14: ...8 3 2 HDD CD ROM Installation 1 Unscrew the 4 screws with blue vibration pad first figrue3 2 1 then remove the holding bracket from chassis figure3 2 2 Figure 3 2 1 Figure 3 2 2...

Страница 15: ...ch and screw the holding bracket w HDD figure3 2 3 then install HDD back to chassis figure3 2 4 Figure 3 2 3 Figure 3 2 4 3 Remove the CD ROM drive holding bracket from chassis first figure3 2 5 Figur...

Страница 16: ...10 4 Attach and screw the holding bracket in the side of the CD ROM then screw the other side of the drive bay back to chassis figure 3 2 6 3 2 7 Figure 3 2 6 Figure 3 2 7...

Страница 17: ...11 3 3 SBC Installation NOTE Please check system board user manual for connector installation 1 Install the SBC with chassis 2 Use 2 screws install SBC in the front panel next to VGA port...

Страница 18: ...12 3 4 WLAN Module Installation 1 Option 1 User can install USB type wireless LAN module 2 Option 2 User can install the Network Card and Network antenna module...

Страница 19: ...13 3 5 Wallmount Installation There are four wallmount accessories come with package Please use it as showing below...

Страница 20: ...14 This page intentionally left blank...

Страница 21: ...the touch screen driver The following sections describe the installation procedures of driver based on WIN2000 operating systems Other operation system may slightly different 4 1 Touch Screen Driver...

Страница 22: ...select Browse to choose where to install and click on Install to begin installation 4 Once the Install Shield Wizard finishes updating your system click on Finish to exit the wizard We recommend you...

Страница 23: ...o adjust the display with touch screen right click on PM in the system tray of WINXP and choose Control Panel to execute calibrate Choose PenMount 6000USB device and click on Configure that will displ...

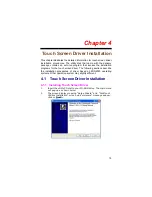
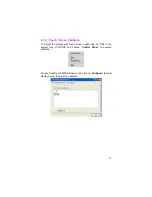
Страница 24: ...18 Click on Standard Calibration button and follow the five calibrate points to do the calibration...

Отзывы: