background image

English

Installation and Safety Guidelines

Page 7

pro.Bose.com

Installation

5)

Choose fasteners to attach brackets to surface that are consistent with all local building codes and requirements to support the 
loads depicted in Figure 3. As a general guideline, use 3/8

"

x 3" lag screws into wood and 3/8"-16 double expansion anchors into 

concrete and masonry block. 

6)

Drill holes into mounting surface using previously marked positions.

7)

Attach left and right brackets using required fasteners as outlined in Step 5. 

8)

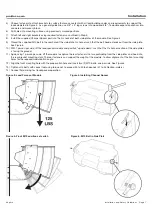
Install the supplied Channel Spacer part into the C-channel of both side-plates of the module. See Figure 4.

9)

Thread the supplied M10 bolt in the rear hole of the side-plate C-channel such that the bolt head extends out from the side plate. 
See Figure 6.

10) With 1 person per side, lift the loudspeaker module and position “upside down” such that the C-channel section of the side plates 

is facing the ground.

11) Again using 1 person per side, lift the module to capture the rear fasteners that are protruding from the side plates and hook into 

the rear bracket mounting slots. The rear fasteners can support the weight of the module, to allow alignment of the front mounting 
holes for the required module pitch angle.   

12) Align the front mounting hole with the proper pitch hole and insert two (2) M10 bolts, one per side. See Figure 5.

13) Tighten all 4 bolts with socket tool using torque not to exceed 35 to 40 foot-pounds (47 to 54 Newton-meters).

14) Connect field wiring, test loudspeaker operation.

Figure 3. Load Forces of Module

Figure 5. Front M10 position sets pitch

Figure 4. Installing Channel Spacer

Figure 6. M10 Bolt in Side Plate

Содержание RoomMatch RMBRKT

Страница 1: ...RoomMatch RMBRKT Surface Mount Bracket Installation and Safety Guidelines Instrucciones de instalación y de seguridad Installation et instructions de sécurité Installations und Sicherheitshinweise ...

Страница 2: ... application We recommend Bose mounting accessories when available A licensed professional engineer must review the design and fabrication of any custom mounting hardware 3 Bose RoomMatch array module loudspeakers feature an integrated side plate rigging system designed to facilitate loudspeaker array mounting by professional installers Module to module connections should be made using only the in...

Страница 3: ...icencia deberá revisar el diseño y la fabricación de cualquier accesorio de montaje personalizado 3 El conjunto de altavoces modulares Bose RoomMatch incorpora un sistema integrado de instalación mediante placa lateral diseñado para facilitar el montaje del conjunto de altavoces a los instaladores profesionales Las conexiones entre módulos deberán realizarse utilizando sólo las placas laterales de...

Страница 4: ...trôler par un professionnel qualifié la conception et la fabrication des accessoires de montage sur mesure 3 Le module d enceintes Array Bose RoomMatch est doté d un système de fixation par plaque latérale intégré destiné à en faciliter le montage par un installateur professionnel La connexion entre deux modules doit être réalisée uniquement à l aide des plaques latérales intégrées et des attaches M...

Страница 5: ...rprüfen 3 Bose RoomMatch Array Modullautsprecher verfügen über ein integriertes Seitenplattenverankerungssystem das die Montage des Lautsprecher Arrays durch fachkundige Monteure erleichtern soll Verbindungen zwischen den Modulen dürfen nur mithilfe der integrierten Verankerungsseitenplatten und den mitgelieferten M10 Befestigungselementen vorgenommen werden Verwenden Sie KEINE Befestigungselement...

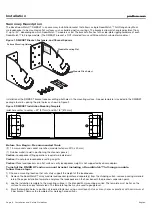
Страница 6: ...ers M10 x 40 mm 1 Rubber mallet to aid in positioning the channel spacers Caution Loudspeaker lifting operations require two individuals Caution Do not place loudspeakers resting on grills Caution Place loudspeakers on a flat surface verify loudspeaker weight is not supported by driver adapters To install the RMBRKT surface mount bracket including a RoomMatch full range module follow these steps 1 ...

Страница 7: ...ead extends out from the side plate See Figure 6 10 With 1 person per side lift the loudspeaker module and position upside down such that the C channel section of the side plates is facing the ground 11 Again using 1 person per side lift the module to capture the rear fasteners that are protruding from the side plates and hook into the rear bracket mounting slots The rear fasteners can support the...

Страница 8: ...asse 36D 61381 Friedrichsdorf Deutschland 06172 7104 0 Hong Kong Bose Limited Suites 2101 2105 Tower One Times Square 1 Matheson Street Causeway Bay Hong Kong 852 2123 9000 India Bose Corporation India Private Limited 4th Floor Shriram Bhartiya Kala Kendra 1 Copernicus Marg New Delhi 110001 India 91 11 23073825 Italy Bose SpA Via Della Magliana 87600148 Rome Italy 066 5670802 Japan Bose K K Shibuy...

Отзывы: