background image

20

System Setup

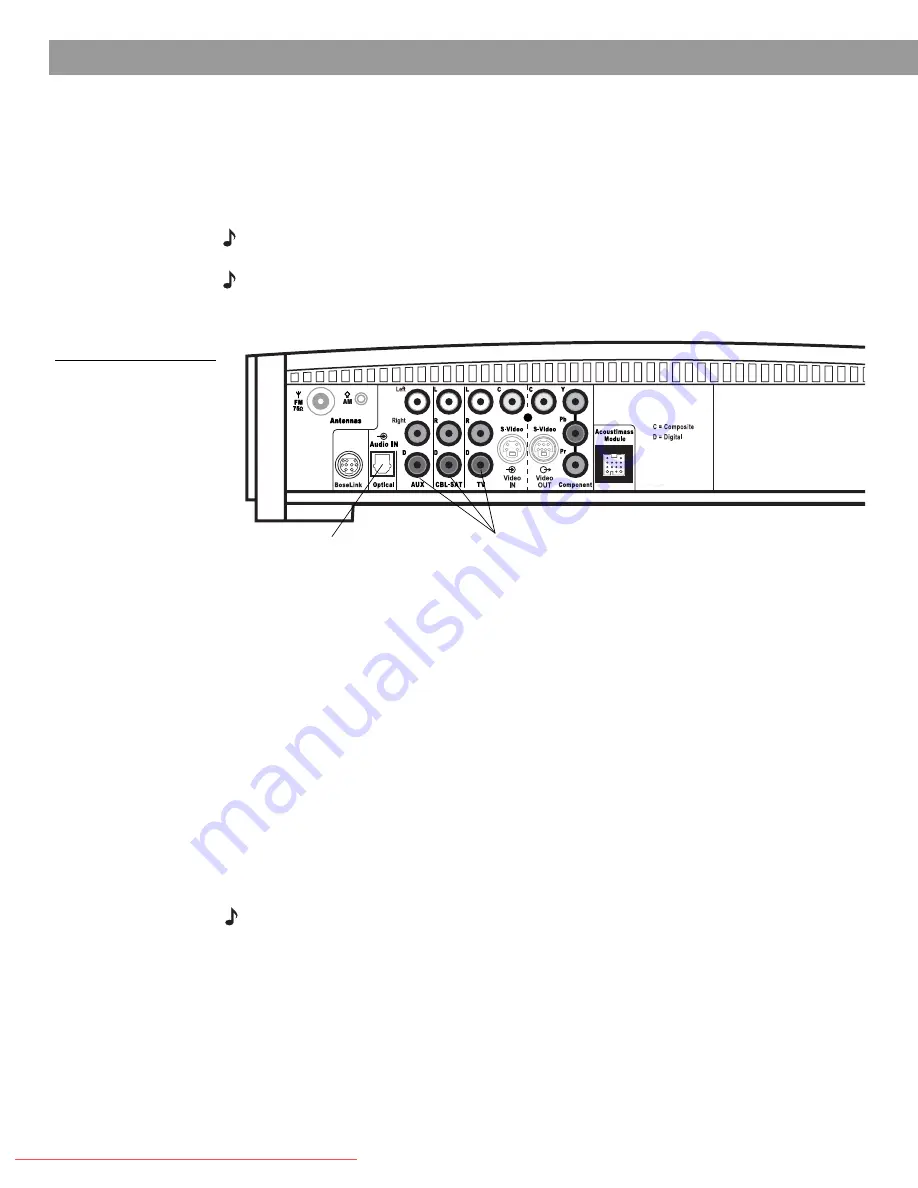
Connecting digital audio devices

Some audio devices may feature a digital audio output for optimum sound performance. Use 
an optical digital cable or a coaxial digital cable, as appropriate, to connect this output to the 
digital input on the media center. You can purchase the required cables at a local electronics 
store.

On the media center rear panel, an optical digital cable connects to the OPTICAL jack. A 
coaxial cable connects to the audio input jacks labeled 

D.

Note: 

The digital audio inputs of the 

3•2•1

 system are not able to decode a DTS bitstream from 

an external audio device. Only a DTS bitstream from the internal DVD player can be decoded.

Note: 

Before you can benefit from the optical connection, you will need to assign the optical 

connector to the audio source in the system settings menu. See “Media center options” on 
page 48.

Figure 16

Media center digital audio 
input jacks

Connecting your cable/satellite box, TV, and VCR to the media center

The 3•2•1 home entertainment system provides flexibility for you to add up to three external 
audio devices, including your TV, directly to the media center. 

Figure 17 shows you an advanced setup using a TV, VCR and cable/satellite box. In this 
setup, please notice the following:

• S-video connections are used to deliver the cable/satellite signal to the media center. 

Therefore, the media center output video is sent to the TV also through an S-video 
connection.

• Analog and digital coax audio connections are shown for the cable/satellite box. As an 

option, you may use an optical digital connection. However, before you can benefit from the 
optical connection, you will need to assign the optical connector to the cable/satellite box 
audio source in the system settings menu. See “Media center options” on page 48.

• When connecting an audio device to the media center jacks, remember to match the red 

jack to the right channel (R) and the white (or black) jack to the left channel (L).

• For further details on making the video connections between your VCR and TV, refer to the 

manuals for these video devices.

Note: 

The recommendations contained in this owner’s guide are basic suggestions for connect-

ing external devices to the 3•2•1 Series II system. Instructions and terminology pertinent to these 
external devices may vary, depending on the manufacturer. Consult the owner’s guide that came 
with the device for clarification on setup and usage before making any connections.

Optical digital 
audio input

Coaxial digital 
audio inputs

Downloaded From TheatreSystem-Manual.com Manuals

Содержание 3-2-1 GS Series III

Страница 1: ...Owner s Guide Downloaded From TheatreSystem Manual com Manuals ...

Страница 2: ...PRODUCT label is located on the bottom of the media center CAUTION Use of controls or adjustments or performance of procedures other than those spec ified herein may result in hazardous radiation exposure The DVD player should not be adjusted or repaired by anyone except properly qualified service personnel Class B emissions limits This Class B digital apparatus meets all requirements of the Canad...

Страница 3: ...S video connections higher quality video 18 Making component video connections highest quality video 19 Connecting digital audio devices 20 Connecting your cable satellite box TV and VCR to the media center 20 Connecting a game console 22 Installing the remote control batteries 23 Connecting the power cord 24 Checking your system setup 25 System Controls and Indicators 26 Remote control 26 The med...

Страница 4: ...by and the double D symbol are trademarks of Dolby Laboratories Manufactured under license from Dolby Laboratories Confidential unpublished works 1992 1997 Dolby Laboratories All rights reserved This product incorporates copyright protection technology that is protected by method claims of certain U S patents and other intellectual property rights owned by Macrovision Corporation and other rights ...

Страница 5: ...g types of discs identified by their corresponding logos Check for region code compatibility For a DVD player and DVD disc to be compatible their region code numbers must match These numbers are allocated according to where the player and disc are sold The 3 2 1 Series II DVD home entertainment systems have a region code which must also match the DVD discs Check the region code number on the carto...

Страница 6: ...ing DTS DVD An acronym that is most commonly known to mean Digital Video Disc or Digital Versatile Disc The audio video data storage system based on 12 and 8 cm optical discs DVD Video A standard for storing and reproducing audio and video on DVD ROM discs based on MPEG video Dolby Digital and MPEG audio and other proprietary data formats IR An acronym for infrared Pertains to the type of remote t...

Страница 7: ...home entertainment systems are covered by a limited transferable warranty Details of the limited warranty are provided on the product registration card that came with your system Please fill out the information section on the card and mail it to Bose Failure to do so will not affect your limited warranty rights For your records Serial numbers are located on the bottom of the media center and the r...

Страница 8: ... and Acoustimass module Copy these numbers onto your product registration card and in the space provided on page 7 120 VAC power cord US Canada 115 230 VAC power cord with adapter US Europe Your system includes one of the following cords 240 VAC power cord Australia 230 VAC power cord Europe 230 VAC power cord UK Singapore Rubber feet for speakers Acoustimass module Batteries Speaker cable 3 2 1 s...

Страница 9: ...entilation openings Do not put it in a built in system such as a bookcase or cab inet that may keep air from flowing through its ventilation openings Place the media center where nothing obstructs opening the disc tray on its front panel Make sure the media center will be placed close enough to the Acoustimass module and the speakers so that all the cables will reach Make sure the media center wil...

Страница 10: ...ze the surround sound experience CAUTION Choose a stable and level surface for both speakers Vibration can cause the speak ers to move particularly on smooth surfaces like marble glass or highly polished wood If you are placing the speakers on a flat surface be sure to attach the smaller of the two sets of sup plied rubber feet to the bottom surface You may obtain additional rubber feet part numbe...

Страница 11: ...such as under a table behind a sofa or chair or behind drapes but do not block the port opening Aim the port of the module into the room or along the wall This prevents a blocked port or over powering bass Stand the Acoustimass module on its feet Do not lay it on its side or stand it on either end Figure 5 Figure 5 Recommended orientation of the module CAUTION Do not block the openings on the back...

Страница 12: ...t jack on the rear of the Acoustimass module Note The jacks for the Acoustimass module cable are keyed so that the cable connectors only plug in one way Make sure that the arrow on the connector body faces up when plugging in the cable Figure 6 Acoustimass module to media center connection Connecting the speakers to the Acoustimass module 1 Insert the single plug end of the speaker cable into the ...

Страница 13: ...of the left speaker Figure 9 Plug the RIGHT speaker cable into the rear jack on the right speaker Figure 9 Left and right speaker connections Note Make sure cable connectors are fully inserted and seated firmly in the speaker jacks Note If you purchased a 3 2 1 GS Series II system the left and right speaker cable connectors will be marked with a GS R IGHT LEFT RIGHT speaker cable LEFT speaker cabl...

Страница 14: ...ment with positioning the loop for opti mum AM reception Follow the instructions enclosed with the AM loop antenna to stand it on the supplied base or mount it to a wall Connecting cable FM radio Some cable TV providers make FM radio signals available through the cable service to your home This connection is made to the external FM jack on the back panel of the media cen ter To connect to this ser...

Страница 15: ...e video connections Note Some older TVs with standard TV cable connectors do not have a composite video or an S video input Such TVs are not compatible with any DVD players and require use of an RF mod ulator for this connection RF modulators are available at your local electronics store 1 Insert one end of the supplied video cable yellow to the Video OUT C composite jack on the back of the media ...

Страница 16: ...o the audio output jacks on your TV Insert the white RCA plug into the white AUDIO OUT L jack Insert the red RCA plug into the red AUDIO OUT R jack 3 Insert one end of the supplied video cable yellow to the Video OUT C composite jack on the back of the media center Insert the other end of the video cable into one of the video input jacks on your TV Figure 12 TV and VCR connections with media cente...

Страница 17: ...f your VCR Insert the other end of the supplied video cable into the Video IN C composite jack on the back of the media center 4 Insert one end of the second video cable yellow into the Video OUT C composite jack on the back of the media center Insert the other end of the second video cable into one of the video input jacks on your TV Figure 13 System setup when TV has no audio output jacks Rememb...

Страница 18: ...ced setup options Making S video connections higher quality video An S video input jack provided on many TVs delivers a higher quality TV picture than the composite video output connection shown in Figure 11 For this connection you will need an S video cable which can be purchased from your Bose dealer or a local electronics retailer Insert one end of the S video cable into the S Video OUT jack on...

Страница 19: ... output jacks Figure 15 2 Plug the other end of each video cable into the corresponding color or letter code com ponent video jack on the back of your TV Figure 15 TV component video to media center connections Note For more information or to purchase the video cables contact your local electronics store or authorized Bose dealer Media center rear panel Color coded component video jacks Y Pb and P...

Страница 20: ...using a TV VCR and cable satellite box In this setup please notice the following S video connections are used to deliver the cable satellite signal to the media center Therefore the media center output video is sent to the TV also through an S video connection Analog and digital coax audio connections are shown for the cable satellite box As an option you may use an optical digital connection Howe...

Страница 21: ... disc that came with your 3 2 1 Series II home entertainment system Cable satellite CBL SAT S video output Cable satellite CBL SAT service Media center s S video output to TV CBL SAT signal to VCR VCR analog audio VCR TV Media center CBL SAT signal to TV CBL SAT analog audio CBL SAT digital audio Downloaded From TheatreSystem Manual com Manuals ...

Страница 22: ...the game console to the C composite Video IN jack Figure 18 Game console connections Game console connection panel TV connection panel Media center IMPORTANT If you connected your game console this way you will need to select the AUX source on the 3 2 1 remote in order to hear sound from the game console Downloaded From TheatreSystem Manual com Manuals ...

Страница 23: ...lent as shown Match the plus and minus marked on the batteries with the plus and minus inside the battery compartment 3 Slide the battery compartment cover back into place Note Replace the batteries when the remote control stops operating or its range seems reduced Figure 19 Installing the batteries Battery compartment door 2 AA batteries IEC R6 Downloaded From TheatreSystem Manual com Manuals ...

Страница 24: ...ctrical authorities 1 Insert the small connector end of the power cord into the AC INPUT connector on the Acoustimass module Figure 20 2 Insert the large end of the cord into an AC power mains outlet Note On 220 240V models only turn the Acoustimass module POWER switch to on l Figure 20 Connecting to power 115V AC input jack Note Provided only on 220 240V rated systems Note Provided only on 115 23...

Страница 25: ...urn off the internal speakers you may need to adjust both the 3 2 1 system volume and your TV volume until you find a level that produces the desired sound In some TVs when the internal speakers are turned off you may need to raise the TV s volume level by 75 to 100 in order to hear audio from the 3 2 1 home entertain ment system See your TV owner s guide for help 5 Turn on your 3 2 1 system Point...

Страница 26: ...on Selects the built in tuner and turns the system on to the previously selected FM AM station Switches between FM and AM when the tuner is selected TV Turns your system on and selects the TV input as the sound source Input Changes the external input to your TV For example your TV might have two external inputs where one is connected to your cable box and the other to your VCR Pressing this button...

Страница 27: ... Puts the main menu of a cable satellite box VCR or PVR on your TV screen if supported Puts the TV program guide if supported on your TV screen Dismisses the Settings menu System menu or TV program guide if sup ported from your TV screen or media center display Tunes the FM or AM radio to the next higher or lower frequency Selects the next item up or down in menus Confirms a menu selection or intr...

Страница 28: ...of no user interaction the disc player stops and returns to the beginning of the disc to wait for the next command Starts the disc player Skips backward or forward through CD tracks Skips backward or forward through DVD chapters Seeks backward or forward to the next strongest radio station Plays audio CD tracks in random order Press again to cancel this mode Repeats a CD CD track DVD chapter or DV...

Страница 29: ...f the system Not all possible choices shown below light up at once Figure 22 The display changes with each adjustment or selection you make Figure 22 Sample media center display On Off Source Volume Enter Eject Turns system power on or off Steps through the available source selections Lowers or raises the volume level Opens or closes the disc tray Used to navigate through menus Selects the next av...

Страница 30: ...e tray The DVD should begin to play automatically If not press Play on the 3 2 1 remote Note Not all DVDs offer the same features For example you can choose to display subtitles while watching a movie only if that particular disc provides subtitle information Before you play your first DVD Familiarize yourself with the 3 2 1 remote control See Remote control on page 26 Be sure you understand how t...

Страница 31: ...rrent DVD Press Chapter to skip to the previous chapter Press Repeat while a chapter is playing to make it repeat Press to scan backward through the current DVD Press to scan forward Press Eject on the media center to stop a disc and open the disc tray Note For information on changing DVD related source settings see DVD settings menu on page 42 Restricting access to video DVDs The DVD Lock menu al...

Страница 32: ...ext track on the current CD Press Track to skip to the previous track Press and hold to scan backward through the current CD Press and hold to scan forward Press once to advance to the next song Press Repeat once for REPEAT TRACK mode Press Repeat again for REPEAT DISC mode Press Repeat again to turn the repeat functions off REPEAT OFF Press Shuffle once for SHUFFLE DISC mode Press Shuffle again t...

Страница 33: ...reset to select the previous stored station OR Press the number of a stored station on the keypad Note For information on changing FM AM related source settings see FM AM settings menu on page 41 Storing stations as presets Using your 3 2 1 remote control you can store up to 20 AM and 20 FM station presets This enables you to tune to a favorite station quickly 1 Tune to the preferred station 2 Sto...

Страница 34: ... 1 or 3 2 1 GS system remote turns on the system and selects the audio for that component Be sure a tape or disc is loaded as needed Use the Volume up or down arrows on the system remote or on the media center to raise or lower the volume of the system Using the sleep timer Your system includes a sleep timer which can be set to turn your system off automatically after 1 to 90 minutes of listening ...

Страница 35: ...ntrol options If you know the device code you can do the following To set up the remote to control your TV 1 Turn on both the 3 2 1 system and your TV 2 Press and hold the TV button until the remote LED is lit about five seconds 3 On the remote keypad enter the four digit device code for your TV The LED will turn off temporarily as you press each key 4 Check that the LED turns off after the code i...

Страница 36: ...f your VCR or PVR does not respond go back to step 2 and try other codes If you are still unsuccess ful see Searching for a device code on page 36 Searching for a device code Use this method if you do not know the device code for a device Note This is a very time consuming process Use it as a last resort To set up the remote to control your TV 1 Turn on both the 3 2 1 system and your TV 2 Press an...

Страница 37: ...and press CBL SAT On Off If your cable satellite box does not respond go back to step 2 and try again To set up the remote to control your VCR or PVR for example TiVo or Replay TV 1 Turn on both the 3 2 1 system and your VCR PVR 2 Press and hold AUX until the remote LED is lit about five seconds 3 Alternately press Channel and AUX On Off until your VCR PVR turns off 4 Press Enter Check that the re...

Страница 38: ...icated by a long blink This is the fourth digit 7 Press Exit Changing channel selection control If you are using your 3 2 1 home entertainment system with other audio devices such as a VCR and cable satellite box you may wish to change channels using one of these other audio devices rather than your TV You can easily switch your 3 2 1 remote to change channels on another audio device 1 Press and h...

Страница 39: ... Settings to display the Settings menu for the selected source If the list of menu items is too long for the screen a small down or up arrow indicates that you need to scroll down or up to see other items 4 Press Exit to dismiss the Settings menu Figure 24 Sample Settings menu on your TV screen Note Any changes made in the settings menu on your TV screen will also appear in the media center displa...

Страница 40: ...ton to select the menu item setting 6 Press the up or down arrow button to change the setting 7 Press Enter or the left arrow button to save the setting 8 Press Exit to dismiss the Settings menu The progression in Figure 26 shows output mode for the FM tuner being changed from Auto to Stereo Figure 26 Changing the FM output mode setting Note You can restore all default settings by choosing Restore...

Страница 41: ...eo Mono Auto Allows you to listen to stereo broad casts in either stereo or mono output RDS Info FM only and only on some systems Off On Off Displays station and program infor mation as available from Radio Data System Sleep Timer Off 10 90 minutes Off Turns the system off after the set time expires Choose off to deactivate the timer Item Name Settings Default Description Track __ of __ Allows you...

Страница 42: ...the current disc according to the number set Some DVDs do not allow direct access to titles Chapter _____ Selects a DVD chapter from the current DVD movie according to the number entered Some DVDs do not allow direct access to chapters Audio Track Dependenton disc Allows you to choose one of the available audio tracks on the current disc Subtitle language Dependenton disc Allows you to choose one ...

Страница 43: ...vailable only when a Dolby Digital 1 1 signal is detected Item Name Settings Default Description Movie EQ On Off On Optimizes the tonal balance for movies Range Compression On Off On Adjusts volume to maintain dialogue intelligibility Keeps some sounds from overwhelming others Mono Decoding On Off On Engages Videostage 5 mono decod ing circuitry to process mono sound one channel audio for your sys...

Страница 44: ...s the System button on your 3 2 1 remote control The System menu appears with Audio options selected showing a list of the Audio options that can be changed 3 Press System again or press Exit to dismiss the System menu Note Entering the System menu causes any DVD or VCD that is playing to pause Figure 27 Sample system menu showing audio options select Bass Compensation Treble Compensation Audio Pr...

Страница 45: ...hlight one of the option categories Audio Video Media Center Remote Control or DVD Lock 4 Press Enter or the down arrow to select the option category 5 Using the down and up arrow buttons select the system option to change 6 Press the right arrow button to see the system option settings 7 Press the up or down arrow button to change the setting 8 Press Enter or the left arrow button to save the set...

Страница 46: ...eased low frequency reproduction Treble Compensation 0 default 14 to 14 Normal high frequency reproduction Decreased or increased high frequency reproduction Audio Processing Automatic default User Adjustable Standard Bose processing applied Processing options Movie EQ Range Compression Mono Decoding available in Source Settings menus Input Levels TV Analog Input Level TV Digital Input Level CBL S...

Страница 47: ...tio Normal default Widescreen 4 3 ratio screen display 16 9 ratio widescreen display Widescreen DVDs Modified default Unmodified Modified default Unmodified Video Connector Composite S Video default Component Identifies the type of video connection made on the back panel of the media center Video Black Level Normal default Extended Screen black level generally appropriate for TVs Increases screen ...

Страница 48: ...ness Darkens or lightens the media center display Display Language English default Dansk Deutsch Espanol Francais Italiano Nederlands Svenska On screen display menus appear in the selected language Optical Source None default TV CBL SAT AUX No digital signal received via optical cable Digital signal received via optical cable for selected source Tuner Spacing US default European Channel spacing fo...

Страница 49: ...nd Brand name Provides a list of TV brands for the 3 2 1 remote control to operate TV Device Code Code number Provides a list of available device codes for the selected TV brand CBL SAT Device Cable Satellite Identifies which of two devices is connected to the CBL SAT input CBL SAT Brand Brand name Provides a list of cable satellite box brands for the 3 2 1 remote control to operate CBL SAT Device...

Страница 50: ...3 2 1 system 2 Press the System button on your 3 2 1 remote control 3 Using the right and left arrow buttons highlight the DVD Lock option 4 Press Enter or the down arrow key Note If you are using the DVD Lock option for the first time enter a four digit password Then enter it again to confirm Video Media Center Remote Control DVD Lock Audio select navigate Select Remote Control to adjust these sy...

Страница 51: ...n of America MPAA rating system Example Choosing a Parental Control Setting of 4 restricts access to videos rated above PG 13 Videos with ratings above that may be viewed only after entering the password Your password also helps prevent others from changing the restriction level setting without permission Parental Control Setting MPAA Rating Audience Restriction 8 None 7 NC 17 Adult audiences 6 R ...

Страница 52: ...ves Do not allow liquids to spill into any openings The speaker grilles require no special care although you may vacuum them carefully if necessary Cleaning discs Handle discs by their edges to prevent fingerprints and scratches Figure 33a To remove stains or fingerprints from the surface of a disc use a soft and dry lint free cloth Wipe in straight movements from the center of the disc to the out...

Страница 53: ... 2 1 Series II and 3 2 1 GS Series II system shelf speakers are compatible with Bose mounting accessories including the UB 20 wall brackets UFS 20 floor stands and UTS 20 table stands Figure 35 Bose also offers cable adapters for use in running speaker cable through walls For further information or to order the mounting brackets stands or cable adapters contact your Bose dealer or Bose Corporation...

Страница 54: ...TE is lit on the display If it is press the Mute button on the remote con trol to unmute the sound Make sure the Acoustimass module cable and speaker cable are firmly seated in their respective jacks and the multi pin connector on the other end is firmly seated in the Acoustimass module jack Check speaker connections Turn the media center off for 10 seconds then on again to restore communication b...

Страница 55: ...s lit After pressing the CD DVD button wait a few seconds before pressing Play Make sure the disc is properly inserted label side up Eject the disc and try loading it again There may be dirt or dust on the disc Clean the disc See Cleaning discs on page 52 The disc may be defective Try another disc Make sure region codes for both the DVD and player match See Check for region code compatibility page...

Страница 56: ...FM antenna AM external AM antenna Maximum ambient temperature 104 F 45 C Dimensions Media center 3 H x 13 W x 10 D 8 3 cm x 34 9 cm x 25 4 cm Remote control 11 8 H x 21 2 W x 9 D 3 0 cm x 6 5 cm x 22 9 cm 3 2 1 speakers 31 2 H x 77 8 W x 51 4 D 8 7 cm x 19 9 cm x 13 6 cm 3 2 1 GS speakers 4 H x 51 2 W x 21 2 D 10 5 cm x 14 cm x 6 4 cm Acoustimass module 141 2 H x 83 4 W x 191 8 D 36 7 cm x 22 2 cm...

Страница 57: ...n 0619 Hytex 0007 IEEC 1018 Jasco 0015 0315 0153 Jebsee 0400 Jerrold 0476 0810 0276 0003 0012 0014 0098 0047 0011 0015 Leon 0069 0015 LG 0144 0040 0838 0779 Magnavox 0069 Memorex 0000 MNET 0443 0019 Motorola 0476 0810 0276 1254 1106 Movie Time 0063 0078 Mr Zap 1112 MS 0015 1018 0303 0069 NET 0274 Noos 0817 Now 0776 NSC 0063 0070 NTL 1068 Oak 0007 0248 0019 Ono 1068 Optimus 0021 Pace 0237 1060 1068...

Страница 58: ...175 0847 BT 0515 0710 0668 Bush 0067 0522 Cambridge 0515 Canal Digital 0853 Canal Satellite 0853 Canal 0853 Chaparral 0216 0053 CityCom 1176 0818 0115 Clark 0811 CNT 0520 Commlink 0288 Connexions 0396 Conrad 0607 0115 0809 Crossdigital 1109 Crown 0243 D box 1127 0873 0723 Dae Young 0735 Daeryung 0396 Digenius 0299 DirecTV 2001 0392 0566 2002 0639 1142 0247 0749 1749 0724 0819 1856 1076 1109 0099 D...

Страница 59: ...s 0369 Luxor 0172 0108 0573 Macab 0586 0179 Magnavox 0724 0722 Manhattan 0520 1017 0455 0765 0592 1083 Maspro 0336 0092 0750 0495 Matsui 0571 Matsushita 0500 0340 Mediamarkt 0243 MediaSat 0853 Memorex 0724 Metronic 0713 0084 1215 Micronik 1003 Minerva 0571 Mitsubishi 0749 0491 Morgan s 0132 0683 0513 1103 0243 0829 Motorola 0869 Multichoice 0879 0642 Multistar 0331 Muratto 0335 Navex 0332 NEC 0499...

Страница 60: ...funken 0421 Teleka 0243 0613 Telesat 0605 Telestar 0114 1100 0501 0157 Televisa 2004 0887 Thomson 0455 1012 0853 0711 1046 Thorens 0586 Tonna 0668 0346 Topfield 1206 Toshiba 0749 1749 0790 0486 1285 0082 TPS 1253 0820 Triad 0351 0335 0321 Triasat 0501 0414 Triax 0115 Twinner 0136 UltimateTV 2001 0392 0639 2002 Uniden 0724 0722 0074 0052 0238 0831 Unitor 0332 Universum 0173 0571 Victor 0506 0505 04...

Страница 61: ...al 0451 Citizen 0039 0186 0056 1928 0046 0280 Clairtone 0185 Clarivox 0037 Clatronic 0370 0247 Clayton 0385 Colt 1906 Concerto 0056 Condor 0320 0370 Contec 0036 0216 0009 0185 0157 Continental Edison 0205 0198 0196 0399 Crosley 0084 0074 0087 Crown 0039 0579 0037 0418 0009 0370 CS Electronics 0414 0216 CTC 0247 Curtis Mathes 0451 0093 0145 0166 0056 1919 0039 0466 0016 Cybertron 0218 Daewoo 0451 0...

Страница 62: ... 0374 0216 Hypson 0282 0264 0037 ICE 0371 0264 0217 ICeS 0218 Imperial 0247 0552 0084 0418 0074 0370 0630 Indiana 0037 Ingelen 0163 Inno Hit 0516 0072 Innova 0037 Interfunk 0361 0247 0163 0512 0037 Intervision 0102 0377 0037 0264 0217 IR 0074 IRT 0628 Isukai 0218 ITC 0552 ITS 0371 ITT 0548 0163 0544 0361 0351 Janeil 0046 JCB 0000 Jean 0003 0179 0009 Jensen 0815 1933 0817 JVC 0053 0653 0036 0190 06...

Страница 63: ...05 0179 0320 0443 0655 1929 0177 0294 0355 0544 1911 0037 0235 0321 0516 Osaki 0032 0218 0493 0217 0412 0072 0264 Oso 0218 Osume 0072 0032 0157 Otto Versand 0037 0320 0505 0552 0036 0217 0349 0535 0556 0010 0191 0343 0512 0554 Palladium 0363 0418 0370 Panama 0264 0217 Panasonic 0250 1930 0126 1947 0226 0340 1650 1927 0055 1946 0214 0274 0650 1924 0037 1941 0163 0367 1919 Pathe Cinema 0320 0238 021...

Страница 64: ...s 0157 0200 0535 0037 0195 0328 0191 0327 0554 Signature 0016 Silver 0036 Simpson 0187 0186 Singer 0087 Sinudyne 0177 0516 0102 0294 0087 0235 0544 0010 Skantic 0356 SKY 0037 Skysonic 0696 Skyworth 0037 Solavox 0032 0351 0163 Sonitron 0208 Sonoko 0037 0009 Sonolor 0208 0163 Sontec 0037 Sony 0000 0010 0080 0650 1505 1925 0036 0505 1010 1904 0011 0111 0651 1651 Soundesign 0178 0186 0179 Soundwave 00...

Страница 65: ... 0000 0352 0348 0687 0307 0479 Akai 0041 0315 0106 Akiba 0072 Alba 0209 0072 0278 0352 0315 0293 0020 Alienware 1972 Ambassador 0020 America Action 0278 American High 0035 Amstrad 0000 Anam 0162 0037 0240 0278 0226 Anam National 0162 0454 0226 1562 Anitech 0072 ASA 0037 0081 Asha 0240 Asuka 0037 Audiovox 0037 0278 Baird 0000 0104 0041 Bang Olufsen 0499 Basic Line 0072 0278 0020 Beaumark 0240 Bell ...

Страница 66: ...or 0048 0104 0043 0062 0106 LXI 0037 M Electronic 0000 0038 Magnasonic 1278 Magnavox 0035 0039 0081 0000 0149 1781 Magnin 0240 Manesth 0045 0072 Marantz 0035 0081 0062 Marta 0037 Matsui 0209 0348 0004 0352 Matsushita 0035 0162 0227 0226 Media Center PC 1972 Medion 0348 MEI 0035 Memorex 0035 0162 0037 0048 0039 0047 0240 0000 0104 0209 0307 0479 0454 0348 1237 Memphis 0072 Metz 0162 0037 0347 1562 ...

Страница 67: ...Sontec 0037 Sony 0035 0032 0033 0000 0636 1232 0034 1032 STS 0042 Sunkai 0348 Sunstar 0000 Suntronic 0000 Sylvania 0035 0081 0000 0043 1781 Symphonic 0000 Tagar Systems 1972 Tandy 0000 0104 Tashiko 0037 0000 Tatung 0081 0045 0000 0067 0041 0008 Teac 0000 0041 0278 0642 0637 0307 Tec 0020 Technics 0035 0162 0226 Teco 0035 0037 0048 0041 0038 0040 Teknika 0035 0037 0000 Teleavia 0041 0493 Telefunken...

Страница 68: ... 2004 Bose Corporation The Mountain Framingham MA 01701 9168 USA 274558 AM Rev 00 CCM 000364 Downloaded From TheatreSystem Manual com Manuals ...

Отзывы: