background image

Содержание WTVC533SUS

Страница 1: ...osch Vision _ 300 500 800 Series Electric Clothes Dryers ...

Страница 2: ...ight when the buzzer rings Wrinkle Block gives you one hour of intermittent tumbling preventing creases from setting in and ultimately reducing ironing time Stainless Steel Drum Bosch dryers feature smooth stainless steel drums for the gentlest of care 160 Door Hinge The dryer door opens up to 160 making it easier to load and unload laundry Washer and dryer doors also open in opposite directions s...

Страница 3: ...Laundry Identification of fabrics Drying tips Cycle Selection Options Delicates ECO Action LED indicators of cycle sequence Cycle Selection Table Automatic cycles Steam cycles Special cycles Time cycles Additional Options on LCD Menu Operation Using the dryer Cleaning the lint filter Using the dryer rack Option Cleaning and care Cleaning the dryer Cleaning the exhaust duct Cleaning the moisture se...

Страница 4: ... the dryer our customer service team will be happy to assist you Further information and a selection of our products can be found on our web site www boschappliances com Information Please read and follow these operating and installation instructions and all other information enclosed with the dryer Models Covered by this User Manual Display types The instructions in this manual refer to dryers wi...

Страница 5: ...E IS REMOVED FROM SERVICE OR DISCARDED REMOVE THE DOOR TO THE DRYING COMPARTMENT Do not place items exposed to cooking oils in your dryer Items contaminated with cooking oils may contribute to a chemical reaction that could cause a laundry load to catch fire 3 The dryer must only be used for its intended purpose Do not reach into the appliance if the drum is rotating Do not install or store this a...

Страница 6: ...ose connections on a regular basis to ensure that they are tight and not leaking Notes A B C The IMPORTANT SAFEGUARDS and WARNINGS presented in this manual do not cover all possible conditions that may OCCUr Common sense caution and care must be exercised when installing maintaining or operating the dryer Always contact your dealer distributor service agent or the manufacturer about any problems o...

Страница 7: ...ironmentally friendly and can be reused Please dispose of packaging in an environmentally friendly manner Please ask your dealer or inquire at your local authority about the best means of disposal Disposal of the old appliance If the appliance is no longer usable pull out main plug cut off power cord and discard with main plug To prevent children from locking themselves in the appliance remove the...

Страница 8: ...tion the dryer near the installation location see page 8 5 If required change the door hinge to the left see page 9 6 If required install the side or bottom exhaust air outlet on the dryer see page 19 7 Have the power supply cord fitted by a qualified technician or a licensed electrician see page 14 Check for Y connection short hose and water supply hose included with the dryer packaging see page ...

Страница 9: ... can be reversed if necessary Tools Needed T20 star head screwdriver Hinge Reversal Parts Hinge with 4 white plastic bushings Hinge Cover Plate Door Assembly Hinge Reversal Procedure 1 Unplug the dryer 2 Prepare a firm flat padded surface to lay the dryer door on while changing the hinge 3 Open the dryer door to fully expose the hinge cover 4 Remove the 4 screws holding the hinge cover in place re...

Страница 10: ...lip the door over so the back faces up 16 Reassemble the parts preserving their new alignments 17 Reinsert the single screw that goes under the striker plate Tighten the screw securely 18 Rotate the striker cover and striker 180 degrees so the assembly fits to the install area on the opposite side of the door where the hinge had been Reinstall the striker cover and striker to the new location and ...

Страница 11: ...ied minimum size Refer to the following illustrations of enclosed installations for additional information Allow additional clearance for door wall and window molding where necessary Installation Types Observe the following minimum clearances between the dryer and adjacent surfaces for all installation types Minimum Installation Clearances A Sides 0 25in 6 4mm B Top 0 25in 6 4mm C Rear 5 25in 13 4...

Страница 12: ...out shelfstackingkit H Width 27 50in 69 9cm I Depth 37 25in 94 6cm Appliance must not be mounted on a pedestal for stacked installations The washer must not be stacked on top of the dryer Serious injury and damage may result D Utilize care in sliding the stacked washer and dryer units into place See the stacking kit installation instructions for further information Side by Side Dimensions for side...

Страница 13: ...of the dryer It is recommended to have a water supply pressure of 20 100 psi 1 37 6 89 bar for best performance Since most connections will share the cold water faucet used by the clothes washer a Y connector is provided along with a short hose if needed in order to connect the water supply hose to the cold water faucet 1 Y connector 2 Short metal braided inlet hose 3 Rubber washer inserted in fem...

Страница 14: ...Contact your local dealer or customer service for additional details see page 32 Never ground the dryer to plastic plumbing lines gas lines or water pipes Grounding instruction This appliance must be grounded In the event of a malfunction or breakdown grounding will reduce the risk of electric shock by providing a path of least resistance for the electric current 10 Attach the right angle connecto...

Страница 15: ...ii_iii_ii_ii_ii_i_ i _i _ _iil o _ installation _r 3 wire installation Loosen the bottom screw of the grounding strap Straighten the grounding strap so it is vertical Replace the green screw in the GROUND terminal hole Make sure the grounding strap does not touch the back panel to avoid tripping the circuit breaker during dryer operation Q ake sure that there is a grounding strap in place The illu...

Страница 16: ...ef clamp screws 2 5 Nm so that the power cord f_3 _ _ cannot be moved _Ji _ _ _ This will hold the power cord in place and will make it easier to correctly install the terminal screws Attach the 2 power cord outer conductors red and black either one can go left or right on the 2 terminals labeled L Attach the remaining power cord conductor white to the terminal labeled N Make sure the terminal scr...

Страница 17: ...liance optional Special exhaust air connections can be obtained from your dealer part supplier or customer service for either connection type see page 19 Side exhaust kit Bottom exhaust kit A qualified technician should change the exhaust air outlet to the optional connection location Ductwork The dryer vent system moves moist air away as your clothes tumble dry You can shorten drying times save e...

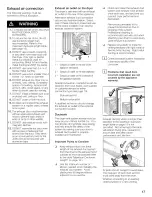
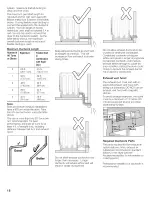
Страница 18: ...distance between last turn and exhaust hood Good Better Keep exhaust ductwork as short and as straight as practical This will increase air flow and result in shorter drying times _ii iiidiiii i Do not allow exhaust ductwork to be longer than necessary Longer ductwork will reduce airflow and will result in longer drying times Do not allow exhaust ductwork to be crushed or otherwise constricted Cons...

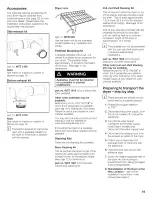
Страница 19: ...hes 16 mm to the stacked height See page 12 for dimensions part no WTZ 1601 is for the basic mechanical stacking kit Pull Out Shelf Stacking Kit This kit serves to stack the dryer on top of the washer and also provides a pull out shelf This kit adds approximately 1 52 inches 38 6 mm to the stacked washer dryer height See page 12 for dimensions This kit may also be combined with the pedestal mounti...

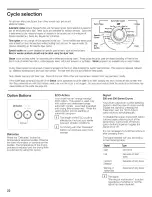
Страница 20: ...ies LEDcountdownindicatesthe estimated remaining timeof a runningcycle in minutes 800 Series Indicates the settingsof additionaloptionsandthe estimatedremaining timeof programs Seepage25 Additional Options Menuselectsoneof the additionaloptions Select changesthe settingsof the selectedoption Option buttons Addfunctions to the cycleselected Theoptionbutton LEDis lit whenthe optionis selected Presst...

Страница 21: ...ended period of time you should 1 Turn off the circuit breaker 2 Unplug the power supply plug if possible 3 Clean the lint filter 4 Turn off the water supply applies only to Steam dryers Laundry Identification of fabrics Observe the treatment symbols on the textile labels They provide valuable information as well as limitations about the drying process Do not dry the following textiles in the drye...

Страница 22: ...s wouldbe wateris notseensprayingintodrum clothesare lesswrinkle free than theycustomarily arewiththis function checkto besurethe nozzle is notclogged Lint mayaccumulate to blockthe nozzle tip or hardwatermay causebuilduponthe nozzle seepage29 Option Buttons Delicates i Delicates Press the Delicates button for temperature sensitive textiles Observe the care information or symbols on the textiles T...

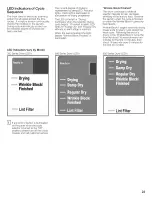
Страница 23: ...he load is finished the LED beside Wrinkle BlocWFinished is illuminated 500 Series Dryer LED s Wrinkle Block Finished The drum continues to rotate at specific intervals to help decrease wrinkling of the laundry load Remove the laundry when the cycle is finished or within the Wrinkle Block period for best results Wrinkle Block begins when the drying phase ends for every cycle except the wool cycle ...

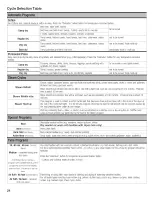
Страница 24: ...tes Thisprogramis usedto refresha cottontextileloadthat hasbeendriedandhasbeenleftin the drumof the dryerat Steam Touch up the endof the cycleovernight This20 minuteprogramrefreshes the loadto helpsmoothout the wrinklescausedby the loadpressingdownunderitsown weight Clothingcontaining foam rubber or plasticmustbe refreshed ona clothes lineor by usingthe Air fluff No heat cycleasthesearticlesmayign...

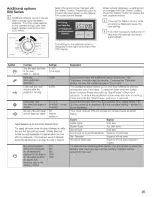
Страница 25: ...is running Volumeof the endsignal andthe dampdry signal Settings 0 12h 0 5 h steps 0n 0ff Off medium maximum SignalBehavior at the Endof the SelectedCycle Thesignalwill soundwhenthe cycleis finishedto notify the userthatthe cyclehasended WrinkleBlockwill tumblethe loadperiodically for approximately onehour afterthe cycleends Thesignalwill soundat intervals duringWrinkleBlockasa reminderthe loadisf...

Страница 26: ...olen clothing and shoes see the information on page 28 Ensure that there is only laundry in the drum Check that all items are completely in the drum and that none are caught between the door and the dryer housing or door seal 6 Close the door The Start Pause indicator light continues flashing Press the Start Pause button The selected cycle begins and the Start Pause indicator light stops blinking ...

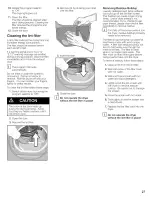
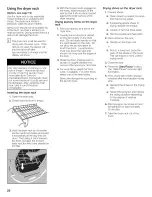
Страница 27: ...he filter 6 Close the door D Do not operate the dryer without the lint filter in place Removing Residue Buildup Laundry detergent and fabric softener can build up on the lint filter screen This buildup can cause longer drying times Use of dryer sheets is not recommended If you choose to use dryer sheets please clean the lint filter periodically to remove residue D If lint falls off the screen whil...

Страница 28: ...ing Drying laundry items on the dryer rack 2 Fold your laundry so it fits on the dryer rack Laundry items should be placed so they lay loosely on the dryer rack Do not stack laundry so that it is compressed on the rack Do not allow the laundry items to touch the drum Laundry items must only touch the rack and should not hang over the edges of the rack Close the door making sure no laundry is caugh...

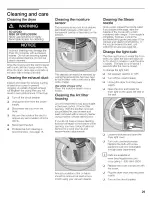
Страница 29: ... the lint filter opening With the lint filter removed accumulated lint can be seen and easily removed with a vaccum cleaner using a narrow crevice cleaning tool If you do not have a crevice cleaning tool that will reach to the bottom of the opening you may contact Customer Service for a list of sources and recommended attachments Any accumulation of lint or debris should be removed at least once a...

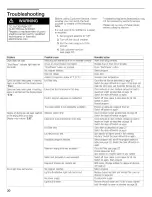
Страница 30: ... programselected Maximum dryingtime wasexceeded Motorlimittemperaturewasexceeded Degree of drynessnot correctlyset Noprogramselected Lightbulbdefective light bulbburnedout Nopowersupply Lightbulbis loose Remedialaction Insertmainplugcorrectly Replace fuseor resetcircuitbreaker Press Start Pause button Selectprogram Closedoor Increaseroomtemperature Cleanthe lintfilter as described onpage27 Switcht...

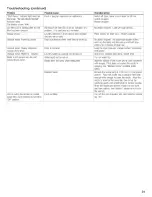
Страница 31: ...p Laundryballedupcausingloadto bounce Watertap s not turnedon Nozzle doesnot spraywateradequately Blocked nozzle LEDor buttonilluminated oncontrol Faultcondition panelwhenCycleSelectoris turnedto Off position Noactionrequired As suspension systemrollers warmupthumpingwill decrease andshouldstop within2 to 3 minutesof dryeruse Levelthe dryer seeusermanualsection Installation Instructons Stopdryer s...

Страница 32: ...you are not satisfied This will usually correct the problem If after working with your installer or service person the problem still has not been resolved to your satisfaction please let us know by either writing to us at BSH Home Appliances Corporation 5551 McFadden Avenue Huntington Beach CA 92649 or calling us at 1 800 944 2904 Please be sure to include if writing or have available if calling t...

Страница 33: ...responsibility hereunder is to repair manufacturer defective Product only using a Bosch authorized service provider during normal business hours For safety and property damage concerns Bosch highly recommends that you do not attempt to repair the Product yourself or use an un authorized servicer Bosch will have no responsibility or liability for repairs or work performed by a non authorized servic...

Страница 34: ...t correction of installation problems you are solely responsible for any structure and setting for the Product including all electrical plumbing or other connecting facilities for proper foundation flooring and for any alterations including without limitation cabinetry walls floors shelving etc and resetting of breakers or fuses TO THE EXTENT ALLOWED BY LAW THIS WARRANTY SETS OUT YOUR EXCLUSIVE RE...

Страница 35: ...acion de arrugas y en definitiva reduce el tiempo de planchado Tambores de acero inoxidable El tambor de lavado Nexxt TM tiene centenas de orificios de bordes redoblados que permiten a sus prendas rodar suavmente sin presentar enganches Bisagra de la puerta de 160 La puerta de la secadora se abre hasta 160 Io que hace mas facil cargar y descargar la ropa Las puertas de la lavadora y de la secadora...

Страница 36: ...endas Consejos para el secado Seleccion del ciclo Opciones Delicates Ropa fina ECO Action Accion ecologica Indicadores de LED de la secuencia del ciclo Tabla de seleccion de ciclos Programas automaticos Steam ciclos Programas temporizados Opciones adicionales Serie 800 Funcionamiento Uso del secador Limpiar el filtro para pelusas Uso de la canastilla opciones Limpieza y cuidado Limpieza del secado...

Страница 37: ...clientes gustosamente le respondera En nuestra pagina de web encontrara mas informacion referida a nuestros productos y su seleccion www boschappliances com Informacion Rogamos leer y seguir estas instrucciones de funcionamiento e instalacion conjuntamente con todas aquellas informaciones entregadas con nuestra maquina de lavar Modelos que abarca este manual del usuario La presentacion escribe a m...

Страница 38: ...r a que los ni_os se suban a la secadora se guarden encima de la secadora dentro de ella en los estantes ni en gabinetes u otras areas de almacenamiento adyacentes a la secadora 7 No permita que los juguetes u otros objetos de los ni_os que puedan alentar a que los ni_os se suban a la secadora se guarden encima de la secadora dentro de ella en los estantes ni en gabinetes u otras areas de almacena...

Страница 39: ... lesiones o da_os 32 Para evitar da_os en el piso y tambien en el crecimiento de moho no permita que salpicaduras o derramamientos de agua se acumulen alrededor o debajo del secador 33 Aseg0rese de que todas las conexiones de agua del secador tengan una valvula de paso y de que se encuentren en un lugar facilmente accesible Cierre la s valvula s de paso del electrodomestico al final de cada dia de...

Страница 40: ...iejos Si el electrodomestico ya no se encuentra en condiciones de uso desconecte el enchufe principal corte el cable de alimentacion y elimine el cable junto con el enchufe principal Para evitar que los niSos queden encerrados dentro del electrodomestico retire la puerta Para evitar que los niSos al jugar se pongan en peligro al quedar atrapados asegurarse de que el mecanismo de cierre de la puert...

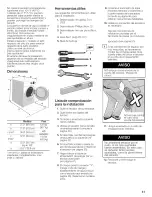
Страница 41: ... conductos apropiado vet pagina 50 Si las condiciones de espacio son muy reducidas se recomienda montar las primeras partes de la tuberia antes de ubicar el secador en su sitio de emplazamiento definitivo NO empuje contra el vidrio de la puerta del secador iRiesgo de rotura Medidas Peso a 27 0 68 6cm 125 Ibs b 31 8 81 0cm 56 7 kg c min 36 9 93 6cm with packaging c 37 8 95 9cm 143 Ibs max 64 8 kg d...

Страница 42: ...n la Iocalizacion de fallos ver pagina 30 de las INSTRUCCIONES DE FUNCIONAMIENTO y determine el fallo C6mo invertir la bisagra de la puerta La secadora viene de fabrica con la bisagra del lado derecho de la puerta De ser necesario se puede invertir la bisagra de la puerta Herramientas necesarias Destornillador con cabeza de estrella T20 Piezas para invertir la bisagra Bisagra con 4 manguitos de pl...

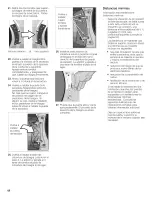
Страница 43: ... ilustracion con la letra A 14 Gire el anillo delantero 180 grados para que ahora el mango de la puerta quede del lado derecho El mango de la puerta esta ubicado en el interior del anillo delantero Es una hendidura del tama_o de la mano 15 16 17 Voltee la puerta para que la parte trasera apunte hacia arriba Vuelva a colocar las piezas manteniendo su nueva alineacion Vuelva a insertar el tornilio q...

Страница 44: ... apropiadamente El proceso de la reversion de la bisagra es ahora completo Distancias minimas Informacion importante sobre distancias minimas Seg0n la ubicacion de la conexion de aire del escape se debe sumar a este lado el lado donde se encuentra la conexion una distancia minima adicional de 5 1 2 pulgadas 14 cm para conductos soportes consulte la pagina 52 Los beneficios de mantener una distanci...

Страница 45: ...ra y secadora apiladas En la siguiente ilustracion se muestran las dimensiones para la instalacion apilada Hay dos kits para apilar disponibles para apilar la secadora encima de la lavadora consulte la seccion Accesorios en la pagina 52 Por su peso y tama_o se recomienda que mas de dos personas levanten la secadora para colocarla en su posicion No hacerlo puede ocasionar lesiones personales o la m...

Страница 46: ...necesaria a fin de conectar la manguera de suministro al grifo de agua fria Piezas de la secadora a vapor incluidas Las siguientes piezas estan incluidas con el envfo de su secador 2 0 3 4 2 Conector Y Manguera de entrada de metal trenzado corta Arandela de hule insertada en la parte hembra de la manguera de entrada corta que se muestra separada para mayor claridad 4 manguera de suministro de agua...

Страница 47: ... quite la clavija de puesta a tierra Su secador se provee sin el cable de alimentacion El cable a conec tar debe presentar las siguientes caracteristicas Aprobacion UL en USA 208 a 240 volts de valor eficaz minimo 30 amperes Tipo SRDT o DRT UL 21 58 Cinco pie de Iongitud minimo El cable de alimentacion debe set conectado pot un tecnico calificado o un etectricista con licencia 0nicamente Utilice 0...

Страница 48: ...de que la correa de conexi6n a tierra _ correa de conexi6n a tierra Instalacibn con cable de 3 conductores m Enderece la correa de conexi6n a tierra para que quede vertical Vuelva a colocar el tomillo verde en el odficio del borne GROUND Conexi6n a tierra AsegQrese de que la correa de conexi6n a tierra no toque el panel posterior para evitar desconectar el disyuntor durante el funcionamiento del s...

Страница 49: ... de los tornillos de los bornes Enhebre el cable de 3 conductores a trav6s de la abrazadera de descarga de tracci6n Apriete los tornillos de la abrazadera de descarga de traccidn 2 5 Nm de modo que el cable de alimentaci6n no se mueva Conecte los 2 conductores externos del cable de alimentaci6n rojo y negro cualquiera de los dos puede ira Ja izquierda o a la derecha a los 2 bornes rotulados con la...

Страница 50: ...rdel electr0d0mestic0 0pciOn Las conexiones especiales para el aire de salida se las provee su vendedor al igual que parte requeridas para cada opcion vet la pagina 52 Juego para salida lateral Juego de salida inferior El cambio de la salida de aire y una conexion opcional debe efectuarla un tecnico calificado Tuberia Puntos importantes a considerar El sistema de respiradero del secador separa el ...

Страница 51: ...al usar la tabla anterior No se recomienda el uso de mas de dos codos de 90 Para un mejor rendimiento separe los codos a una distancia de al menos 4 pies de conducto recto incluida la distancia entre el 01timo codo y la campana de escape Good Better Mantenga los conductos de escape tan cortos y tan rectos como sea posible desde el punto de vista practico Esto aumentara el flujo de aire y tendra co...

Страница 52: ...bre un pedestal en instalaciones apiladas La pieza n WTZ 1610 es para un pedestal blanco liso Puede haber otros colores de pedestales disponibles Identifique la pieza n WT7 1610 X en la que la X designa un color disponible p ej A para antracita P para plata Consulte a su distribuidor sobre las opciones de colores disponibles Tambien puede consultar un catalogo de productos actual o visitar nuestra...

Страница 53: ...nistro de agua Desconecte la manguera de suministro de agua 4 Desconecte el tubo de ventilacion de la salida correspondiente en el secador 5 Recoja todos los accesorios y embalelos para enviarlos con el electrodomestico 6 Cierre la puerta y asegOrela con cinta adhesiva 7 Atornille los pies ajustables en altura hasta que queden dentro de la carcasa para evitar que se da_en durante el transporte 8 R...

Страница 54: ...ciones adicionales Select Seleccionar cambia losajustesdela opcion seleccionada Lt Boton 0pcione Agreguefunciones al programaseleccionado El indicador luminosoesta encendidocuandoel bot0nde opcionesestaseleccionado Presioneel bot0nde opcionesnuevamenteparaapagar la opcion elindicador luminosose apaga Delicates Ropa fina Presioneel boton Delicateslow temp Ropafina bajatemperatura paratratar prendas...

Страница 55: ...do prolongado debe 1 Corte el conmutador de alimentacion 2 Desenchufar la fuente de alimentacion si es posible 3 Limpie el filtro de pelusas 4 Apagar el suministro de agua se aplica 0nicamente alas secadoras Steam Ropa Identificaci6n de prendas Observe el simbolo que determina el tratamiento en las etiquetas de las prendas Estas proveen informacion importante respecto de eventuales limitaciones co...

Страница 56: ...uenose observa pulverizaciOn deaguaen eltambor laropa tienemb s arrugasqueIo habitualcon estafunciOn aseg0rese de quelaboquillanoesteobstruida Esposiblequese acumulepelusaqueobstruya la puntadela boquilla o el aguadurapuedeprovocaracumulaciOn de sarroen la boquilla verpb gina 63 Option Buttons Opciones Delicates _ i Delicates Ropa fina Presione el boton Delicates Ropa fina para telas sensibles a l...

Страница 57: ... secadoras de la Luces de LED de las secadoras de la serie 300 serie 500 Wrinkle Block Finished El tambor continOa girando a intervalos especificos durante una hora para ayudar a disminuir la cantidad de arrugas de la carga de ropa Retire la ropa cuando termine el cic o o dentro del periodo Wrinkle Block Proteccion contra arrugado a fin de obtener los mejores resultados La funcion Wrinkle Block Pr...

Страница 58: ...te 12 minutos Esteprogramase usapararetocarunacargadetejidosde algod6nquese hasecadoy haquedado en eltambordel Steam Touch up secadordurantetoda la noche al finalizarel ciclo Esteprograma de 20 minutosretocalacargaparaayudaraalisar lasarrugascausadasporel propiopesode lacarga La ropaquecontieneespuma huleo plb stico debedejarsesecarenuntendederoo usandoelcicloAirfluff Noheat Suavizado a aire NingO...

Страница 59: ...ugado giraralacargaperi0dicamente durante aproximadamente unahoradespuesdecuefinaticeet cicto La seSatsonaraa intervatos durante WrinkleBlock Proteccion contraarrugado comorecordatodo dequelacargaestalista Eltiempode secado optimizadoparala velocidadde centrifugado coordinael tiempo restantemostradoparael secadorcon la velocidad decentrifugado a lacual se centrifug6previamente la ropaen la lavador...

Страница 60: ...as prendas esten completamente dentro del tambor y que ninguna este atrapada entre la puerta y la carcasa de la secadora o el sello de la puerta Cierre la puerta La luz indicadora Start Stops contin0a a centellear Presione el boton Start Pause Inicio Pausa El ciclo seleccionado comienza y la luz indicadora Start Pause Inicio Pausa deja de iluminarse en forma intermitente y permanece encendida Si l...

Страница 61: ...apelusa Esta acumulacion puede provocar tiempos de secado mas largos No se recomienda el uso de toallitas para secadora Si usted decide usar toallitas para secadora limpie el filtro atrapapelusa periodicamente para retirar los residuos D Si cae pelusa de la pantalla mientras esta en la secadora es probable que se necesite retirar la acumulacion de residuos El filtro debe cepillarse levemente al me...

Страница 62: ... queden sueltas sobre la rejilla de la secadora No apile ropa de modo que quede comprimida sobre la rejilla No permita que las prendas toquen el tambor Las prendas deben tocar Onicamente la rejilla y no deben colgar por encima de los bordes de la rejilla Cierre la puerta y asegOrese de que no quede ropa atrapada entre la puerta y la carcasa o el sello de la puerta Para las prendas de lana seleccio...

Страница 63: ... humedad una vez al mes C6mo limpiar la carcasa del filtro atrapapelusa A traves del tiempo se junta pelusa resultante de los sucesivos procesos de secado en la proteccion del rodamiento Esta pelusa puede eliminarse facilmente utilizando la aspiradora por Io menos una vez al mes C6mo limpiar la boquilla Steam Una vex al aSo examine el enchufe del inyector Si usted sospecha la obstruccion limpie el...

Страница 64: ...cerrada Cierrela puerta Latemperaturaambiente estadebajo Aumentelatemperaturadelambiente delos41 F 5 C Elfiltro parapelusasestasucio Limpieel filtroatrapapelusa comose describeen la pagina61 Apaguelasecadora y vuelvaa encenderla Si estono borraelcOdigo de error Ilamea Servicioa Clientes pkg 66 Eltubo deairedesalidaestaobstruido o es Limpieel tubo deairedesalida Reduzca la Iongitud demasiado largo ...

Страница 65: ...mbornecesitan tiempoparacalentarse Elsecadornoestanivelado Lacargarebotaporquela ropase agrup6formando unabola La s Ilave s deaguano esta n abierta s Laboquillanorociaaguacorrectamente Boquillaobstruida LEDor buttonilluminated oncontrol CondiciOn defalla panelwhenCycleSelectoris turnedto Off position Retirelacubiertadelfocoy si elfocoestaflojo aj_stelo Vuelvaa instalarlacubiertacomose indica en la...

Страница 66: ...icando porque no esta conforme explicando a que se debe su disconformidad Si despues del trabajo realizado por su instalador o tecnico de servicio el problema no ha sido solucionado a su satisfaccion haganoslo saber o bien escribiendo a BSH Home Appliances Corporation 5551 McFadden Ave Huntington Beach CA 92649 O bien Ilamenos a 1 800 944 2904 Tanto en caso de escribir o de Ilamar aseg0rese de inc...

Страница 67: ...ba que su Producto ha sido fabricado con un defecto en los materiales o en la mano de obra Si se ha intentado de manera razonable reparar el Producto sin exito Bosch reemplazara su Producto es posible que usted tenga disponibles modelos mejorados a entera discrecion de Bosch por un cargo adicional Todas las piezas y los componentes extraidos seran propiedad de Bosch a su entera discrecion Todas la...

Страница 68: ...sponsabilidad ni obligacion alguna por los da_os ocasionados a los bienes circundantes incluidos los gabinetes pisos techos y demas estructuras u objetos que se encuentren alrededor del producto Tambien se excluyen de esta garantfa las rayas hendiduras abolladuras menores y da_os esteticos en superficies externas y piezas expuestas productos en los cuales los n0meros de serie hayan sido alterados ...

Отзывы: