background image

18

en | Access and Connections

Bosch HD LCD Monitors

F.01U.272.027 | 1.0 | 2012.08

User's Manual

Bosch Security Systems, Inc.

3

Access and Connections

3.1

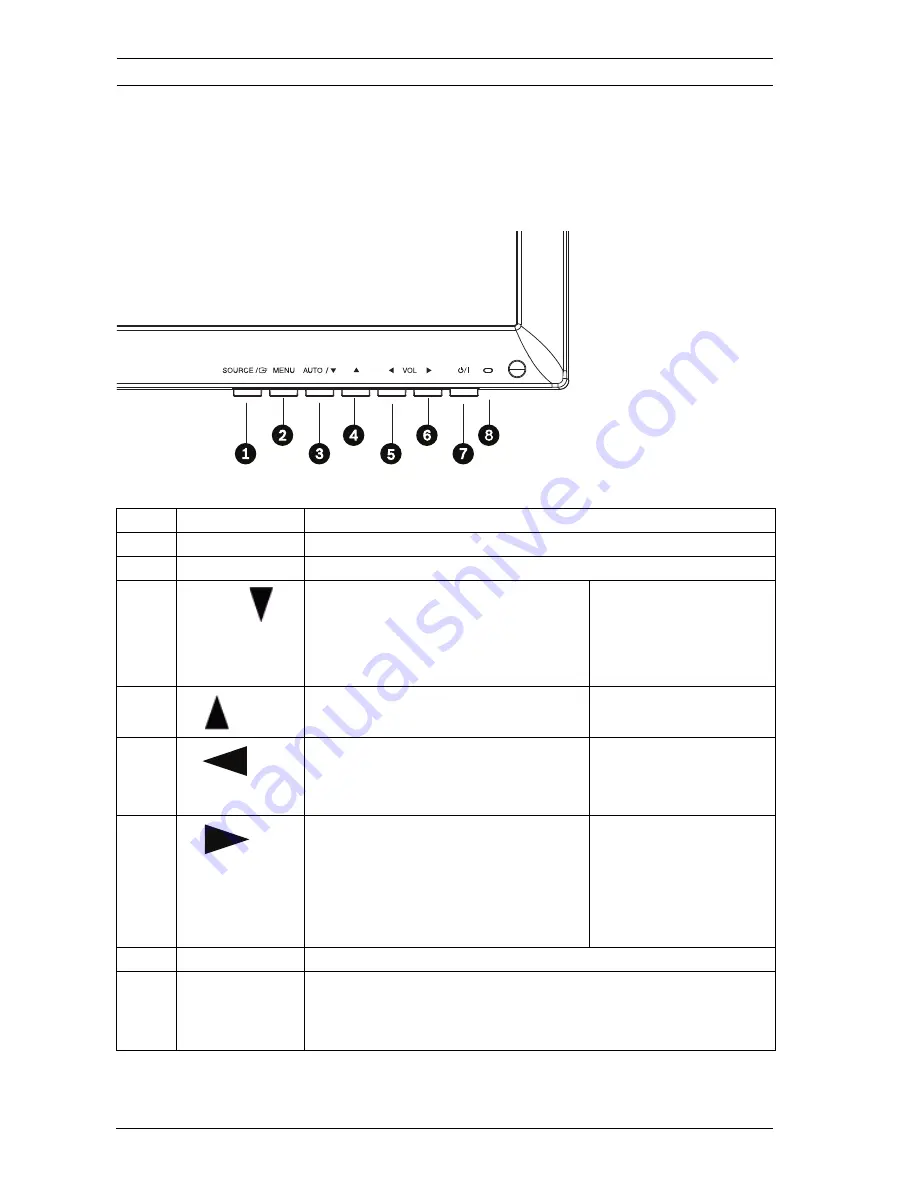
Front Control Panel

Figure 3.1

UML-193-90/UML-223-90 Front Panel

Ref. # Button/Part

Description

1

SOURCE

Selects the signal to be displayed.

2

MENU

Opens the on-screen display (OSD) menus.

6

AUTO / 

Adjusts the value when in the 

OSD.

Activates the Auto Adjustment 

function when in PC mode.

Scrolls down in the 

OSD.

5

Adjusts the value when in the 

OSD.

Scrolls up in the 

OSD.

3

Decreases the value when in the 

OSD.

Decreases audio volume.

Scrolls left in the 

OSD.

4

Increases the value when in the 

OSD.

Serves as the Enter function for 

OSD menus.

Increases audio volume.

Scrolls right in the 

OSD.

7

Power

Display power (On/Off).

8

LED Indicator Indicates the operating status of the monitor:

Power On, Standby (blue)

Power Off (LED off)

Содержание UML-193-90

Страница 1: ...Bosch High Performance HD LED Monitors UML 193 90 UML 223 90 en User s Manual ...

Страница 2: ......

Страница 3: ...er Support and Service 15 2 Unpacking 17 2 1 Parts List 17 3 Access and Connections 18 3 1 Front Control Panel 18 3 2 Bottom Panel 19 4 Description 20 4 1 Features 20 4 2 Power 21 5 Installing the Monitor 22 5 1 Ventilation 22 5 2 Desktop Installation 22 5 3 Connecting Power 23 5 4 Connecting Audio to the Monitor 23 5 5 Connecting the PC Signal to the Monitor 23 5 5 1 HDMI Connection 24 5 5 2 DVI ...

Страница 4: ...nitor 25 6 1 Navigating the Front Panel 25 6 2 Using the Monitor On screen Display OSD 26 6 3 On screen Display Menus 27 6 4 Image Menu 28 6 5 Display Menu 29 6 6 Sound Menu 30 6 7 System Menu 31 7 Power Management 33 7 1 Power Consumption 33 7 2 LED Indicator 33 8 Troubleshooting 34 9 Maintenance 36 10 Technical Specifications 37 ...

Страница 5: ...ilation to prevent overheating and ensure reliable operation Do not block or cover these openings Do not place the unit in an enclosure unless proper ventilation is provided or the manufacturer s instructions have been adhered to 4 Water Do not use this unit near water for example near a bathtub washbowl sink laundry basket in a damp or wet basement near a swimming pool in an outdoor installation ...

Страница 6: ...the unit 10 Power disconnect Units have power supplied to the unit whenever the power cord is inserted into the power source The power cord is the main power disconnect device for switching off the voltage for all units 11 Power sources Operate the unit only from the type of power source indicated on the label Before proceeding be sure to disconnect the power from the cable to be installed into th...

Страница 7: ...ctly follows the operating instructions 14 Replacement parts Be sure the service technician uses replacement parts specified by the manufacturer or that have the same characteristics as the original parts Unauthorized substitutions may cause fire electrical shock or other hazards 15 Safety check Safety checks should be performed upon completion of service or repairs to the unit to ensure proper op...

Страница 8: ...lt in an electrical shock serious bodily injury or death WARNING Medium risk Indicates a potentially hazardous situation If not avoided this could result in minor or moderate bodily injury CAUTION Low risk Indicates a potentially hazardous situation If not avoided this could result in property damage or risk of damage to the unit Accessories Do not place this unit on an unstable stand tripod brack...

Страница 9: ...o grounding electrodes and requirements for the grounding electrode Electronic Surveillance This device is intended for use in public areas only U S federal law strictly prohibits surreptitious recording of oral communications Environmental statement Bosch has a strong commitment towards the environment This unit has been designed to respect the environment as much as possible Electrostatic sensit...

Страница 10: ...to a grounded power outlet only If unable to insert the plug into the outlet contact a locally certified electrician to replace the obsolete outlet Do not defeat the safety purpose of the grounding plug Moving Disconnect the power before moving the unit Move the unit with care Excessive force or shock may damage the unit and the hard disk drives Outdoor signals The installation for outdoor signals...

Страница 11: ...twork Voltage TNV circuits System ground Safety ground The system ground is only used to comply with safety standards or installation practices in certain countries Bosch does not recommend connecting system ground to safety ground unless it is explicitly required However if the system ground and safety ground are connected and grounding loops are causing interference in the video signal use an is...

Страница 12: ...d in accordance with the instruction manual may cause harmful interference to radio communications Operation of this equipment in a residential area is likely to cause harmful interference in which case the user will be required to correct the interference at his expense Intentional or unintentional modifications not expressly approved by the party responsible for compliance shall not be made Any ...

Страница 13: ...sonnable contre les interférences nuisibles quand l appareil est utilisé dans une installation commerciale Cette appareil génère utilise et émet de l energie de fréquence radio et peut en cas d installation ou d utilisation non conforme aux instructions générer des interférences nuisibles aux communications radio L utilisation de ce produit dans une zone résidentielle peut provoquer des interféren...

Страница 14: ... OF THIS PRODUCT Disclaimer Underwriter Laboratories Inc UL has not tested the performance or reliability of the security or signaling aspects of this product UL has only tested fire shock and or casualty hazards as outlined in UL s Standard s for Safety for Information Technology Equipment UL 60950 1 UL Certification does not cover the performance or reliability of the security or signaling aspec...

Страница 15: ...ncies between the user guide and the product described 1 4 Customer Support and Service If this unit needs service contact the nearest Bosch Security Systems Service Center for authorization to return and shipping instructions Service Centers USA Repair Center Telephone 800 566 2283 Fax 800 366 1329 E mail repair us bosch com Customer Service Telephone 888 289 0096 Fax 585 223 9180 E mail security...

Страница 16: ...Fax 65 63521776 E mail rmahelpdesk sg bosch com Customer Service Telephone 86 0 756 7633117 or 86 0 756 7633121 Fax 86 0 756 7631710 E mail customer service cn bosch com Warranty and more information For additional information and warranty queries please contact your Bosch Security Systems representative or visit our website at www boschsecurity com ...

Страница 17: ...packing carton is the safest container in which to transport the unit and must be used if returning the unit for service Save it for possible future use 2 1 Parts List Quantity Description 1 UML 193 90 or UML 223 90 Color LCD Flat Panel Monitor 1 Monitor Stand 2 FS4 x 12 screws for monitor stand 1 Installation manual printed booklet English version 1 Installation manual CD ROM multi language versi...

Страница 18: ...nus 6 AUTO Adjusts the value when in the OSD Activates the Auto Adjustment function when in PC mode Scrolls down in the OSD 5 Adjusts the value when in the OSD Scrolls up in the OSD 3 Decreases the value when in the OSD Decreases audio volume Scrolls left in the OSD 4 Increases the value when in the OSD Serves as the Enter function for OSD menus Increases audio volume Scrolls right in the OSD 7 Po...

Страница 19: ... and Connections en 19 Bosch Security Systems Inc User s Manual F 01U 272 027 1 0 2012 08 3 2 Bottom Panel Figure 3 2 Bottom View I O Panel Ref Connector 1 Upgrade 2 PC Stereo IN VGA and DVI In 3 VGA IN 4 DVI IN 5 HDMI IN 6 DC 12V ...

Страница 20: ... PCs and digital video devices in security applications a High Definition Multimedia Input HDMI and DVI connectors You access monitor control functions from the push buttons and the on screen display OSD menus Refer to Section 3 Access and Connections page 18 for descriptions of the connectors and push buttons available on each model 4 1 Features 18 5 inch and 21 5 inch models VGA Input 640 x 480 ...

Страница 21: ...i 50 60 Hz 1080p 24 25 30 50 60 Hz 640 x 480 60 Hz 720 x 400 70 Hz 800 x 600 60 Hz 1024 x 768 60 Hz 1280 x 768 60 Hz 1360 x 768 60 Hz 1440 x 900 60 Hz 1680 x 1050 60 Hz 1920 x 1080 60Hz 4 2 Power Model No Rated Voltage Voltage Range Power at Rated Voltage Sync Format UML 193 90 120 230 VAC 50 60 Hz 100 to 240 V 42 W NTSC PAL UML 223 90 120 230 VAC 50 60 Hz 100 to 240 V 42 W NTSC PAL ...

Страница 22: ...re that the ventilation openings on the rear of the monitor are not covered 5 2 Desktop Installation Before setting up the monitor ensure that the power to the monitor and other attached devices are turned off 1 Connect the stand a Place the monitor with its front facing downward on a soft cloth b Assemble the Stand Base into the Stand Body in the correct direction using the included screws in the...

Страница 23: ...r cord Use the US style power cord where 120 VAC 60 Hz power is available use the Euro style power cord where 230 VAC 50 Hz power is available The monitor automatically adjusts to either power input voltage 5 4 Connecting Audio to the Monitor There is one 1 set of stereo audio connectors for audio input located on the rear panel This audio input is not associated with any input terminals on the re...

Страница 24: ...e connected by using the supplied DVI D cable and connecting it to the digital DVI D signal Figure 5 2 DVI Input 5 5 3 VGA Connection You can connect PC signal to the monitor using the VGA connector on the rear panel and a VGA cable D SUB to D SUB Figure 5 3 VGA Input Pin Description Pin Description Pin Description 1 Red Video 6 Red Ground 11 Ground 2 Green Video 7 Green Ground 12 SDA for DDC 3 Bl...

Страница 25: ... be displayed 2 MENU Opens the on screen display OSD menus 6 AUTO Adjusts the value when in the OSD Activates the Auto Adjustment function when in PC mode Scrolls down in the OSD 5 Adjusts the value when in the OSD Scrolls up in the OSD 3 Decreases the value when in the OSD Decreases audio volume Scrolls left in the OSD 4 Increases the value when in the OSD Serves as the Enter function for OSD men...

Страница 26: ...monitor 2 Press the Power button to turn on the unit 3 If required press the SOURCE or ENTER button and then the and the and buttons until a signal is displayed 4 Press the Menu button to activate the main menu selections 5 Press the and buttons to select a menu 6 Press the button to enter the selected menu 7 Press the and buttons to select a sub menu item 8 Press the and buttons to toggle the OSD...

Страница 27: ...ur settings Press the Menu button to access the OSD menu Icon Menu Function Image Adjusts the Brightness Contrast Color Temperature Zoom and Information Bar settings Display Adjusts the Auto adjust Phase Clock Display position and Auto color settings PC mode Sound Adjusts the Volume and Mute settings System Resets the factory default settings and adjusts the Language Key Lock Image Rotation and OS...

Страница 28: ...s the Menu button to save any changes then press the Menu button again to exit the OSD Image Brightness 000 Contrast 000 Color Temp Zoom 4 3 Information Bar On Move Select Menu Submenu Definition Brightness Adjusts the brightness level for video performance range 0 100 Contrast Adjusts the intensity of the image range 0 100 Color Temp Adjusts the color of the picture Choices are Warm Normal Cool a...

Страница 29: ...nd Down arrow buttons to select a submenu When finished press the Menu button to save any changes then press the Menu button again to exit the OSD Display Auto Adjust Phase 000 Clock 000 Display Position Auto Color Move Select Menu Submenu Definition Auto Adjust Automatic adjustment of the screen geometry Phase Adjusts the number of horizontal picture elements range 0 100 Clock Adjusts the vertica...

Страница 30: ...P and Down arrow buttons to select the Sound icon Press the Left arrow button to enter the menu and then press the Up and Down arrow buttons to select a submenu When finished press the Menu button to save any changes then press the Menu button again to exit the OSD Sound Volume 100 Mute OFF Move Select Menu Submenu Definition Volume Controls the built in speaker volume range 0 100 Mute Enables dis...

Страница 31: ... exit the OSD System Input OSD Settings Language Key Lock On Image Rotation On Reset Firmware Version Move Select Menu Submenu Definition Input Selects the video input source Choices are VGA HDMI and DVI OSD Settings Adjusts the number of horizontal picture elements Choices are Timer 3sec 6sec 12sec Rotation 0 90 180 270 Position and Transparancy range 0 100 Language Adjusts the language of the OS...

Страница 32: ...ware Version Displays the release level of the monitor firmware NOTICE When Key Lock is enabled through the front panel use the front panel buttons to disable the key lock command To disable the Key Lock feature using the front panel buttons press and hold both the Down arrow and the Left arrow buttons until the monitor displays the Key Unlocked message ...

Страница 33: ... 2012 08 7 Power Management 7 1 Power Consumption 7 2 LED Indicator The power management feature of the monitor is comprised of these stages Mode Power Consumption UML 193 90 UML 223 90 ON 42 W ACTIVE OFF 0 5 W Mode LED Color Monitor Operation ON Blue Normal Operation POWER OFF LED Off Standby Operation ...

Страница 34: ...uld be in the ON position and the LED lit Check that the Brightness and or Contrast adjustments of the display have not been turned down to minimum levels Display image is not centered is too small or too large in the PC mode Push the down arrow key to activate the Auto Adjust function or Adjust the Frequency and Phase in the PC OSD submenu Vertical or horizontal noise is present in the picture Pu...

Страница 35: ...to the default settings The error message Out of Range is displayed PC is operating with either a resolution or timing mode that is not supported by the monitor Change the PC timing mode to one of the valid combinations below 640 x 480 60 72 75Hz 720 x 400 70Hz 800 x 600 60 75Hz 1024 x 768 60 75Hz 1280 x 768 60Hz 1280 x 960 60Hz 1280 x 1024 60Hz 1366 x 768 60Hz 1600 x 1200 60Hz 1920 x 1080 60Hz Pr...

Страница 36: ...spray any liquid directly on the screen Dampen a clean soft lint free cloth with water only using a paper towel or dirty cloth can scratch the screen 3 Gently wipe the screen starting from the top of the screen to bottom wiping in a downward motion Be careful not to press too hard to avoid damaging the screen 4 To avoid streaking wipe the screen again with another clean dry lint free cloth Do not ...

Страница 37: ...l 5 ms typical Resolution H x V 1366 x 768 1920 x 1080 Frequency Horizontal 31 64 MHz Vertical 50 75 Hz Horizontal 31 75 MHz Vertical 50 75 Hz Active Display Area W x H 409 8 x 230 4 mm 16 1 x 9 1 in 476 64 x 268 11 mm 18 8 x 10 6 Input Signal HDMI 1 input DVI D 1 digital input PC RGB 15 pin D Sub connector Audio 1 input stereo Speaker 8 Ohm 2 W Upgrade 1 input Packing Dimensions W x H x D 505 x 3...

Страница 38: ...38 en Technical Specifications Bosch HD LCD Monitors F 01U 272 027 1 0 2012 08 User s Manual Bosch Security Systems Inc ...

Страница 39: ......

Страница 40: ...Bosch Security Systems Inc 850 Greenfield Road Lancaster PA 17601 U S A www boschsecurity com Bosch Security Systems Inc 2012 ...

Отзывы: