background image

105

TES703.|.11/2011

105

ru


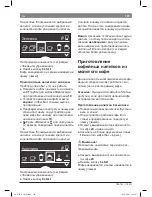
( ..

.

.

)

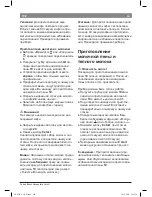
. .

.

-

.

.

.

.

23

.

-

.

.

.

.

.

.

.

.

2

.

a

.

.

.

. .

.

.

.

.

.

.

.

.

1 O /

.

I

,. .

.

. .

.

.

.

.

.

.

.

.

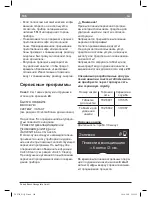
22

. .

.

.

21

.

.

.

23

.

.

.

.

23b

. .

.

-

.

23

.

. .

.

.

.

. .

.

.

.

23a

,.

.

.

.

.

23

. .

.

(

. E

). .

.

.

.

.

.

.

.

23

.

.

.

.

.

.

.

.

.

.

.

.

.

.

.

. .

. .

.

.

.

.

.

.

.

.

.

. .

.

.

.

.

.

.

.

23

. .

-

.

.

.

.

.

.

23

. .

.

.

.

.

23b

.

. .

.

. .

.

.

21

.


.

.

.

-

.

.

.

.

.

.

.

. .

.

.

.

.

. .

.

.

.

14

,.

.

.

.

10d

. .

-

.

.

10c

.

.

.

.

.

11

. .

.

. .

-

.

.

13

.

.

.

.

.

.

. .

.

.

-

.

23

.

.

.

.

21

.

.

.

.

.

.

.

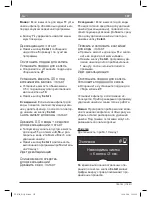
25

.

.

.

.

24

. .

. .

. .

.

.

.

.

,.

.

.

25

. .

.

-

.

.

.

21

.


.

.

.(

.

).

-

.

.

-

.

.

.

-

. .«

.

».. .«

-

.

».

.

.

.

.

..

-

.

.

.

(

.

).

.

.( ..

.

«

.

..

Автооткл.

 через

»)..

TES703_H1_RW.indb   105

18.10.2011   19:12:19

Содержание TES703

Страница 1: ...VeroBar TES703_H1_RW indb 1 18 10 2011 19 11 46 ...

Страница 2: ...en 2 fr 24 it 46 nl 68 ru 90 cz 114 TES703_H1_RW indb 2 18 10 2011 19 11 46 ...

Страница 3: ...A Espresso ËÍ Â Ã À Á Å Æ 15 18 16 17 6 9 26 28 27 10 1 11 12 31 20 21 22 19 5a 5c 5b 8 7 4 2 3 4 33 TES703F1DE TES703F1DE 32 TES703_H1_RW indb 3 18 10 2011 19 11 48 ...

Страница 4: ...13 11 14 30 28 27 26 29 D B c d b a 10 C TES703_H1_RW indb 4 18 10 2011 19 11 51 ...

Страница 5: ...E II I III IV 24 25 23b 23a 23 TES703_H1_RW indb 5 18 10 2011 19 11 53 ...

Страница 6: ...ce In the event of malfunction unplug the ap pliance immediately To avoid potential hazards repairs such as replacing a damaged cord should only be performed by our service personnel Never immerse the appliance or power cord in water Do not reach into the grinding unit Use the appliance only in frost free rooms Risk of scalding The milk frother 10 for milk and hot water gets very hot After use all...

Страница 7: ... height adjustable and swivelling 10 Milk frother height adjustable and removable milk hot water a Upper part b Lower part c Tube d Milk pipe 11 Removable water tank 12 Lid for water tank 13 Storage compartments measuring spoon and milk frother accessories 14 Measuring spoon insertion aid for water ilter 15 Bean container 16 Aroma cover 17 Selector for grind setting 18 Cup warming 19 Button for cu...

Страница 8: ...n Pull the power cord out of the storage compartment 30 and plug in Adjust the length of the cable by pushing it back in or pulling it out The easiest way to do this is to place the appliance so that its back is l ush with the edge of the counter and either pull the cable downward or push it upward Lift the lid of the water tank 12 Remove and rinse the water tank 11 and i ll it with fresh cold wat...

Страница 9: ...witch O I The power switch 1 O I is used to switch the appliance to energy saving mode or to switch it off completely In energy saving mode only the a button 2 lights up Important Do not switch the appliance off at the power on off switch 1 until it is in energy saving mode so that the automatic rinse process can take place a button The appliance is switched on ready for use or put into energy sav...

Страница 10: ...and per cup quan tity e g Î The selection line 5b shows symbols for drink selection The arrows in the navigation line 5c indicate the direction in which more menu levels can be found Display messages Various messages are shown on the display 5 Information Please wait Prompts Refill water tank Check water tank Replace drip tray Empty drip tray Refill bean container Position swivel arm Set up milk f...

Страница 11: ...ot water Ì Short rinse milk system Coffee strength only for coffee drinks 2x 2x 5 55 555 55 555 mild regular strong AromaDouble Shot Per cup quantity only for coffee drinks Î Ð Ò small medium large Select your personal per cup quantity Espresso ËÍ Î 0 ml Espresso ËÍ Î Ð Ò Espresso ËÍ 5 55 555 Espresso ËËÍ À Á Å Æ È É TES703_H1_RW indb 7 18 10 2011 19 11 55 ...

Страница 12: ...you set À for example the adjustment of the per cup quantity in ml and in the case of a milk based coffee drinks for example Æ the adjustment of the per cup quantity including the volume of milk froth in ml is indicated Important The selected amount in ml is an approximate value and can vary sig nii cantly as a result of crema forming the grind setting or the type of milk used etc Start button Pre...

Страница 13: ...tings hold down for at least 3 seconds Displaying information The following information can be displayed in the Info menu how many drinks have been dispensed since the espresso machine was switched on when should the next service be completed Press the j button 7 briel y and navigate with the and buttons 4 Info Descale after xxx À Clean after xxx À No filter Change filter in xxx À Info No of coffe...

Страница 14: ...as a cup warmer 18 that can be switched on or off manually with button 19 When the cup warmer 18 is on button 19 lights up Tip For optimal cup warming place the base of the cups on the cup warmer 18 Menu settings Hold the j button down for at least 3 seconds The different setting options are now displayed Settings Language English Water hardness Descale In the following operating instructions each...

Страница 15: ... the knob 6 j 3 sec Auto off after Turn the knob 6 to enter the time span after which the appliance should auto matically switch to energy saving mode following drink preparation A time between 5 minutes and 8 hours can be set j 3 sec Water filter Before a new water i lter is used it must be rinsed To do this press the water i lter i rmly into the water tank 11 with the aid of the measuring spoon ...

Страница 16: ...gs are now reactivated Preparation using coffee beans This fully automatic espresso machine grinds beans freshly for each brew If pos sible use only beans for fully automatic coffee and espresso machines For optimal quality deep freeze the beans or store in a cool place in sealed containers Coffee beans can be ground while frozen Important Fill the water tank 11 with fresh cold water every day The...

Страница 17: ... using ground coffee This fully automatic espresso machine can also be operated with ground coffee not instant coffee powder N B The AromaDouble Shot function can not be used when coffee is prepared using ground coffee Drink preparation without milk Select À or Á by turning the knob 6 Place the pre warmed cup s under the coffee outlet 9 Open the drawer 20 by pressing Pour in no more than 2 level m...

Страница 18: ...rn ing the knob 6 Press the start button 8 Milk froth or warm milk lows from the outlet of the milk frother 10 for about 40 or 60 seconds respectively Press the start button 8 again to cut the process short Note When preparing warm milk you may hear a whistling sound This is caused by the milk frother 10 for technical reasons Tip For optimal milk froth quality use cold milk with a fat content of a...

Страница 19: ...the dishwasher Wash the inside of the milk container 32 by hand or in the dishwasher Important Drip tray for coffee outlet 27 and coffee grounds container 29 should be emptied and cleaned daily to prevent mould from developing N B If the appliance is cold when switched on with the a button 2 or if it is set to a mode after brewing coffee it rinses auto matically in other words the system cleans it...

Страница 20: ...egularly for cleaning Switch to the energy saving mode with the a button 2 Switch the appliance off completely at the power on off switch 1 O I no buttons are lit Slide the door opener 22 to the right and open the door 21 to the brewing unit 23 Slide the red lock 23b on the brewing unit 23 completely to the left Press the red button 23a grasp the brew ing unit 23 by the recessed grips Fig E and re...

Страница 21: ... collecting in the drip tray Descale the appliance regularly to avoid a build up of limescale Limescale residue results in higher energy consumption Service Programmes Tip Refer also to the quick reference guide in the storage compartment 24 Please short rinse milk system start see Cleaning the milk system At regular intervals the display 5 shows the following texts Service descale or Service clea...

Страница 22: ... into the empty wa ter tank 11 up to the 0 5 litre mark and dissolve 2 Bosch descaling tablets in it Press the start button 8 The descaling pro gramme will now run for about 20 minutes Descaling Not enough descaling fluid Refill fluid start Note If there is not enough descaling solu tion in the water tank 11 the corresponding prompt is displayed Pour in descaling solu tion and press start 8 again ...

Страница 23: ...Clean Duration approx 40 minutes Calc n Clean combines the separate func tions of descaling and cleaning If both programmes are due to be run soon the espresso machine automatically suggests this service programme Espresso ËÍ Service Calc n Clean i button 3 sec The start button 8 lashes while the different Calc n Clean processes are running The igures on the top right indicate the progress of the ...

Страница 24: ...iance Descaling Cleaning Empty drip tray Replace drip tray Empty drip tray 27 and replace Replace the ilter if one is being used The appliance has completed descaling and cleaning and is ready for use again Important Wipe down the appliance using a soft damp cloth to immediately remove any descaler residue Such residue can cause corrosion N B If one of the service programmes is interrupted e g by ...

Страница 25: ...electrical and electronic equipment WEEE The directive provides the framework for the EU wide take back and disposal of end of life appliances Please ask your specialist retailer about current disposal facilities Guarantee The guarantee conditions for this appliance are as deined by our representative in the country in which it is sold Details regarding these conditions can be obtained from the de...

Страница 26: ...rocedure The selected per cup quan tity is not reached Coffee dispensing slows to a trickle or stops completely Coffee is ground too inely Pre ground coffee is too ine Adjust the grinding unit to a coarser setting Use coarser pre ground coffee Build up of limescale in the appliance Descale the appliance Coffee has no crema Unsuitable type of coffee Use a type of coffee with a higher proportion of ...

Страница 27: ...coarser or finer setting or use 2 level measuring spoons of ground coffee Display shows Clean brewing unit Brewing unit is soiled Clean brewing unit Too much pre ground coffee in the brewing unit Clean brewing unit Pour in no more than 2 level measuring spoons of ground coffee The brewing unit s mechanism is stiff Clean brewing unit see Maintenance and daily cleaning Coffee or milk froth quality v...

Страница 28: ...mbH 90 ru 91 92 93 O I 93 a 93 93 93 94 start 96 C 96 j 97 98 98 98 98 98 99 99 Calc n Clean 99 99 99 99 100 100 100 101 102 103 103 105 105 106 106 107 Calc n Clean 108 110 110 110 110 111 TES703_H1_RW indb 90 18 10 2011 19 12 15 ...

Страница 29: ...11 2011 91 ru 10 Bosch 24 A B C D E 1 O I 2 a 3 C 4 5 a b c 6 7 j 8 start 9 10 a b c d 11 12 13 14 15 16 17 18 19 20 21 22 23 a b 24 25 26 27 28 29 30 31 TES703F1DE 32 33 TES703_H1_RW indb 91 18 10 2011 19 12 15 ...

Страница 30: ...12 11 max 11 12 15 1 O I 8 start 5 4 Language English start Pycckий Nederlands English Русский Nederlands Français Italiano Svenska Español Polski Български Magyar Türkçe Dansk Norsk Suomi Português Čeština Ελληνικa 8 start 2 a TES703_H1_RW indb 92 18 10 2011 19 12 15 ...

Страница 31: ...93 TES703 11 2011 93 ru 2 a 5 9 5 Эспрессо ËÍ Â Ã À Á Å Æ 1 Автооткл через O I 1 O I 2 a 1 a 2 a 2 a 5 8 start 27 6 5 4 5c TES703_H1_RW indb 93 18 10 2011 19 12 15 ...

Страница 32: ...ль Заполнить отсек для кофейных зерен Повернуть блок подачи кофе Установить устройство вспенивания молока Устан заварочный блок Закрыть дверцу Очистить заварочный блок выдвижной отсек Заменить фильтр Провести декальцинацию Необходима чистка Запустить Calc n Clean Температура ниже Подождите Быстро промойте молочную систему start Высокое или низкое напряжение 5a 5b 5c TES703_H1_RW indb 94 18 10 2011...

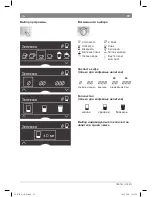
Страница 33: ...офе Å Маккиато Æ Капучино È Молочная пена É Теплое молоко Ê Горячая вода Ì Быстр пром мол сист 2x 2x 5 55 555 55 555 AromaDouble Shot Î Ð Ò Эспрессо ËÍ Î 0 мл Эспрессо ËÍ Î Ð Ò Эспрессо ËÍ 5 55 555 Эспрессо ËÍ Â Ã À Á Å Æ TES703_H1_RW indb 95 18 10 2011 19 12 16 ...

Страница 34: ...ru AromaDouble Shot TES7 AromaDouble Shot AromaDouble Shot À Â Ã Î Ð Ò 6 Á Ò À Æ start 8 start 8 start C 3 C 3 3 C 4 6 Температура Кофе нормальн Горячая вода Температура Кофе Горячая вода 85 C 3 C TES703_H1_RW indb 96 18 10 2011 19 12 16 ...

Страница 35: ...3 C 3 5 18 Эспрессо ËÍ 3 C 3 5 j 7 j 3 7 j 4 Инфо меню Декальц xxx À Очистка xxx À Не установлен фильтр Замена фильтра xxx À Инфо меню Чашек кофе xx Молочн нап xx Горячей воды xл 7 j 10 TES703_H1_RW indb 97 18 10 2011 19 12 16 ...

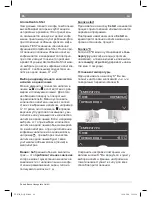
Страница 36: ...8 ru 17 17 a b a b 18 18 19 18 19 18 7 j 3 Настройки Язык Pусский Жесткость воды Декальцинация j 3 4 Настройки Жесткость воды Декальцинация start Очистка j 3 Язык 6 j 3 Жесткость воды 6 1 2 3 4 TES703_H1_RW indb 98 18 10 2011 19 12 17 ...

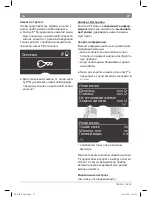
Страница 37: ...альцинация 8 start j 3 Очистка 8 start j 3 Calc n Clean 8 start Calc n Clean Calc n Clean j 3 Подогр ч выкл 18 5 8 6 j 3 Автооткл через 6 5 8 j 3 Фильтр воды 14 11 max 6 start 8 start Установить ёмкость 0 5 л под вспениватель молока start 0 5 10 8 start TES703_H1_RW indb 99 18 10 2011 19 12 17 ...

Страница 38: ...ch Hausgeräte GmbH 100 ru Заменить фильтр 2 TCZ7003 467873 Фильтр воды нет j 3 Контраст 5 20 20 0 6 j 3 Фабр настройки 8 start 4 1 O I 5 8 start 11 11 18 AromaDouble Shot 9 6 TES703_H1_RW indb 100 18 10 2011 19 12 17 ...

Страница 39: ...01 TES703 11 2011 101 ru 5 Эспрессо ËÍ Â Ã À Á Å Æ 8 start 31 10d 10 9 9 10 Å Æ 6 5 Капучино ËÍ À Á Å Æ È É 8 start 10 AromaDouble Shot 6 À Á 9 20 14 20 8 start TES703_H1_RW indb 101 18 10 2011 19 12 17 ...

Страница 40: ...102 Robert Bosch Hausgeräte GmbH 102 ru 90 Å Æ 6 10d 10 31 9 9 10 20 14 20 8 start 10 90 10 10d 10 31 10 6 È É 8 start 10 40 60 8 start 10 TES703_H1_RW indb 102 18 10 2011 19 12 18 ...

Страница 41: ...103 TES703 11 2011 103 ru 1 5 10 10 10 6 Ê 8 start 40 10 8 start C 11 23 25 26 31 28 27 29 20 14 16 31 TES703_H1_RW indb 103 18 10 2011 19 12 18 ...

Страница 42: ...Hausgeräte GmbH 104 ru TES703F1DE 32 32 27 29 2 a a 10 23 10 10 5 Ì 8 start Под вспенив постав пустой стакан опуст в него трубку start 10 10d 8 start 10d 1 10d 10 10 10a 10b 10 TES703_H1_RW indb 104 18 10 2011 19 12 18 ...

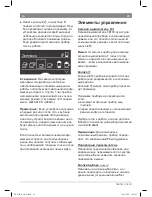
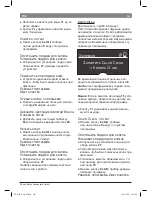
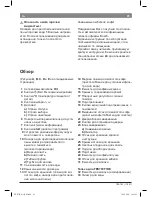
Страница 43: ...105 TES703 11 2011 105 ru 23 2 a 1 O I 22 21 23 23b 23 23a 23 E 23 23 23 23b 21 14 10d 10c 11 13 23 21 25 24 25 21 Автооткл через TES703_H1_RW indb 105 18 10 2011 19 12 19 ...

Страница 44: ...ромойте молочную систему start 5 Провести декальцинацию Необходима чистка Запустить Calc n Clean Calc n Clean Calc n Clean 20 TCZ6001 310575 TCZ6002 310967 30 Эспрессо ËÍ Провести декальцинацию Кнопка i 3 сек 8 start TES703_H1_RW indb 106 18 10 2011 19 12 19 ...

Страница 45: ... воды start Добавить 0 5 л воды средство для декальцинации start 11 0 5l 2 Bosch 8 start 20 Идет декальцинация Слишком мало средства для декальцинации Добавить ср во start 11 8 start Промыть и заполнить контейнер для воды start 11 max 8 start 1 Идет декальцинация Опустошить поддон для капель Установить поддон для капель 27 10 Эспрессо ËÍ Необходима чистка Кнопка i 3 сек 8 start TES703_H1_RW indb 1...

Страница 46: ...е таблетки Bosch и закрыть лоток Bosch 20 Нажать start 8 start 7 Работает программа Идет очистка Опустошить поддон для капель Установить поддон для капель 27 Calc n Clean 40 Calc n Clean Эспрессо ËÍ Запустить Calc n Clean Кнопка i 3 сек Calc n Clean 8 start 11 7 j 3 Calc n Clean start 8 start 5 Опустошить поддон для капель Установить поддон для капель 27 9 1 10 8 start Работает программа Идет очис...

Страница 47: ...rt 20 Идет декальцинация Слишком мало средства для декальцинации Добавить ср во start 11 8 start Промыть и заполнить контейнер для воды start 11 max 8 start 1 7 Идет декальцинация Работает программа Идет очистка Опустошить поддон для капель Установить поддон для капель 27 11 max 8 start 3 Работает программа Идет очистка Опустошить поддон для капель Установить поддон для капель 27 TES703_H1_RW indb...

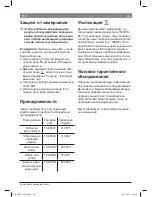
Страница 48: ...Hausgeräte GmbH 110 ru 11 10 È 15 1 O I 11 27 TCZ6001 310575 TCZ6002 310967 TCZ7003 467873 TCZ7004 570351 TCZ7009 674992 2002 96 waste electrical and electronic equipment WEEE A TES703_H1_RW indb 110 18 10 2011 19 12 19 ...

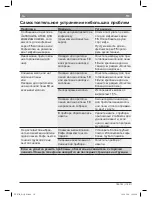
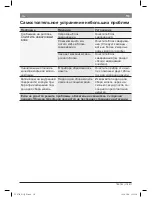
Страница 49: ...111 TES703 11 2011 111 ru Заполнить отсек для кофейных зерен 15 15 15 10 10 10 10 10 1 5 10 2 TES703_H1_RW indb 111 18 10 2011 19 12 20 ...

Страница 50: ...112 Robert Bosch Hausgeräte GmbH 112 ru Неисправность Позвоните в службу технической поддержки 11 Пров конт р для воды 2 TES703_H1_RW indb 112 18 10 2011 19 12 20 ...

Страница 51: ...113 TES703 11 2011 113 ru Очистить заварочный блок 2 TES703_H1_RW indb 113 18 10 2011 19 12 20 ...

Страница 52: ...russel Tel 070 222 141 Fax 024 757 291 mailto bru repairs bshg com www bosch home be BG Bulgaria EXPO2000 service 1 431 1359 087 982 6388 mobil 087 814 5091 mailto service expo2000 bg BH Bahrain Khalaifat Est P O Box 5111 Manama Tel 01759 2233 mailto service khalaifat com BR Brasil Brazil Mabe Hortolândia Eletrodomésticos Ltda Rua Barão Geraldo Rezende 250 13020 440 Campinas SP Tel 0800 704 5446 F...

Страница 53: ...ces Limited Unit 1 2 3rd Floor North Block Skyway House 3 Sham Mong Road Tai Kok Tsui Kowloon Hong Kong Tel 2565 6151 Fax 2565 6681 mailto bshhkg service bshg com HR Hrvatska Croatia Andabaka d o o Kopilica 21a 21000 Split Info Line 021 481 403 Info Fax 021 453 891 mailto servis andabaka hr HU Magyarország Hungary BSH Háztartási Készülék Kereskedelmi Kft Háztartási gépek márkaszervize Királyhágó t...

Страница 54: ...me pt RO România Romania BSH Electrocasnice srl Sos Bucuresti Ploiesti nr 19 21 sect 1 13682 Bucuresti Tel 021 203 9748 Fax 021 203 9733 mailto service romania bshg com www bosch home com RU Russia OOO 19 1 119071 495 737 2961 mailto mok kdhl bshg com www bosch home com SE Sverige Sweden BSH Hushållsapparater AB Landsvägen 32 169 29 Solna Tel 0771 11 22 77 mailto Bosch Service SE bshg com www bosc...

Страница 55: ...9 UK Calls provided by a UK BT Landline will be charged at up to 3 pence per minute A Call Set Up Fee of up to 6 pence per call applies to calls from residential lines Mobile and other providers costs may vary See www bt com pricing for details HR 01 64 03 609 HU 014 895 461 IE 01450 2655 IS 0520 3000 LT 052 741 788 LU 26 349 300 LV 06 742 52 32 ME 020 662 444 MK 02 2454 600 PL 801 191 534 RO 021 ...

Страница 56: ...9000704445 TES703 RW en fr it nl ru cz 11 11 TES703_H1_RW_Rückseiten indd 142 20 10 2011 17 30 57 ...

Отзывы: