background image

6 720 810 560 (2016/06)

Optiflow Professional

8 | Product details

2.9

Electrical wiring diagram

Fig. 3

Electrical diagram

[1] Flame sensor rod
[2] Fan
[3] Ignition electrode
[4] Power supply
[5] Connection for frost protection
[6] Connection for remote control
[7] Modulation electrovalve (gas)
[8] Segmentation electrovalve 1 (gas)

[9] Segmentation electrovalve 2 (gas)
[10] Safety electrovalve (gas)
[11] Thermal fuse
[12] Water flow sensor 
[13] Air temperature sensor
[14] Hot water temperature sensor
[15] Cold water temperature sensor
[16] Water valve

Содержание Optiflow Professional GWH 20

Страница 1: ... CTD E23 31 F5 L 6 720 810 560 2016 06 AU Read installation manual prior to installation of this appliance Read user manual before putting this unit in operation Observe the warnings in the manuals The installation location must meet the requirements for sufficient ventilation Installation by an authorised person only ...

Страница 2: ...nnection 14 4 7 Gas connection 14 4 8 Installation of flue accessories 15 4 9 Altitude of installation site 15 4 10 Electrical connection only by authorised technicians 16 4 10 1 Connecting the power cable 16 4 11 Commissioning of the appliance 16 4 12 Changing the setpoint limit temperature only for 55 C preset appliances 16 4 13 Delivery temperature calibration 16 5 Regulating the gas only for a...

Страница 3: ...ety inspection every two years The installer is responsible for the safety and environmental compatibility of the installation according to local regulations TheOwner Userisresponsibleforkeepingtheareaaround the water heater free from debris Safe access to inspect and service the water heater is the responsibility of the property owner Use only genuine Bosch spare parts Explosive and highly flamma...

Страница 4: ... inlet water pressure exceeds 800 kPa a pressure limiting valve 500kPa MUSTbefitted Thepreferablelocationfor the pressure limiting valve is at the water meter Wherethepressurelimitingvalveislessthan3metresfrom the hot water unit it must be fitted in conjunction with a cold water expansion valve 700 kPa between the water heater and the pressure limiting valve Failure to comply with this requirement...

Страница 5: ...ostatic D Digital user interface E Electric ignition 23 Appliance set for natural gas 31 Appliance set for Universal LP gas F5 Tight chamber L Locked water temperature adjustment 2 3 Included Items Gas continuous flow water heater Fixing bracket Appliance documentation 2 4 Rating plate The rating plate is located on the outside of the appliance on the bottom The rating plate has the indications on...

Страница 6: ...al 6 Product details 2 7 Dimensions and minimum clearances Fig 1 Dimensions in mm Connections Water Gas A B C D E Cold Hot Nat Universal LPG GWH12 300 570 170 120 107 GWH16 364 570 175 142 137 GWH20 364 570 175 142 137 Table 4 Dimensions in mm ...

Страница 7: ...re sensor 7 Thermal fuse 8 Hot water temperature sensor 9 Hot water outlet 10 Power cord and plug 11 Combustion gas collector 12 Frost protection device 13 Ignition electrode 14 Burner pressure test point 15 Water flow sensor and Water valve 16 Electronic control unit 17 Cold water temperature sensor 18 Gas shut off valve 19 Cold water inlet 20 Gas pressure test point 21 Gas inlet ...

Страница 8: ...ectrode 4 Power supply 5 Connection for frost protection 6 Connection for remote control 7 Modulation electrovalve gas 8 Segmentation electrovalve 1 gas 9 Segmentation electrovalve 2 gas 10 Safety electrovalve gas 11 Thermal fuse 12 Water flow sensor 13 Air temperature sensor 14 Hot water temperature sensor 15 Cold water temperature sensor 16 Water valve ...

Страница 9: ...al LP gas when operating kPa 2 75 2 75 2 75 Water supply data Maximum permissible pressure static kPa 1000 1000 1000 Minimum operating pressure kPa 100 100 100 Start up flow l min 2 0 2 0 2 0 Maximum flow corresponding to a temperature increase of 25 C l min 12 0 16 0 20 0 Maximum inlet temperature C 50 50 50 Electrical circuit Power supply voltage VAC 230 230 230 Frequency Hz 50 50 50 Maximum pow...

Страница 10: ...numbers shown below Bosch 4000S coaxial flue must be used with this appliance Failure to use Bosch 4000S flue could result in appliance failure DANGER Install the flue gas pipe so that there are no leaks Non compliance with this requirement may cause combustion gases to leak through the appliance installation compartmentandmayresultinpersonal injury or death Below is a list of accessories Only use...

Страница 11: ...flue components All 4000S coaxial flue components have an internal pipe diameter of 60 mm and an external pipe diameter of 100 mm Flue Elbow Ø 60 100 90 7 736 995 079 Flue Elbow Ø 60 100 45 7 736 995 071 Flue Terminal Extension DN60 100 350mm 7 736 995 059 Flue Terminal Extension DN60 100 750 mm 7 736 995 063 Flue Terminal Extension DN60 100 1500 mm 7 736 995 067 Horizontal Condensate Trap Ø 60 10...

Страница 12: ...ing regulations Lmax Concentric pipes GWH12 GWH16 12 m GWH20 10 m Table 7 Lmax Concentric pipes GWH12 8 m GWH16 GWH20 6 m Table 8 In case of horizontal flue ensure that the installations has a fall of 3 Equivalent lengths Leq Ø Accessory Leq Min Length Ø 60 100 45 elbow Ø 60 100 90 elbow 2 m 0 375 m Table 9 DANGER Explosion Always shut off the gas valve before carrying out work on gas pipes The ap...

Страница 13: ...ance 4 2 2 Overall flue length of the installation The overall flue length may not exceed the values indicated in the tables 7 and 8 and must not be less than the values indicated in table 9 Min length In determining the overall length of the installation the equivalent length Leq of each accessory must be considered Surface temperature The maximum surface temperature of the appliance is below 85 ...

Страница 14: ...From the ground above a balcony or other surface1 1 unless appliance is certified for closer installation 300 C From a return wall or external corner1 300 D From a gas meter GM 1000 E From an electricity meter or fuse box P 2 2 Prohibitedareabelowelectricitymeterorfuseboxextends to ground level 500 F From a drain pipe or soil pipe 75 G Horizontally from any building structure 1 or obstruction faci...

Страница 15: ... distance between the end of the inlet air pipe and the facade is no greater than 30 mm Fig 7 Fig 7 Dimensions 4 9 Altitude of installation site Toensurecorrectoperationoftheappliance ataltitudesabove 500m the altitude setting must be adjusted Enter the Service function section 5 2 Display will show P2 Press until the display shows P4 Press the button Display will show E Press until the display sh...

Страница 16: ...gh the thermistor placed at the hot water outlet If the appliance detects an excessive temperature a safety shutoff will occur Safety shut off due to incorrect flue conditions If the appliance detects an incorrect flue condition a safety shut off will occur Re start after a safety shut off To put the appliance back into operation after a safety shut off Close all hot water taps Reset the appliance...

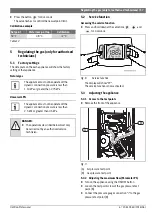
Страница 17: ...Adjusting the appliance 5 3 1 Access to the test points Remove the front of the appliance Fig 9 A Air pressure test point B Gas pressure test point 5 3 2 Adjusting the maximum flow Parameter P1 Turn on the appliance using the ON OFF button Loosen the test point screw of the gas pressure test point B Connect the pressure gauge connection to the gas pressure test point B Setpoint Water temp at tap C...

Страница 18: ... sign of confirmation Press Display will show L2 Close the hot water tap Press until the display shows E Press the button Display will show P2 Simultaneously press the and for 3 seconds Display will show the temperature selected Disconnectthepressuregaugefromthetestpoints A and B Tighten the shutter screws of the test points A and B The adjustment of the minimum gas flow is complete 5 3 4 Adjustin...

Страница 19: ...ay will show P1 Press until the display shows P2 Press the button for 3 seconds The displayed value flashes as a sign of confirmation Press Factory default settings are now restored 6 Maintenance onlybyauthorisedservice technician Bosch recommend that to maintain optimum performance from this appliance servicing should be carried out by suitably licensed persons at intervals not greater than two 2...

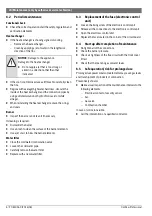
Страница 20: ...ater inlet isolation valve Loosen the cold water pipe Carefully remove the water filter Replace with a new water filter 6 3 Replacement of the fuse electronic control unit Loosen the fixing screw of the electronic control unit Release all the connections to the electronic control unit Open the electronic control unit Replace the fuse located in the corner of the circuit board 6 4 Start up after co...

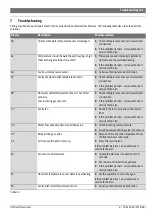
Страница 21: ...9 Hot water outlet temperature sensor is not fitted properly Low incoming gas pressure Check temperature sensor and associated connections If the problem persists call an authorised service technician C7 Faulty fan Check if the fan is properly connected to ECU If the problem persists call an authorised service technician CA Water flow above maximum specified value Check incoming water pressure Ins...

Страница 22: ... and remove dirt or other impediment to good extraction EE Modulating solenoid valve disconnected Check solenoid connections If the problem persists call an authorised service technician EF Wrong gas connected Call an authorised service technician F7 A flame is detected although the appliance is switched off Unplug the electrical connection for 10 seconds Reconnect and restart the appliance If the...

Страница 23: ...rtified for compliance with relevant parts of Australian and New Zealand gas electrical and water standards Whilst Bosch water heaters are warranted against defects the warranty is conditional upon correct installation and use in accordance with detailed instructions provided with the heater In the case of the water supplied to the heater it is important that the water quality be of an acceptable ...

Страница 24: ...r influences NOTE Any service call costs incurred by the owner or user of the hot water unit for any matter not covered by the terms of this warranty will not be reimbursed by Bosch even if those costs are incurred during the warranty period If the hot water unit is located outside the usual operating area of a Bosch service agent the agent s travel freight or similar costs are not coveredbythiswa...

Страница 25: ... questions about this warranty or to lodge a warranty claim please contact Robert Bosch Australia Pty Ltd 1555 Centre Road Clayton Victoria 3168 Tel Australia 1300 307 037 Tel New Zealand 0800 543 352 IMPORTANT NOTE FOR AUSTRALIAN CONSUMERS Our goods come with guarantees that cannot be excluded under the Australian Consumer Law You are entitled to a replacementorrefundforamajorfailureandforcompens...

Страница 26: ...6 720 810 560 2016 06 Optiflow Professional 26 Notes ...

Страница 27: ...6 720 810 560 2016 06 Optiflow Professional 27 Notes ...

Страница 28: ...6720810560 ...

Отзывы: