en
Cleaning and servicing
22
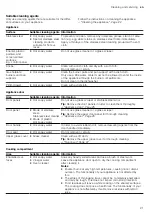
Area
Suitable cleaning agents Information
Self-cleaning sur-
faces
-
Follow the instructions for self-cleaning surfaces.
→
"Cleaning self-cleaning surfaces in the cooking compartment",
Glass cover on
the oven light
¡
Hot soapy water
Use oven cleaner to remove very heavy soiling.
Rails
¡
Hot soapy water
Soak any heavily soiled areas and use a brush or steel wool.
Tip:
Remove the shelf supports for cleaning.
Accessories
¡
Hot soapy water
¡
Oven cleaner
Soak any heavily soiled areas and use a brush or steel wool.
Enamelled accessories are dishwasher-safe.
14.2 Cleaning the appliance
In order to avoid damaging the appliance, clean your
appliance only as specified, and using suitable clean-
ing products.
WARNING ‒ Risk of burns!
The appliance and its parts that can be touched be-
come hot during use.
▶
Caution should be exercised here in order to avoid
touching heating elements.
▶
Young children under 8 years of age must be kept
away from the appliance.
WARNING ‒ Risk of fire!
Loose food remnants, fat and meat juices may catch
fire.
▶
Before using the appliance, remove the worst of the
food residues and remnants from the cooking com-
partment, heating elements and accessories.
Requirement:
Read the information on cleaning
agents.
→
1.
Clean the appliance using hot soapy water and a
dish cloth.
‒
For some surfaces, you can use alternative
cleaning agents.
→
"Suitable cleaning agents", Page 21
2.
Dry with a soft cloth.
14.3 Cleaning controls
WARNING ‒ Risk of electric shock!
An ingress of moisture can cause an electric shock.
▶
Do not detach the control knobs to clean them.
▶
Do not use wet sponge cloths.
1.
Observe the information regarding the cleaning
agents.
2.
Clean using a damp sponge cloth and hot soapy
water.
3.
Dry with a soft cloth.
14.4 Cleaning self-cleaning surfaces in the
cooking compartment
The back panel in the cooking compartment is self-
cleaning. The self-cleaning surfaces are coated with a
porous, matte ceramic layer and have a coarse sur-
face. When the appliance is in operation, the self-clean-
ing surfaces absorb splashes of fat from baking, roast-
ing or grilling and break them down. If the self-cleaning
surfaces no longer clean sufficiently during operation,
heat up the cooking compartment specifically.
ATTENTION!
If the self-cleaning surfaces are not cleaned regularly,
the surfaces may be damaged.
▶
If dark spots can be seen on the self-cleaning sur-
faces, heat up the cooking compartment.
▶
Do no use any oven cleaners or abrasive cleaning
aids. If oven cleaner accidentally comes into contact
with the self-cleaning surfaces, dab the surfaces im-
mediately with water and a sponge cloth. Do not rub
them.
1.
Remove accessories and cookware from the cook-
ing compartment.
2.
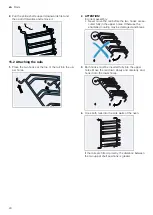
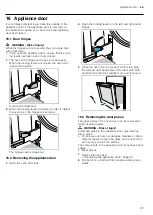
Detach the shelf supports and remove them from
the cooking compartment.
→
3.
Remove coarse dirt using soapy water and a soft
cloth:
– From the smooth enamel surfaces
– From the inside of the appliance door
– From the glass cover on the oven light
This prevents stubborn stains.
4.
Remove any items from the cooking compartment.
The cooking compartment must be empty.
5.
Use the function selector to set
3D hot air
.
6.
Use the temperature selector to set the temperature.
a
The appliance starts heating after a few seconds.
7.
Switch off the appliance after one hour.
8.
Once the appliance has cooled down, wipe the
cooking compartment with a damp cloth.
Note:
Reddish marks may appear on the self-clean-
ing surfaces. This is not corrosion but rather residue
from food that contains salt. Food ingredients such
as sugar and egg white are not removed from the
surface coating and may stick to the surface. These
spots are not harmful and do not impair the clean-
ing ability of the self-cleaning surfaces.
9.
Attach the shelf supports.
→

