background image

en 

Cleaning and servicing

24

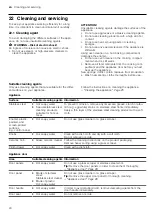
22  Cleaning and servicing

To keep your appliance working efficiently for a long
time, it is important to clean and maintain it carefully.

22.1 Cleaning agent

To avoid damaging the different surfaces of the appli-
ance, do not use unsuitable cleaning agents.

WARNING ‒ Risk of electric shock!

An ingress of moisture can cause an electric shock.

Do not use steam- or high-pressure cleaners to
clean the appliance.

ATTENTION!

Unsuitable cleaning agents damage the surfaces of the
appliance.

Do not use aggressive or abrasive cleaning agents.

Do not use cleaning products with a high alcohol
content.

Do not use hard scouring pads or cleaning
sponges.

Do not use any special cleaners if the appliance is
still warm.

Using oven cleaner in a hot cooking compartment
damages the enamel.

Do not use oven cleaner in the cooking compart-
ment when it is still warm.

Remove all food remnants from the cooking com-
partment and the appliance door before you next
heat up the appliance.

New sponge cloths contain residues from production.

Wash new sponge cloths thoroughly before use.

Suitable cleaning agents

Only use cleaning agents that are suitable for the differ-
ent surfaces on your appliance.

Follow the instructions on cleaning the appliance. 
→ 

"Cleaning the appliance", Page 25

Appliance

Surface

Suitable cleaning agents Information

Stainless steel

¡

Hot soapy water

¡

Special stainless steel
cleaning products
suitable for hot sur-
faces

To prevent corrosion, remove any limescale, grease, starch or albu-
min (e.g. egg white) stains on stainless steel fronts immediately.
Apply a thin layer of the stainless steel cleaning product with a soft
cloth.

Enamel, plastic,
painted, and
screen-printed
surfaces
E.g. control panel

¡

Hot soapy water

Do not use glass cleaner or a glass scraper.

Knobs

¡

Hot soapy water

Clean with a dish cloth and dry with a soft cloth.
Do not remove or scrub.

Ceramic hob

¡

Glass ceramic cleaner Follow the cleaning instructions on the product packaging.

Remove heavy soiling using a glass scraper.

Plinth drawer

¡

Hot soapy water

Clean with a dishcloth.

Appliance door

Area

Suitable cleaning agents Information

Door panels

¡

Hot soapy water

Do not use a glass scraper or stainless steel wool.

Tip: 

Remove the door panels in order to clean them thoroughly. 

→ 

"Appliance door", Page 28

Door panel

¡

Made of stainless
steel:
Stainless steel cleaner

¡

Made of plastic:
Hot soapy water

Do not use glass cleaner or a glass scraper.

Tip: 

Remove the upper door panel for thorough cleaning. 

→ 

"Appliance door", Page 28

Door handle

¡

Hot soapy water

In order to avoid stubborn dirt, remove descaling agents from the
door handle immediately.

Door seal

¡

Hot soapy water

Do not remove or scrub.

Содержание HLS59D3 1 Series

Страница 1: ...Register your new device on MyBosch now and get free benefits bosch home com welcome Free standing cooker HLS59D3 1 en User manual ...

Страница 2: ...ce as follows To prepare meals and drinks Under supervision Never leave the appli ance unattended when cooking for short periods In private households and in enclosed spaces in a domestic environment Up to an altitude of max 4000 m above sea level Do not use the appliance On boats or in vehicles as a room heater with an external timer or a remote control You cannot operate the appliance with a tim...

Страница 3: ...tin to hold it down Combustible objects that are left in the cook ing compartment may catch fire Never store combustible objects in the cooking compartment If smoke is emitted the appliance must be switched off or the plug must be pulled out and the door must be held closed in order to stifle any flames Food may catch fire The cooking process must be monitored A short process must be monitored con...

Страница 4: ...trap your fingers Keep your hands away from the hinges Scratched glass in the appliance door may develop into a crack Do not use any harsh or abrasive cleaners or sharp metal scrapers to clean the glass on the oven door as they may scratch the surface If you leave the appliance door open people may bump into it resulting in injury Always keep the appliance door closed during and after operation Wh...

Страница 5: ... contact with the door pane it could cause permanent discolouration Do not allow aluminium foil in the cooking compart ment to come into contact with the door pane When the cooking compartment is hot any water in side it will create steam The change in temperature may cause damage Never pour water into the cooking compartment when it is still hot Never place cookware containing water on the cookin...

Страница 6: ...that is in a good con dition Stains discolouration Unsuitable cleaning methods Only use cleaning agents that are suitable for glass ceramic and only clean the hob when it is cold Blisters or fractures in the glass Knocks or falling cookware cooking ac cessories or other hard or pointed objects When cooking do not hit the glass or let ob jects fall onto the hob Scratches discolour ation Rough cookw...

Страница 7: ...itched off Saving energy If you follow these instructions your appliance will use less power Select the cooking zone to match the size of your pan Centre the cookware on the hob Use cookware whose base diameter is the same dia meter as the hotplate Tip Cookware manufacturers often give the upper diameter of the saucepan It is often larger than the base diameter Unsuitable cookware or incompletely ...

Страница 8: ... manufac turer s Customer Service or a similarly qualified per son in order to prevent any risk Any damage arising from the appliance being con nected incorrectly will invalidate the warranty Information on the electrical connection by the installer If the plug is not accessible following installation an all pole isolating unit with a contact clearance of at least 3 mm must be available on the ins...

Страница 9: ...table feet and the drawer is removable set the base height of your appliance as follows 1 Pull out the plinth drawer and lift it up and out There are adjustable feet at the front and rear on the in side of the plinth 2 Use an Allen key to raise or lower the adjustable feet until the cooker is level 3 Push in the plinth drawer Adjacent units Any adjacent units must not be made of flammable ma teria...

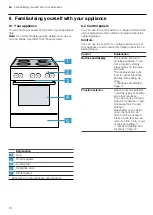
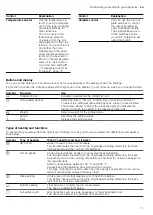
Страница 10: ...tatus Controls You can use the controls to configure all functions of your appliance and to obtain information about the op erating status Control Explanation Buttons and display The buttons are touch sensitive surfaces To se lect a function simply press lightly on the relev ant field The display shows sym bols for active functions and the time setting op tions Buttons and display Page 11 Function...

Страница 11: ...pective symbol indicates the function to which the setting in the display corresponds Weight Select a weight for the programmes Minus Plus Decrease the setting values Increase the setting values Types of heating and functions To ensure that you always find the right type of heating to cook your food we explain the differences and applica tions below Symbol Type of heating What it s used for and ho...

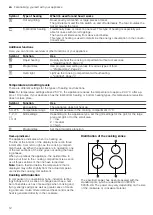
Страница 12: ...e Zero setting The appliance does not heat up 50 275 Temperature range Set the temperature in the cooking compartment in C 1 2 3 or I II III Grill settings Depending on the appliance type set the grill settings for the grill for the large area and grill or for the small area 1 low 2 medium 3 high Programmes Set the programme function Heat up indicator The appliance indicates when it is heating up ...

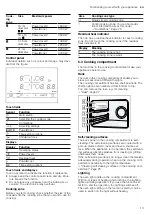
Страница 13: ...al heat indicator for each cooking zone Do not touch the cooking zone if the residual heat indicator is lit Display Meaning The cooking zone is hot The cooking zone is warm 6 3 Cooking compartment The functions in the cooking compartment make your appliance easier to use Rails The rails in the cooking compartment enable you to place accessories at different heights The cooking compartment has five...

Страница 14: ...roof dishes Cookware Meat e g roasting joints or steak Frozen meals Universal pan Moist cakes Biscuits Bread Large roasts Frozen meals Catching dripping liquids e g fat when grilling food on the wire rack Baking tray Tray bakes Sponge cake simple 7 1 Using the accessory Always slide the accessory into the cooking compart ment correctly This is the only way that you can re move the accessory halfwa...

Страница 15: ...efore heating wipe the smooth surfaces in the cooking compartment with a soft damp cloth 3 Ventilate the room while the appliance is heating 4 Set the type of heating and the temperature Basic operation Page 19 Type of heat ing 3D hot air Temperature Maximum Cooking time 1 hour 5 Switch off the appliance after the specified cooking time 6 Wait until the cooking compartment has cooled down 7 Clean ...

Страница 16: ...2 3 15 30 Potatoes boiled in their skin 4 5 25 35 Pasta 1 6 7 6 10 Soups 3 4 15 60 Vegetables 2 3 10 20 Stew in a pressure cooker 4 5 Stewing Pot roast 4 5 60 100 Goulash 3 4 50 60 Braising frying with a small amount of fat 1 Escalope plain or breaded 6 7 6 10 Steak 3 cm thick 7 8 8 12 Poultry breast 2 cm thick 2 5 6 10 20 Hamburgers 2 cm thick 2 6 7 10 20 Fish and fish fillet breaded 6 7 8 20 Pra...

Страница 17: ...ch off the hotplates Setting the kitchen timer 1 Select the hotplate and touch twice a beside lights up 2 Use or to select the required time a The time counts down Changing or deleting the timer duration 1 Touch repeatedly until the display beside lights up 2 To change the cooking time touch or or set it to 12 PowerBoost Allows larger volumes of water to be heated more quickly than with the power ...

Страница 18: ...in before adjusting it Cookware test You can use this function to test the quality of the cookware Not suitable Not optimal Suitable Automatic management with power limitation Deactivated Does not show the power limit unless is activated 1 Switched on Always displays the power limit Restoring factory settings Individual settings 1 Factory settings 1 Factory setting 14 2 To go to the basic settings...

Страница 19: ...ion selector to set the type of heating 2 Use the temperature selector to set the temperature or grill setting a The appliance starts heating after a few seconds 3 When the dish is ready switch off the appliance Tips The most suitable type of heating for your food can be found in the description of the types of heating You can also set a cooking time and an end time on the appliance Time setting o...

Страница 20: ... the change after a few seconds Cancelling the timer The timer duration can be cancelled at any time Requirement is highlighted in the display Use the button to reset the timer duration to zero a After a few seconds the appliance applies the change and goes out 18 3 Setting the cooking time The cooking time can be set to up to 23 hours and 59 minutes for the operation Requirement The type of heati...

Страница 21: ... the change and starts heating up The cooking time counts down 18 5 Setting the time Once the appliance has been connected to the mains or after a power cut the time flashes in the display The time starts at 12 00 Set the current time Requirement The function selector must be set to the off position 1 Use or to set the time 2 Press a The time that is set appears in the display Tip You can define w...

Страница 22: ... and add up to 250 g ve getables if required 2 Do not sear the meat beforehand 09 Joint of veal lean E g tenderloin or eye Roasting dish with lid Weight of meat Cover the bottom of the roasting dish and add up to 250 g ve getables if required 2 Do not sear the meat beforehand 10 Pork neck joint Boned seasoned Roasting dish with glass lid Weight of meat Cover the bottom of the roasting dish and add...

Страница 23: ... display To deactivate the childproof lock press and hold the button until goes out in the display 21 Basic settings You can configure the basic settings for your appliance to meet your needs 21 1 Overview of the basic settings Here you can find an overview of the basic settings and factory settings The basic settings depend on the features of your appliance Display Basic setting Selection Signal ...

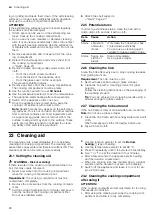
Страница 24: ...eaning the appliance Cleaning the appliance Page 25 Appliance Surface Suitable cleaning agents Information Stainless steel Hot soapy water Special stainless steel cleaning products suitable for hot sur faces To prevent corrosion remove any limescale grease starch or albu min e g egg white stains on stainless steel fronts immediately Apply a thin layer of the stainless steel cleaning product with a...

Страница 25: ...aner Soak any heavily soiled areas and use a brush or steel wool Enamelled accessories are dishwasher safe 22 2 Cleaning the appliance In order to avoid damaging the appliance clean your appliance only as specified and using suitable clean ing products WARNING Risk of burns The appliance and its parts that can be touched be come hot during use Caution should be exercised here in order to avoid tou...

Страница 26: ...for glass ceramic hobs Stains Sugar rice starch or plastic Clean immediately Use a glass scraper 22 6 Cleaning the hob Clean the hob after every use to stop cooking residues from getting burnt on Requirement The hob must be cold 1 Remove heavy soiling using a glass scraper 2 Clean the hob with a cleaning product for glass ceramic Follow the cleaning instructions on the packaging of the cleaning pr...

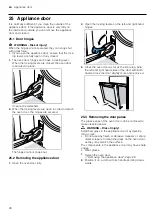
Страница 27: ...g compartment more quickly heat up the appliance with the door open with 3D hot air and 50 C for approx five minutes 24 Rails To clean the rails and cooking compartment thor oughly you can remove the shelf supports 24 1 Unhooking the rails WARNING Risk of burns The rails can be very hot Never touch the rails when they are hot Allow the appliance to cool down Keep children at a safe distance 1 Lift...

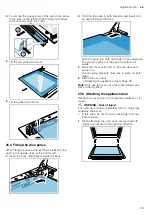
Страница 28: ...he hinges are secured The hinges cannot snap shut 25 2 Removing the appliance door 1 Open the oven door fully 2 Open the locking levers on the left and right hand hinges 3 Close the oven door as far as the limit stop Grip the left and right hand sides of the door with both hands Close the door slightly more and remove it 25 3 Removing the door panes The glass panes of the oven door can be removed ...

Страница 29: ... into both openings on the underside The smooth surface of the pane must face out wards 3 Place the cover at the top of the oven door and press it on The mounting brackets must lock in place on both sides 4 Attach the oven door Attaching the appliance door Page 29 Note Only use the oven once the glass panes have been correctly fitted 25 5 Attaching the appliance door Reattach the oven door in the ...

Страница 30: ...d out by trained specialist staff If the appliance is defective call Customer Service WARNING Risk of electric shock Incorrect repairs are dangerous Repairs to the appliance should only be carried out by trained specialist staff Only use genuine spare parts when repairing the appliance If the power cord of this appliance is damaged it must be replaced by the manufacturer the manufac turer s Custom...

Страница 31: ...n the display panel Fault Cause and troubleshooting No displays light up The power supply has been disconnected Use other electrical appliances to check whether there has been a power failure The appliance has not been connected as shown in the circuit diagram Connect the appliance in accordance with the circuit diagram Electronics fault If you are unable to rectify the fault inform the technical ...

Страница 32: ...rcised here in order to avoid touching heating elements Young children under 8 years of age must be kept away from the appliance WARNING Risk of electric shock When changing the bulb the bulb socket contacts are live Before replacing the bulb ensure that the appliance is switched off in order to prevent a potential electric shock Also unplug the appliance from the mains or switch off the circuit b...

Страница 33: ...ntains light sources from energy effi ciency class G 28 1 Product number E Nr and production number FD You can find the product number E Nr and the pro duction number FD on the appliance s rating plate You will see the rating plate with these numbers if you open the appliance door Make a note of your appliance s details and the Cus tomer Service telephone number to find them again quickly 29 How i...

Страница 34: ...air mode and the energy efficiency class Only use original accessories The original accessory has been tailored to the cooking compartment and the types of heating Ensure that the accessory slides in the right way round Greaseproof paper Only use greaseproof paper that is suitable for the se lected temperature Always cut the greaseproof paper to size WARNING Risk of fire Opening the appliance door...

Страница 35: ...e cake simple 2 levels Vienna ring tin loaf tin 3 1 140 160 60 80 Sponge cake delicate Vienna ring tin loaf tin 2 150 170 60 80 Sponge flan base Flan base tin 3 160 180 30 40 Fruit tart or cheesecake with shortcrust pastry base Springform cake tin diameter 26 cm 2 160 180 70 90 Strudel Tart dish or tin 1 200 240 25 50 Pie Springform cake tin Ø 28 cm 2 160 180 25 35 Sponge cake Bundt cake tin 2 150...

Страница 36: ... Universal pan Baking tray 3 1 150 170 25 40 Puff pastry Universal pan 3 180 200 20 30 Puff pastry 2 levels Universal pan Baking tray 3 1 180 200 25 35 Puff pastry 3 levels 2x Baking tray Universal pan 5 3 1 170 190 30 45 Choux pastry e g profiteroles eclairs Universal pan 3 190 210 35 50 Choux pastry 2 levels e g profiteroles eclairs Universal pan Baking tray 3 1 190 210 35 45 Biscuits Meal Acces...

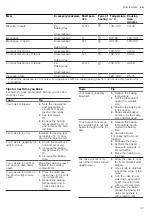
Страница 37: ...lly too light in colour Check the shelf posi tion and accessory Increase the baking temperature by 10 C Or Increase the baking time Your cake is too light on top and too dark under neath Place the cake one level higher in the cooking compartment Your cake is too dark on top and too light under neath Place the cake one level lower in the cook ing compartment Reduce the baking temperature and in cre...

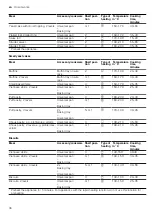
Страница 38: ...latbread Universal pan 3 240 250 25 30 Flatbread frozen1 Universal pan 2 200 2202 10 25 Bread rolls sweet fresh Universal pan 3 170 1802 20 30 Bread rolls sweet fresh 2 levels Universal pan Baking tray 3 1 160 1802 15 25 Bread rolls fresh Universal pan 3 200 220 20 30 Toast with topping x 4 Wire rack 3 200 220 15 20 Toast with topping x 12 Wire rack 3 220 240 15 25 1 The cooking process must take ...

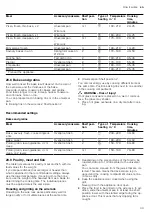
Страница 39: ...es and gratins Meal Accessory cookware Shelf posi tion Type of heating Temperature in C Cooking time minutes Bake savoury fresh cooked ingredi ents Ovenproof dish 2 200 220 30 60 Bake sweet Ovenproof dish 2 180 200 50 60 Potato gratin raw ingredients 4 cm deep Ovenproof dish 2 150 170 60 80 Potato gratin raw ingredients 4 cm deep on 2 levels Ovenproof dish 3 1 150 160 70 80 29 9 Poultry meat and f...

Страница 40: ... become dry Only add salt to steaks once they have been grilled Salt draws water from the meat Tips for poultry meat and fish Observe the instructions when preparing poultry meat and fish Poultry For duck or goose pierce the skin on the underside of the wings This allows the fat to drain out If using duck breast score the skin Do not turn duck breasts Poultry will turn out particularly crispy and ...

Страница 41: ...e without lid 2 200 220 60 70 Small chicken portions 250 g each Cookware without lid 3 220 230 30 35 Chicken goujons nuggets frozen Universal pan 3 190 210 20 25 Duck unstuffed 2 kg Cookware without lid 2 190 210 100 110 Duck breast 300 g each medium Cookware without lid 3 240 260 30 40 Goose unstuffed 3 kg Cookware without lid 2 170 190 120 140 Goose legs 350 g each Cookware without lid 3 220 240...

Страница 42: ...osi tion Type of heating Temperature in C grill setting Cooking time in mins Fish grilled whole 300 g e g trout Wire rack 2 2 20 251 Fish grilled whole 1 kg e g gilthead Wire rack 2 180 200 45 501 Fish grilled whole 1 5 kg e g salmon Wire rack 2 170 190 50 601 Fish fillet fish cutlet 2 3 cm thick grilled Wire rack 3 2 20 251 1 Slide the universal pan underneath the wire rack Tips for next time you...

Страница 43: ...ring the appliance settings 8 After making the yoghurt leave it to cool in the refri gerator Recommended settings Yoghurt Meal Accessory cookware Shelf position Type of heating function Temperature in C Cooking time minutes Yoghurt Cup jar Cooking compartment floor 4 5 hours 29 12 Tips for keeping acrylamide levels to a minimum when cooking Acrylamide is harmful to your health and is produced when...

Страница 44: ...0 5 8 hours Herbs stalks removed Wire rack 3 3 1 60 2 5 hours 29 14 Preserving food You can preserve fruit and vegetables by heating them and sealing them in air tight jars Only use heat resistant clean undamaged pre serving jars rubber seals and clips Only use fruit and vegetables which are in perfect condition Only use jars that are the same size and contain the same food WARNING Risk of injury ...

Страница 45: ...les e g beans kohlrabi red cabbage 1 litre pre serving jars 2 1 170 180 2 120 140 3 1 Until bubbling starts 2 Once it starts bubbling 60 3 Residual heat 30 Vegetables e g peas 1 litre pre serving jars 2 1 170 180 2 120 140 3 1 Until bubbling starts 2 Once it starts bubbling 70 3 Residual heat 30 Stone fruit e g cherries apricot peach grapes gooseberries damsons 1 litre pre serving jars 2 1 170 180...

Страница 46: ...est for another 10 to 30 minutes in the appliance after switching it off Recommended settings Defrosting Meal Accessory cookware Shelf position Type of heating Temperature in C Cooking time minutes Baked items cake and bread fruit veget ables meat products Wire rack 2 3 1 29 17 Test dishes These overviews have been produced for test institutes to facilitate appliance testing in accordance with EN ...

Страница 47: ...sal pan 3 1501 25 35 Small cakes Universal pan 3 1501 25 35 Small cakes 2 levels Universal pan Baking tray 3 1 1501 25 35 Small cakes 3 levels 2x Baking tray Universal pan 5 3 1 1401 35 45 Hot water sponge cake Springform cake tin diameter 26 cm 2 160 1702 30 40 Hot water sponge cake Springform cake tin diameter 26 cm 2 170 30 40 Hot water sponge cake 2 levels Springform cake tin diameter 26 cm 3 ...

Страница 48: ...ing for help You ll find it here Expert advice for your Bosch home appliances help with problems or a repair from Bosch experts Find out everything about the many ways Bosch can support you www bosch home com service Contact data of all countries are listed in the attached service directory 9001701477 9001701477 020209 en BSH Hausgeräte GmbH Carl Wery Straße 34 81739 München GERMANY www bosch home...

Отзывы: