background image

en

    Intended use

4

8

Intended use

Intended use

Read these instructions carefully. Only then 

will you be able to operate your appliance 

safely and correctly. Retain the instruction 

manual and installation instructions for future 

use or for subsequent owners.
The images shown in these instructions are for 

guidance only.
This appliance is only intended to be fully fitted 

in a kitchen. Observe the special installation 

instructions.
Check the appliance for damage after 

unpacking it. Do not connect the appliance if it 

has been damaged in transport.
Only a licensed professional may connect 

appliances without plugs. Damage caused by 

incorrect connection is not covered under 

warranty.
This appliance is intended for domestic use 

only. The appliance must only be used for the 

preparation of food and drink. The appliance 

must be supervised during operation. Only 

use this appliance indoors.
This appliance is intended for use up to a 

maximum height of 4000 metres above sea 

level.
This appliance may be used by children over 

the age of 8 years old and by persons with 

reduced physical, sensory or mental 

capabilities or by persons with a lack of 

experience or knowledge if they are 

supervised or are instructed by a person 

responsible for their safety how to use the 

appliance safely and have understood the 

associated hazards.
Children must not play with, on, or around the 

appliance. Children must not clean the 

appliance or carry out general maintenance 

unless they are at least 15 years old and are 

being supervised.
Keep children below the age of 8 years old at 

a safe distance from the appliance and power 

cable.
Always slide accessories into the cooking 

compartment the right way round. 

~

 "Accessories" on page 11

(

Important safety 

information

Important safety information

General information

:

Warning – Risk of fire! 

Combustible items stored in the cooking 

compartment may catch fire. Never store 

combustible items in the cooking 

compartment. Never open the appliance 

door if there is smoke inside. Switch off the 

appliance and unplug it from the mains or 

switch off the circuit breaker in the fuse box.

Risk of fire! 

Loose food remnants, fat and meat juices 

may catch fire. Before using the appliance, 

remove the worst of the food remnants from 

the cooking compartment, heating elements 

and accessories.

Risk of fire! 

A draught is created when the appliance 

door is opened. Greaseproof paper may 

come into contact with the heating element 

and catch fire. Do not place greaseproof 

paper loosely over accessories during 

preheating. Always weight down the 

greaseproof paper with a dish or a baking 

tin. Only cover the surface required with 

greaseproof paper. Greaseproof paper 

must not protrude over the accessories.

:

Warning – Risk of burns! 

The appliance becomes very hot. Never 

touch the interior surfaces of the cooking 

compartment or the heating elements. 

Always allow the appliance to cool down. 

Keep children at a safe distance.

Risk of serious burns! 

Accessories and ovenware become very 

hot. Always use oven gloves to remove 

accessories or ovenware from the cooking 

compartment.

Risk of burns! 

Alcoholic vapours may catch fire in the hot 

cooking compartment. Never prepare food 

containing large quantities of drinks with a 

high alcohol content. Only use small 

quantities of drinks with a high alcohol 

content. Open the appliance door with care.

Important safety information    

en

5

:

Warning – Risk of scalding! 

The accessible parts become hot during 

operation. Never touch the hot parts. Keep 

children at a safe distance.

Risk of scalding! 

When you open the appliance door, hot 

steam can escape. Steam may not be 

visible, depending on its temperature. When 

opening, do not stand too close to the 

appliance. Open the appliance door 

carefully. Keep children away.

Risk of scalding! 

Water in a hot cooking compartment may 

create hot steam. Never pour water into the 

cooking compartment when the cooking 

compartment is hot. 

:

Warning – Risk of injury! 

Scratched glass in the appliance door may 

develop into a crack. Do not use a glass 

scraper, sharp or abrasive cleaning aids or 

detergents.

Risk of injury! 

The hinges on the appliance door move 

when opening and closing the door, and 

you may be trapped. Keep your hands away 

from the hinges.

Risk of injury! 

If you leave the appliance door open, 

people may bump into it, resulting in injury. 

The appliance door must be kept closed 

both while the appliance is in operation and 

when it has finished.

:

Warning – Risk of electric shock! 

Incorrect repairs are dangerous. Repairs 

may only be carried out and damaged 

power cables replaced by one of our 

trained after-sales technicians. If the 

appliance is defective, unplug the appliance 

from the mains or switch off the circuit 

breaker in the fuse box. Contact the after-

sales service.

Risk of electric shock and serious injury! 

The cable insulation on electrical 

appliances may melt when touching hot 

parts of the appliance. Never bring 

electrical appliance cables into contact with 

hot parts of the appliance.

Risk of electric shock! 

Do not use any high-pressure cleaners or 

steam cleaners, which can result in an 

electric shock.

Risk of electric shock! 

A defective appliance may cause electric 

shock. Never switch on a defective 

appliance. Unplug the appliance from the 

mains or switch off the circuit breaker in the 

fuse box. Contact the after-sales service.

Halogen lamp

:

Warning – Risk of burns! 

The bulbs in the cooking compartment 

become very hot. There is still a risk of burning 

your skin for some time after they have been 

switched off. Do not touch the glass cover. 

Avoid contact with your skin when cleaning.

:

Warning – Risk of electric shock! 

When replacing the cooking compartment 

bulb, the bulb socket contacts are live. Before 

replacing the bulb, unplug the appliance from 

the mains or switch off the circuit breaker in 

the fuse box.

Содержание HHF133B.0B

Страница 1: ...3FHJTUFS ZPVS OFX EFWJDF PO Z PTDI OPX BOE HFU GSFF CFOFGJUT CPTDI IPNF DPN XFMDPNF en Instruction manual Built in oven Built in oven HHF133B 0B HHF313BR0B ...

Страница 2: ......
Страница 3: ...ime setting options 13 Setting the cooking time 13 Setting the end time 14 Setting the timer 15 Setting the time 15 A Childproof lock 15 Activating and deactivating 15 D Cleaning 16 Suitable cleaning agents 16 Surfaces in the cooking compartment 17 Keeping the appliance clean 17 p Rails 18 Detaching and refitting the rails 18 q Appliance door 18 Detaching and attaching the oven door 18 Removing an...

Страница 4: ... safe distance from the appliance and power cable Always slide accessories into the cooking compartment the right way round Accessories on page 11 Important safety information ImportantsafetyinformationGeneral information Warning Risk of fire Combustible items stored in the cooking compartment may catch fire Never store combustible items in the cooking compartment Never open the appliance door if ...

Страница 5: ...are dangerous Repairs may only be carried out and damaged power cables replaced by one of our trained after sales technicians If the appliance is defective unplug the appliance from the mains or switch off the circuit breaker in the fuse box Contact the after sales service Risk of electric shock and serious injury The cable insulation on electrical appliances may melt when touching hot parts of th...

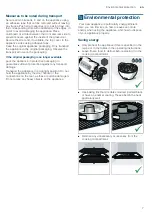
Страница 6: ...liance door Inserting accessories depending on the appliance model accessories can scratch the door panel when closing the appliance door Always insert the accessories into the cooking compartment as far as they will go Carrying the appliance do not carry or hold the appliance by the door handle The door handle cannot support the weight of the appliance and could break 5Installation and connection...

Страница 7: ...e pack the appliance in protective packaging to guarantee sufficient protection against any transport damage Transport the appliance in an upright position Do not hold the appliance by the door handle or the connections on the rear as these could be damaged Do not place any heavy objects on the appliance 7Environmental protection EnvironmentalprotectionYour new appliance is particularly energy eff...

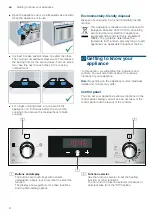
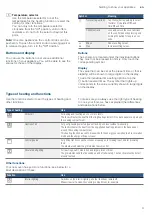
Страница 8: ...tions of your appliance Note Depending on the appliance model individual details and colours may differ Control panel You can set your appliance s various functions on the control panel Below you will see an overview of the control panel and the layout of the controls This appliance is labelled in accordance with European Directive 2012 19 EU concerning used electrical and electronic appliances wa...

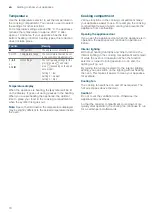
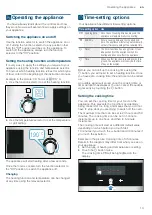
Страница 9: ... the temperature selector clockwise from the Off position until it offers resistance Do not turn the selector beyond this point Symbol Meaning Time setting options Tap the symbol repeatedly to select the timer Q duration x end time y and time Childproof lock Lock and unlock the oven functions on the control panel by pressing and holding the button for approx 4 sec onds A Minus Plus Reduce setting ...

Страница 10: ...ng the appliance door If you open the appliance door when the appliance is in operation the appliance will continue to operate as before Interior lighting With most heating functions and other functions the interior lighting in the cooking compartment will remain lit while the oven is in operation When the function selector is turned to bring operation to an end the lighting will go out By turning...

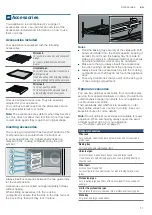
Страница 11: ...ully into the cooking compartment so that they do not touch the appliance door Take any accessories that you will not be using out of the cooking compartment Optional accessories You can buy optional accessories from our after sales service from specialist retailers or online You will find a comprehensive range of products for your appliance in our brochures and online Their availability and wheth...

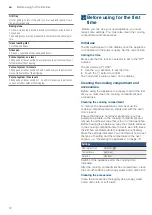
Страница 12: ...th Keep the kitchen ventilated while the appliance is heating Make the settings indicated You can find out how to set the type of heating and the temperature in the next section Operating the appliance on page 13 Switch off the appliance after the cooking time indicated After the cooking compartment has cooled down clean the smooth surfaces with soapy water and a dish cloth Cleaning the accessorie...

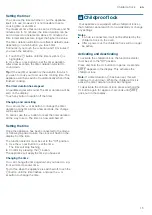
Страница 13: ...n Once you have set a cooking time the end time can be called up An audible signal will sound once the cooking time or timer duration has elapsed You can cancel the audible signal early by touching the v button Setting the cooking time You can set the cooking time for your food on the appliance This prevents the food from accidentally being cooked for too long and means that you do not have to sto...

Страница 14: ...tory The end of the cooking time can be delayed by up to 23 hours and 59 minutes Example in the picture The time is 10 30 a m a cooking time of 45 minutes has been set and you want the food to be ready at 12 30 p m 1 Set the type of heating and temperature or setting 2 Touch the v button twice and use the A or button to set the cooking time 3 Touch the v button again The end time y will be highlig...

Страница 15: ...e timer duration all the way to zero The timer is now switched off Setting the time Once the appliance has been connected to the mains or following a power failure the clock will flash on the display Set the time The function selector must be set to the Off position 1 Use the A or button to set the time The time will stop flashing 2 Confirm by pressing the v button The appliance will apply the tim...

Страница 16: ...under such flecks Special stainless steel cleaning products suitable for hot surfaces are available from our after sales service or from specialist retailers Apply a very thin layer of the cleaning product with a soft cloth Plastic Hot soapy water Clean with a dish cloth and then dry with a soft cloth Do not use glass cleaner or a glass scraper Painted surfaces Hot soapy water Clean with a dish cl...

Страница 17: ...cessories and ovenware from the cooking compartment beforehand Thoroughly clean the smooth enamel surfaces in the cooking compartment the inside of the appliance door and the glass cover on the interior lighting 1 Set the 3D hot air type of heating 2 Set the maximum temperature 3 Start the mode and leave it to run for at least one hour The ceramic coating is regenerated When the cooking compartmen...

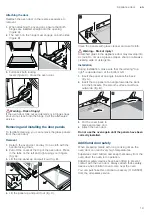
Страница 18: ...iancedoorWith good care and cleaning your appliance will retain its appearance and remain fully functional for a long time to come This will tell you how to remove the appliance door and clean it Detaching and attaching the oven door For cleaning purposes and to remove the door panels you can detach the oven door The oven door hinges each have a locking lever When the locking levers are closed fig...

Страница 19: ...lean the panels with glass cleaner and a soft cloth Warning Risk of injury Scratched glass in the appliance door may develop into a crack Do not use a glass scraper sharp or abrasive cleaning aids or detergents Installation During installation make sure that the lettering top right is upside down at the bottom left 1 Insert the panel at an angle towards the back fig A 2 Insert the top panel at an ...

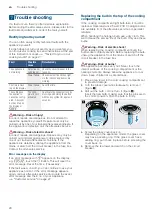
Страница 20: ...rtment light bulb fails it must be replaced Heat resistant 25 watt 230 V halogen bulbs are available from the after sales service or specialist retailers When handling the halogen bulb use a dry cloth This will increase the service life of the bulb Only use these bulbs Warning Risk of electric shock When replacing the cooking compartment bulb the bulb socket contacts are live Before replacing the ...

Страница 21: ...heat to its surroundings during operation Due to the significant differences in temperature between the appliance interior and the external parts of the appliance condensation may build up on the door the control panel or the front panels of adjacent kitchen cabinets This is a normal physical phenomenon Condensation can be reduced by preheating the oven or opening the door carefully General inform...

Страница 22: ... position 5 Universal pan position 3 Baking tray position 1 You can cut energy use by cooking different items at the same time Position baking tins dishes either next to one another or offset on different shelves so that they are not directly one above the other in the cooking compartment Accessories Only use original accessories supplied with your appliance These have been tailored to the cooking...

Страница 23: ...rsal pan 3 80 90 100 150 Pavlova Universal pan 3 150 100 100 150 Soufflé Wire rack 1 2 l soufflé dish 2 160 170 45 50 Pie Wire rack pie dish 3 180 190 45 50 Yorkshire pudding Universal pan 12 cup tin 3 190 200 15 20 Jacket potatoes Universal pan 3 160 170 60 70 Pizza homemade Universal pan 3 210 220 20 25 Preheat Preheat at higher temperature then reduce and insert food Food Dish Shelf position Ty...

Страница 24: ...m cake tin After baking loosen the baked item carefully with a knife The fruit juice overflows Next time use the universal pan Small baked items stick to one another during baking There should be a gap of approx 2 cm around each item This gives enough space for the baked items to expand well and brown on all sides The baked item is too dry Set the temperature 10 C higher and shorten the baking tim...

Страница 25: ...e weight of the heaviest piece as a basis for determining the cooking time The individual pieces should be approximately equal in size The larger the poultry meat or fish is the lower the cooking temperature and the longer the cooking time Turn the poultry meat and fish after approx to Z of the indicated time Poultry When cooking duck or goose pierce the skin on the underside of the wings This all...

Страница 26: ... 20 25 Chicken quarter 450 g each Universal pan with wire insert 1 180 190 20 25 Duck Universal pan with wire insert 1 180 190 20 20 Turkey crown Universal pan with wire insert 1 160 170 15 15 Turkey whole 4 8 kg Universal pan with wire insert 1 160 170 12 12 Casserole Diced meat beef pork lamb 500g meat Wire rack glass roasting dish with lid 2 140 120 150 total time Braising steaks Wire rack glas...

Страница 27: ...mb Steaks height 2 3 cm Wire rack universal pan 5 3 3 1 side 6 7 2 side 6 7 Chops height 2 3 cm Wire rack universal pan 5 3 3 1 side 5 6 2 side 5 6 Pork Steaks height 1 2 cm Wire rack universal pan 5 3 3 1 side 6 7 2 side 6 7 Chops height 2 3 cm Wire rack universal pan 4 3 3 1 side 10 12 2 side 9 10 Burgers height 1 2 cm Wire rack universal pan 5 3 3 1 side 6 8 2 side 4 6 Sausages thickness 2 4 cm...

Страница 28: ...ing time The roast looks good but the juices are burnt Next time use a smaller roasting dish and add more liquid if necessary The roast looks good but the juices are too clear and watery Next time use a larger roasting dish and add less liquid if necessary The meat gets burned during brais ing The roasting dish and lid must fit together well and close properly Reduce the temperature and add more l...

Страница 29: ...enly on the wire rack Dry herbs on the stem Spread the herbs out evenly and slightly heaped on the wire rack Use the following shelf positions for drying 1 wire rack Position 3 2 wire racks Positions 3 1 Turn very juicy fruit and vegetables several times After drying remove the dried food from the paper immediately In the table you will find settings for drying various foodstuffs The temperature a...

Страница 30: ...osted in the refrigerator Not suitable for cream cakes or cream gateaux Use the following shelf positions when defrosting 1 wire rack Position 2 2 wire racks Positions 3 1 Tip Food that has been frozen flat or in portions defrosts more quickly than food items frozen in a block Remove frozen food from its packaging and place it onto the wire rack in suitable cookware Redistribute the food or turn i...

Страница 31: ... the lower of the indicated temperatures first Baking Grilling 2 1 Dish Accessories cookware Shelf posi tion Heating function Temperature in C Cooking time in min Viennese whirls Universal pan 3 140 150 25 35 Viennese whirls 2 levels Universal pan baking tray 3 1 140 150 30 45 Viennese whirls 3 levels Baking trays universal pan 5 3 1 130 140 35 50 Small cakes Universal pan 3 150 170 20 35 Small ca...

Страница 32: ... XFMDPNF PPLJOH GPS IFMQ PV MM GJOE JU IFSF YQFSU BEWJDF GPS ZPVS PTDI IPNF BQQMJBODFT OFFE IFMQ XJUI QSPCMFNT PS B SFQBJS GSPN PTDI FYQFSUT JOE PVU FWFSZUIJOH BCPVU UIF NBOZ XBZT PTDI DBO TVQQPSU ZPV XXX CPTDI IPNF DPN TFSWJDF POUBDU EBUB PG BMM DPVOUSJFT BSF MJTUFE JO UIF BUUBDIFE TFSWJDF EJSFDUPSZ 3PCFSU PTDI BVTHFSÉUF NC BSM 8FSZ 4USB F ßODIFO FSNBOZ XXX CPTDI IPNF DPN 9001317458 9001317458 31...

Отзывы: