Bosch HGB330E50Q Скачать руководство пользователя страница 36

en 

Installation instructions

36

21.6 Leak test and function test

The leak test must be carried out by two people.

WARNING ‒ Risk of explosion!

Sparks, flames or open flames may cause explosions
during the leak and function test.

Ensure that no sparks are produced.

Do not use any fire or naked flames.

Only check the leak tightness using a suitable foam.

Gas leak

¡

Close the gas connection locking device.

¡

Ventilate the relevant location sufficiently.

¡

Check the gas and nozzle connections once more.

¡

Repeat the leak test → 

Page 36

.

Checking the gas connection

1.

Open the gas connection shut-off.

2.

Apply suitable foam around the gas connection.

a

If dispersions and bubbles occur on the foamy sur-
face and these indicate that gas is escaping, follow
the instructions in the section entitled "What to do if
there is a gas leak" → 

Page 36

.

3.

Follow the same instructions for the part that is
sealed with the blind plug.

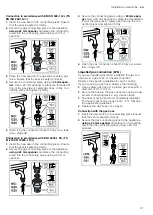
Checking the cooker burner nozzles

Check the leak tightness of each nozzle.

1.

Open the gas connection shut-off.

2.

To check, carefully cover the hole in the burner
nozzle with your finger or a special device.

3.

Apply suitable foam around the nozzle.

4.

Press on the burner knob and turn the knob anti-
clockwise. Gas therefore comes to the nozzle.

a

If dispersions and bubbles occur on the foamy sur-
face and these indicate that gas is escaping, follow
the instructions in the section entitled "What to do if
there is a gas leak" → 

Page 36

.

Checking the bypass nozzles

Check the leak tightness of each bypass nozzle.

1.

Open the gas connection shut-off.

2.

To check, carefully cover the hole in the burner
nozzle with your finger or a special device.

3.

Apply suitable foam around the bypass nozzle on
the burner that is to be checked.

4.

Press on the tap spindle and turn it anti-clockwise.
Gas therefore comes to the nozzle.

a

If dispersions and bubbles occur on the foamy sur-
face and these indicate that gas is escaping, follow
the instructions in the section entitled "What to do if
there is a gas leak" → 

Page 36

.

Checking the lower oven gas burner nozzle

Check the leak tightness of each bypass nozzle.

1.

Open the gas connection shut-off.

2.

To check, carefully cover the hole for the burner
nozzle in the oven's lower gas burner with your fin-
ger or a special device.

3.

Apply suitable foam around the nozzle.

4.

Press the function control knob for the oven and
turn the knob anti-clockwise. Gas therefore comes
to the nozzle.

a

If dispersions and bubbles occur on the foamy sur-
face and these indicate that gas is escaping, follow
the instructions in the section entitled "What to do if
there is a gas leak" → 

Page 36

.

21.7 Checking the correct burner behaviour

Check the burning and soot formation of each burner
after the product has been converted to a different gas
type. If there is a problem, compare the nozzle values
with the values in the table.

Checking the correct burner behaviour of the
cover burner

1.

Ignite the gas cooker burners in accordance with
the instructions in the operating manual.
→ 

"Operating the hotplate", Page 15

2.

Set the gas cooker knob to the small flame setting.
Check whether the flame safety system is working
by keeping the flame at the "small flame" setting for
one minute.

3.

Check that the burners are burning correctly with
both large and small flames.

a

The flame must burn evenly and steadily.

4.

Turn the burner knob back and forth quickly
between the large flame setting and the small flame
setting. Repeat this process several times.

a

The gas flame must not flicker or go out.

Checking the correct burner behaviour for the

lower oven gas burner

1.

Ignite the lower oven gas burner in accordance with
the instructions in the operating manual.
→ 

"Basic operation", Page 16

2.

Open the oven door and observe the flame.

a

The flame must burn evenly.

a

The flame may fail during the first few minutes. How-
ever, the flame must stabilise after a few minutes.

3.

Switch on the appliance for a few minutes to check
whether the thermocouple becomes sufficiently
warm.

a

Adjust the settings, if required. If the bypass nozzle
on the burner is faulty, replace this.

21.8 Technical data – Gas

The different types of gas and the corresponding val-
ues are listed.

Information on some types of gas

Note the following information for the gas types that are
listed in the table for some burners.

Type of gas

Explanation

G20/25
(20/25 mbar)

For France and Belgium

G2.350
(13 mbar)

For Poland

G30 (50 mbar)

The after-sales service must order
the nozzle set HEZ298070.

Содержание HGB330E50Q

Страница 1: ...Register your new device on MyBosch now and get free benefits bosch home com welcome Free standing cooker HGB330E50Q en User manual and installation instructions ...

Страница 2: ... appliance and to convert the appliance to a different type of gas The appliance must be installed and the elec tric and gas connections must be implemen ted in accordance with the instruction and in stallation manual An incorrect connection or incorrect settings may lead to serious accidents and damage to the appliance The appliance manufacturer accepts no liabil ity for damage of this kind The a...

Страница 3: ...gas governor If you do not know what the gas pressure in your gas distributing pipes is please ask your local gas company Connection maintenance and setting of the gas governor must be carried out by an au thorised installation specialist WARNING Risk of suffocation Using the gas cooking appliance leads to a build up of heat moisture and combustion products in the room where the appliance is insta...

Страница 4: ...ring operation Allow the appliance to cool down before cleaning When the cooking compartment is hot any al coholic vapours inside may catch fire Only use small quantities of drinks with a high alcohol content in food Open the appliance door carefully The appliance and its parts that can be touched become hot during use Caution should be exercised here in order to avoid touching heating elements Yo...

Страница 5: ...n people may bump into it resulting in injury Always keep the appliance door closed during and after operation WARNING Risk of scalding The accessible parts of the appliance become hot during operation Never touch these hot parts Keep children at a safe distance Hot steam may escape when you open the appliance door Steam may not be visible de pending on the temperature Open the appliance door care...

Страница 6: ...partment damages the enamel Never use oven cleaner in the cooking compartment when it is still warm Remove all food remnants from the cooking com partment and the appliance door before you next heat up the appliance If the seal is very dirty the appliance door will no longer close properly during operation This may dam age the front of adjacent kitchen units Keep the seal clean at all times Never ...

Страница 7: ...ar effect ive chemicals 2 3 Drawer area Follow the corresponding instructions when using the drawer ATTENTION Do not place hot objects in the plinth drawer The plinth drawer may be damaged Do not place hot objects in the plinth drawer Do not place oven accessories that exceed the height of the drawer into the plinth drawer Otherwise this may damage the appliance Do not place oven accessories that ...

Страница 8: ...ed Keep the hose away from hot surfaces On some appliances you can connect the gas pipe to the gas pipe or flexible safety gas hose on the right hand or the left hand side of the appliance If necessary you can change the connection side The connection must have a free standing and eas ily accessible locking device Target appliance operating pressure You can find the target operating pressure for y...

Страница 9: ...ance on a smooth surface Never set up the appliance behind a decorative door or the door of a kitchen unit There is a risk of overheat ing Max Install the appliance in accordance with the spe cified dimensions The distance between the top edge of the cooker and the bottom edge of the extractor hood must meet the requirements of the extractor hood manu facturer Ensure that the appliance is not move...

Страница 10: ...an1 1 Depending on the appliance specifications Explanation 6 Appliance door 7 Plinth drawer1 1 Depending on the appliance specifications 5 2 Hob You can view an overview of the hob here Note On certain models specific details such as col our and shape may differ from those pictured 1 2 3 4 Power kW Burner hotplate 1 Steam outlet Note When the oven is operating hot steam escapes here 2 1 7 kW Stan...

Страница 11: ...sition Power kW Function Explanation Zero setting The oven is switched off 170 270 3 kW Temperature setting range Heat generated by the lower oven gas burner in ºC for preparing cakes in tins pizza on a baking tray baked goods etc Selector for the oven electric grill Turn the selector for the electric grill clockwise to set the grilling temperature Position Function Explanation Zero setting The ov...

Страница 12: ...t enable you to place accessories at different heights The cooking compartment has five shelf positions The shelf positions are numbered from bottom to top You can remove the rails e g for cleaning Rails Page 21 Lighting The oven light lights up the cooking compartment To illuminate the cooking compartment press the lamp button Steam outlet The hot air from the cooking compartment escapes at the r...

Страница 13: ...e using out of the cooking compartment while the appliance is in operation 6 2 Other accessories You can purchase other accessories from our after sales service specialist retailers or online You will find a comprehensive range of products for your appliance in our brochures and online www bosch home com Accessories vary from one appliance to another When purchasing accessories always quote the ex...

Страница 14: ...e objects WARNING Risk of injury An incorrectly positioned wok may cause injuries The wok is not stable and may overturn Use the wok only on the wok burner and the wok ring Never set the wok ring and wok on the stand ard output burner and high output burner Ensure that the size of the cookware is suit able for the burner size Never use small cook ware on large burners Ensure that the flame does no...

Страница 15: ...n plugs clean If the ignition plugs are dirty the igniter is damaged Clean the ignition plugs regularly with a small metal free brush En sure that the ignition plugs are not exposed to any heavy knocks 9 3 Operating the hotplate You can ignite the gas burner as follows WARNING Risk of fire Escaping gas may ignite If the burner does not ignite after 15 seconds turn the control knob to the Off posit...

Страница 16: ...ame Between large and small flame Note Information If you are using a pan with a lid turn the flame down as soon as the food starts to boil Optional Available for some appliances Depend ing on the appliance type For frying on the wok burner we recommend that you use a wok 10 Basic operation 10 1 Setting the lower oven gas burner When the lower gas burner is lit you can start to bake on a baking tr...

Страница 17: ...e timer has its own audible signal so that you can tell whether it is the timer or a cooking time which has elapsed Note The timer and cooking time cannot count down at the same time If a cooking time has already been set you cannot set the timer 1 Press repeatedly until is selected in the display 2 Use the or button to set the timer duration Button Recommended value 5 minutes 10 minutes Up to 10 ...

Страница 18: ...annot be used The oven s childproof lock does not affect how the lower oven gas burner operates After activating the childproof lock the multi function button cannot be used 12 1 Activating and deactivating the childproof lock Requirement The multi function button must be switched off To activate the childproof lock press and hold the button until appears in the display To deactivate the childproo...

Страница 19: ... for thorough cleaning Appliance door Page 22 Door handle Hot soapy water In order to avoid stubborn dirt remove descaling agents from the door handle immediately Door seal Hot soapy water Do not remove or scrub Upper glass cover Glass cleaner Clean with a soft cloth Tip Remove the upper glass cover for thorough cleaning Top cover Page 23 Cooking compartment Area Suitable cleaning agents Informati...

Страница 20: ...ning gel for burnt on dirt For hard to remove burnt on dirt you can order a cleaning gel from our online shop from your specialist retailer or via our after sales service 1 Follow the instructions on the cleaning product 2 Remove the pan supports and the burner parts 3 ATTENTION On the burner parts the controls and the aluminium surfaces the cleaning gel leads to damage Only use the cleaning gel o...

Страница 21: ...ounting openings 2 Pull the entire shelf support downwards first and then pull it forwards and remove it 14 2 Attaching the rails 1 Place the two hooks at the top of the rail into the up per holes 2 ATTENTION Incorrect assembly Never move the rail before the two hooks are se cured fully in the upper holes Otherwise the enamelled coating may be damaged and break 3 Both hooks must be inserted fully ...

Страница 22: ...ot be detached 2 When the locking levers are open in order to detach the oven door the hinges are secured The hinges cannot snap shut 15 2 Removing the appliance door 1 Open the oven door fully 2 Open the locking levers on the left and right hand hinges 3 Close the oven door as far as the limit stop Grip the left and right hand sides of the door with both hands Close the door slightly more and rem...

Страница 23: ... remove the top cover 16 1 Removing the upper cover WARNING Risk of injury A scratched upper glass cover may break and frag ment Do not use a glass scraper or any harsh or abrasive cleaning products Requirement Before opening the top cover remove any spills with a cloth 1 Take hold of the sides of the cover with both hands and pull the cover upwards 2 Use a glass cleaner for cleaning Note If the c...

Страница 24: ...shes in the display There has been a power cut Reset the time Setting the time Page 18 After pressing the multi function lamp button and no settings can be made on the appli ance Childproof lock is activated Use to deactivate childproof lock Childproof lock Page 18 A message with appears in the dis play e g Electronics fault 1 Press If necessary reset the time on the clock a If the fault was a one...

Страница 25: ... are available from the after sales service or specialist retailers Only use these bulbs WARNING Risk of burns The appliance and its parts that can be touched be come hot during use Caution should be exercised here in order to avoid touching heating elements Young children under 8 years of age must be kept away from the appliance WARNING Risk of electric shock When changing the bulb the bulb socke...

Страница 26: ... be dam aged 4 Do not place any heavy objects on the appliance 19 Customer Service If you have any queries on use are unable to rectify faults on the appliance yourself or if your appliance needs to be repaired contact Customer Service Detailed information on the warranty period and terms of warranty in your country is available from our after sales service your retailer or on our website If you c...

Страница 27: ...ll cold Do not place accessories into the cooking compart ment until it has finished preheating Remove any accessories that are not being used from the cooking compartment Ensure that the accessory slides in the right way round Reference gases Unsuitable gas mixtures may impair the cooking power level Note The appliance was manufactured in accordance with the reference gases specified in the stand...

Страница 28: ... Keep the appliance door closed when using the grill Never grill with the appliance door open Place the food to be grilled on the wire rack In ad dition slide the universal pan in at least one shelf position lower with the slanted edge facing the ap pliance door This means that any dripping fat is caught Recommended settings Dish selection for electric grill Meal Accessory cookware Shelf posi tion...

Страница 29: ...er by authorised per sonnel who have received appropriate train ing The procedure must always be carried out in accordance with the instructions in this manual Incorrect connection and incorrect settings may damage the appliance The appliance manufacturer shall accept no liability for in correct connections or incorrect settings Wear protective gloves so that you do not cut yourself Accessible par...

Страница 30: ...the rating plate Type of gas gas pressure Data following gas con version 21 3 Selecting the gas connection side On many appliances you can carry out the gas con nection on the right or left hand side If necessary you can change the connection side Requirements Shut off the main gas line Seal the gas connecting piece on the side that is not being used with a blind plug 1 Place the new seal in the b...

Страница 31: ...onnecting piece into the connecting piece using a 24 mm spanner 3 Secure the connecting piece using a 24 mm span ner Use a 24 mm spanner to place the threaded fit ting of the gas pipe or safety gas hose on the con necting piece and tighten it firmly 4 Open the gas connection shut off Carry out a leak test Page 36 Liquefied gas connection LPG If you use liquefied gas LPG establish the gas con necti...

Страница 32: ...tion about this in the section entitled Appliance information Page 30 ATTENTION After converting the type of gas label the type of gas that is now set After converting the type of gas affix the label with the specification of the gas type and the star shape at the designated location on the appliance s rating plate Parts for the gas conversion The parts that you need for the gas conversion proced ...

Страница 33: ...pliance was set to natural gas at the time of delivery factory setting NG G20 G25 and is now being converted to liquefied gas for the first time LPG G30 G31 1 In order to gain access to the bypass nozzles below the burner tap remove the control panel You can find additional information about this in the section entitled Removing the control panel Page 33 2 Then tighten the bypass nozzle on the ove...

Страница 34: ...it vertically on the front burner mount 6 Remove the plastic covers from the front profiles on the right and left Ensure that the covers are not damaged or scratched Unscrew the screws T20 below these 7 Remove the two screws M4 that are uncovered when you remove the control knobs T15 8 Grip the panel with both hands and slowly pull it up wards Remove the panel from the fastening lugs Then carefull...

Страница 35: ...he pan support racks Ensure that the 80 mm pan support is fit ted on the auxiliary burner 6 If the appliance has a covering plate hold it vertic ally by both sides and slowly reinsert it into the holder 7 Carefully insert the knobs At this stage it is important to check that the gas burners are burning correctly You can find addi tional information about this in the section en titled Checking the ...

Страница 36: ...t off 2 To check carefully cover the hole for the burner nozzle in the oven s lower gas burner with your fin ger or a special device 3 Apply suitable foam around the nozzle 4 Press the function control knob for the oven and turn the knob anti clockwise Gas therefore comes to the nozzle a If dispersions and bubbles occur on the foamy sur face and these indicate that gas is escaping follow the instr...

Страница 37: ...58 0 38 0 38 0 38 0 58 Max input power kW 1 75 1 75 1 75 1 75 1 75 1 75 1 75 1 75 1 75 1 75 Min input power kW 0 9 0 9 0 9 0 9 0 9 0 9 0 9 0 9 0 9 0 9 Gas flow at 15 C and 1013 mbar m3 h 0 167 0 194 0 167 0 167 0 194 0 194 0 190 0 203 Gas flow at 15 C and 1013 mbar g h 127 125 127 127 Nozzle values for the high output burner Note the following information for the gas types that are listed in the t...

Страница 38: ...5 G25 G25 3 G30 G30 Bypass nozzle mm 0 76 0 76 0 67 0 80 0 70 0 70 0 48 0 45 Max input power kW 3 3 3 3 3 3 3 3 Min input power kW Gas flow at 15 C and 1013 mbar m3 h 0 285 0 332 0 285 0 285 0 332 0 332 0 325 Gas flow at 15 C and 1013 mbar g h 218 218 ...

Страница 39: ......

Страница 40: ...e Free and easy registration also on mobile phones www bosch home com welcome Looking for help You ll find it here Expert advice for your Bosch home appliances help with problems or a repair from Bosch experts Find out everything about the many ways Bosch can support you www bosch home com service Contact data of all countries are listed in the attached service directory 9001695603 9001695603 0202...

Отзывы: