16
| English
Fitting
u
Remove the battery from the power tool before carry-
ing out work on the power tool (e.g. maintenance,
changing tool, etc.). The battery should also be re-
moved for transport and storage.
There is risk of injury
from unintentionally pressing the on/off switch.
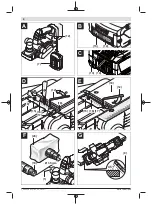
Battery charging (see figure A)
u
Use only the chargers listed in the technical data.
Only
these chargers are matched to the lithium-ion battery of
your power tool.
Note:
The battery is supplied partially charged. To ensure
full battery capacity, fully charge the battery in the charger
before using your power tool for the first time.
The lithium-ion battery can be charged at any time without
reducing its service life. Interrupting the charging process
does not damage the battery.
The lithium-ion battery is protected against deep discharge
by the "Electronic Cell Protection (ECP)". When the battery
is discharged, the power tool is switched off by means of a
protective circuit: The application tool no longer rotates.
u
Do not continue to press the On/Off switch after the
power tool has automatically switched off.
The battery
can be damaged.
To remove the battery
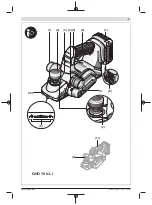
(7)
, press the release button
(8)
and
pull the battery downwards out of the power tool.
Do not
use force to do this.
The hex key
(12)
required for changing the planer blade is
housed inside the power tool and should always be stored
there (see figure
A
).
Follow the instructions on correct disposal.
Battery charge indicator (battery model GBA 18V...)
(see figure B)
The three green LEDs of the battery charge indicator
(14)
in-
dicate the state of charge of the battery
(7)
. For safety reas-
ons, it is only possible to check the state of charge when the
power tool is not in operation.
Press the button for the battery charge indicator
(13)
to
show the state of charge. This is also possible when the bat-
tery is removed.
LED
Capacity
Continuous lighting 3 x green
≥2/3
Continuous lighting 2 x green
≥1/3
Continuous lighting 1 x green
<1/3
Flashing light 1 x green
Reserve
If no LED lights up after pressing the button for the battery
charge indicator
(13)
, then the battery is defective and must
be replaced.
Battery charge indicator (battery model
ProCORE 18V...) (see figure C)
The five green LEDs of the battery charge indicator
(14)
in-
dicate the state of charge of the battery
(7)
. For safety reas-
ons, it is only possible to check the state of charge when the
power tool is not in operation.
Press the button for the battery charge indicator
(13)
to
show the state of charge. This is also possible when the bat-
tery is removed.
LED
Capacity
Continuous lighting 5 x green
>80...100 %
Continuous lighting 4 x green
>60...≤80 %
Continuous lighting 3 x green
>40...≤60 %
Continuous lighting 2 x green
>20...≤40 %
Continuous lighting 1 x green
>0...≤20 %
Flashing light 1 x green
0 %
If no LED lights up after pressing the
(14)
button, then the
battery is defective and must be replaced.
Changing the Tool
u
Take care when changing the planer blade. Do not pick
up the planer blade by the cutting edges.
You may be
injured by the sharp cutting edges.
Use only original
Bosch
HM/TC planer blades.
The hard metal (HM/TC) planer blade has two cutting edges
and can be turned. If both cutting edges become blunt, the
planer blade
(18)
needs to be changed. The HM/TC planer
blade must not be resharpened.
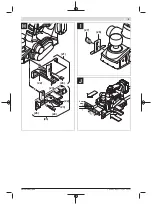
Removing the planer blade (see figure D)
To turn or replace the planer blade
(18)
, turn the blade head
(15)
until it is parallel to the planer base plate
(10)
.
➊
Loosen the two fastening screws
(17)
using the hex key
(12)
(approx. 1–2 turns).
➋
If necessary, loosen the clamping element
(16)
by
lightly striking it with an appropriate implement, e.g. a
wooden wedge.
➌
Use a piece of wood to push the planer blade
(18)
to
the side and out of the blade head
(15)
.
Fitting the planer blade (see figure E)
The guide groove on the planer blade ensures a constant,
even height setting when changing or turning the blade.
If necessary, clean the knife seat in the clamping element
(16)
and the planer blade
(18)
.
When fitting the planer blade, ensure that it is securely
seated in the mounting guide of the clamping element
(16)
and is aligned flush with the side edge of the planer base
plate
(10)
at the rear. Then tighten the two fastening screws
(17)
with the hex key
(12)
.
Note:
Check that the fastening screws
(17)
are firmly
tightened before starting operation. Turn the blade head
(15)
by hand and ensure that the planer blade is not brush-
ing against anything.
Dust/Chip Extraction
The dust from materials such as lead paint, some types of
wood, minerals and metal can be harmful to human health.
Touching or breathing in this dust can trigger allergic reac-
1 609 92A 4PL | (21.02.2019)
Bosch Power Tools

