14
8. CAMERA AND LENS ACCESS
The following steps show the installer how to
access the camera board and the camera lens.
Step 2.1 - Remove the four cap screws with a
3mm Allen key. See
Figure 8-1
on
page 15.
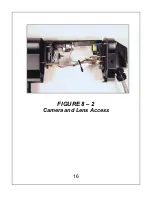
Step 2.2 - Carefully slide out the rear housing
from the main enclosure. Make sure
the gasket remains with the rear
section. See
Figure 8-2
on page 16.
Step 2.3 - Make any necessary camera or lens
adjustments as described in
Section 9, 10 or 11
.
Step 2.4 - Carefully slide the rear section into
the main enclosure and tighten the
cap screws.
Содержание EX27
Страница 1: ...1 EX27 EX27N EX27D All Weather Cameras INSTALLATION INSTRUCTIONS MAN 27 27N 27D 01 ...
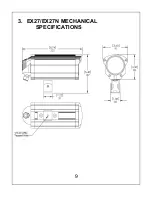
Страница 9: ...9 3 EX27 EX27N MECHANICAL SPECIFICATIONS ...
Страница 10: ...10 4 EX27D MECHANICAL SPECIFICATIONS ...
Страница 15: ...15 FIGURE 8 1 Rear Housing Removal Cap screw ...
Страница 16: ...16 FIGURE 8 2 Camera and Lens Access ...
Страница 18: ...18 FIGURE 9 2 EX27 EX27D Day Night Switch Adjustment Photocell Adjustment ...
Страница 22: ...22 ...
Страница 23: ...23 ...
Страница 24: ...24 ...
Страница 25: ...25 ...
Страница 26: ...26 ...
Страница 27: ...27 ...
Страница 28: ...28 ...
Страница 29: ...29 ...
Страница 30: ...30 ...
Страница 31: ...31 ...
Страница 32: ...32 ...
Страница 33: ...33 ...
Страница 34: ...34 ...
Страница 35: ...35 ...
Страница 36: ...36 ...
Страница 37: ...37 ...
Страница 38: ...38 ...
Страница 39: ...39 ...
Страница 44: ...44 Notes ...
Страница 45: ...45 Notes ...
Страница 46: ...46 Notes ...
Страница 47: ...47 Notes ...

