background image

DinionHD 1080p HDR

Installation | en

25

Bosch Security Systems

Installation Manual

AM18-Q0614 | v1.0 | 2012.03

5.7

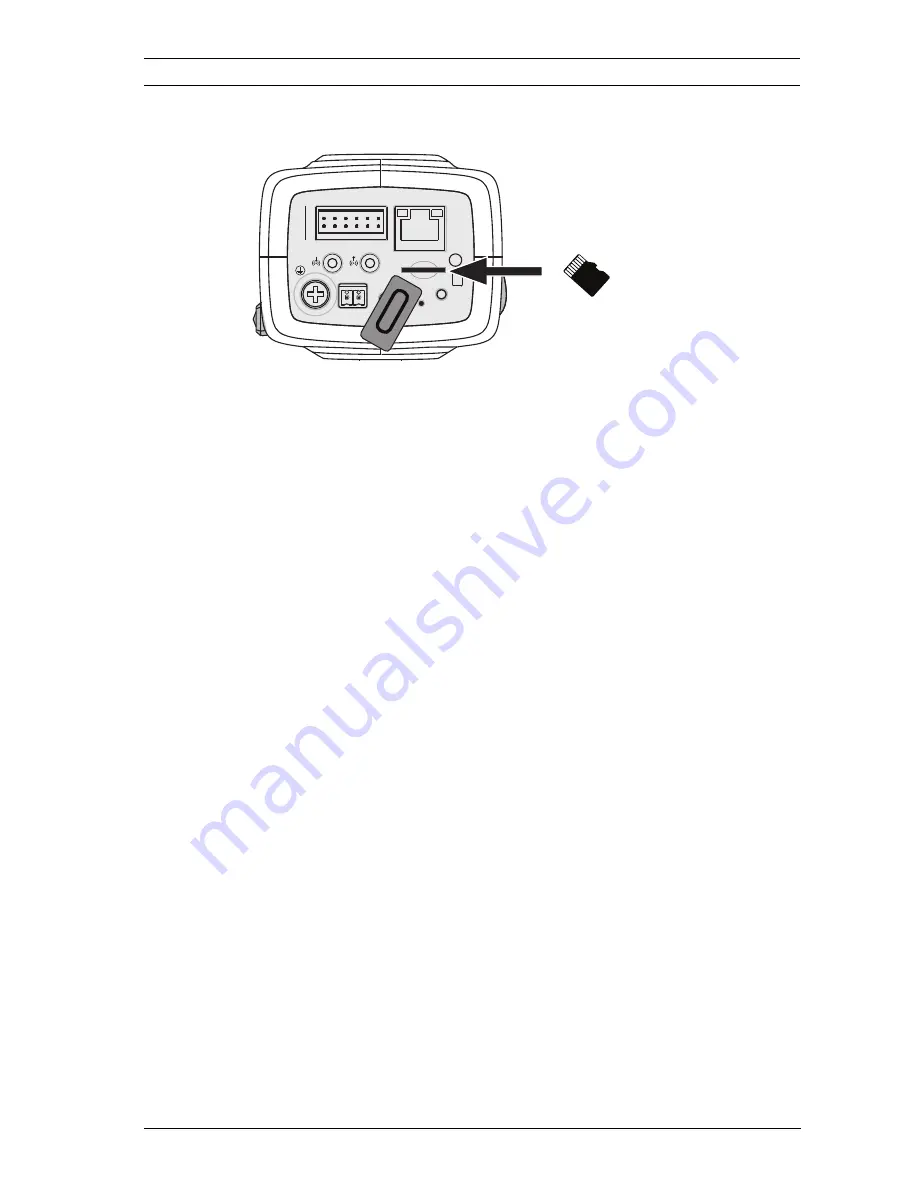
Local storage

Figure 5.7

Inserting an microSD card

1.

Unscrew the card slot cover.

2.

Slide the microSD card into the slot until it locks in place.

3.

Screw the cover into place to seal the slot.

4

5

6

4

5

6

1

2

3

1

2

3

|

|

12VDC

- +

INSTALL

24VAC

MENU

µSD

E
T
H

-

P
o
E

D
A

T
A

A
L
A
R

M

Содержание DinionHD NBN-932

Страница 1: ...DinionHD 1080p HDR NBN 932 en Installation Manual ...

Страница 2: ......

Страница 3: ...duction 12 2 1 Features 12 3 System Information 13 3 1 Overview of functions 13 3 1 1 Progressive scan 13 3 1 2 Day Night function 13 3 1 3 Quad streaming 13 3 1 4 ONVIF Open Network Video Interface Forum 13 3 1 5 Audio 14 3 1 6 Alarm I O 14 3 1 7 Tamper detection and motion detection 14 3 1 8 Video encoding 14 3 1 9 Multicast 14 3 1 10 Power over Ethernet 14 3 1 11 Data interface 14 3 1 12 Encryp...

Страница 4: ...ctor 26 5 9 Data connector 27 6 Install Wizard 28 6 1 Using the camera install wizard 28 6 1 1 Adjustment procedure 29 7 Camera configuration 31 7 1 Reset button 31 7 2 User modes 31 7 3 Day Night switching 32 8 Browser connection 33 8 1 Protected network 33 9 Troubleshooting 34 9 1 Function test 34 9 2 Resolving problems 35 9 3 Customer service 37 10 Maintenance 38 10 1 Testing the network connec...

Страница 5: ... injury or death WARNING Medium risk Indicates a potentially hazardous situation If not avoided this could result in minor or moderate bodily injury CAUTION Low risk Indicates a potentially hazardous situation If not avoided this could result in property damage or risk of damage to the unit CAUTION The Low Voltage power supply unit must comply with EN UL 60950 The power supply must be a SELV LPS u...

Страница 6: ...any kind on the unit 4 Take precautions to protect the unit from power and lightning surges 5 Adjust only those controls specified in the operating instructions 6 Operate the unit only from the type of power source indicated on the label 7 Unless qualified do not attempt to service a damaged unit yourself Refer all servicing to qualified service personnel 8 Install in accordance with the manufactu...

Страница 7: ... grounding 12 VDC 24 VAC power source This unit is intended to operate with a limited power source The unit is intended to operate at either 12 VDC or 24 VAC if PoE is not available User supplied wiring must be in compliance with electrical codes Class 2 power levels PoE Use only approved PoE devices Power over Ethernet can be connected at the same time as a 12 VDC or 24 VAC power supply If auxili...

Страница 8: ...rning the equipment off and on the user is encouraged to try to correct the interference by one or more of the following measures reorient or relocate the receiving antenna increase the separation between the equipment and receiver connect the equipment into an outlet on a circuit different from that to which the receiver is connected consult the dealer or an experienced radio TV technician for he...

Страница 9: ...s for Safety for Information Technology Equipment UL 60950 1 UL Certification does not cover the performance or reliability of the security or signaling aspects of this product UL MAKES NO REPRESENTATIONS WARRANTIES OR CERTIFICATIONS WHATSOEVER REGARDING THE PERFORMANCE OR RELIABILITY OF ANY SECURITY OR SIGNALING RELATED FUNCTIONS OF THIS PRODUCT Disposal Your Bosch product was developed and manuf...

Страница 10: ...fingers Copyright This manual is the intellectual property of Bosch Security Systems and is protected by copyright All rights reserved Trademarks All hardware and software product names used in this document are likely to be registered trademarks and must be treated accordingly Note This manual has been compiled with great care and the information it contains has been thoroughly verified The text ...

Страница 11: ...ent Corporation Permission to use copy modify distribute and sell this software and its documentation for any purpose and without fee is hereby granted provided that the above copyright notices appear in all copies and that both those copyright notices and this permission notice appear in supporting documentation and that the names of Adobe Systems and Digital Equipment Corporation not be used in ...

Страница 12: ... the Internet The camera is easy to install and ready to use Features include Progressive scan 1 3 inch CMOS HD sensor High Dynamic Range True Day Night performance with switchable IR filter Quad streaming MicroSD card slot ONVIF conformant Two way audio and audio alarm Alarm input and alarm output to external devices Pre programmed operation modes Adaptive dynamic noise reduction Enhanced video m...

Страница 13: ...re is fast motion in a scene progressively scanned images are generally sharper than interlaced images 3 1 2 Day Night function In night mode the camera enhances low light viewing by switching the IR infrared filter out of the optical path and providing a monochrome image The camera can switch from color to monochrome mode automatically by sensing the illumination level manually via the alarm inpu...

Страница 14: ...deo encoding The camera uses the H 264 compression standards Thanks to efficient encoding the data rate remains low even with high image quality and can also be adapted to local conditions within wide limits 3 1 9 Multicast In suitably configured networks the multicast function enables simultaneous real time transmission to multiple receivers The prerequisite for this is that the UDP and IGMP V2 V...

Страница 15: ...icense the user data itself can be encrypted 3 1 13 Recording The camera can be used with an iSCSI server connected via the network to store long term recordings and with a local microSD card for shorter storage times and temporary recordings 3 1 14 Configuration The camera can be configured using a browser on the local network Intranet or from the Internet Similarly firmware updates and rapid loa...

Страница 16: ...with Bosch CCTV products as part of a total video surveillance management system Bosch Video Client The camera video server and the Bosch Video Client software combine to provide a high performance system solution The Bosch Video Client is a Windows application for viewing operating controlling and administering CCTV installations such as surveillance systems at remote locations Bosch Recording St...

Страница 17: ...mount adapter Spare lens connector male Optical disk Manual Bosch Video Client Quick install instructions and safety instructions If equipment has been damaged during shipment repack it in the original packaging and notify the shipping agent or supplier 4 2 System requirements Computer with Windows XP Vista 7 operating system network access and Microsoft Internet Explorer web browser version 7 8 o...

Страница 18: ...ded for best performance The camera automatically detects the type of lens and optimizes performance accordingly A spare male lens connector is provided Figure 5 1 Mounting a lens CAUTION Installation should only be performed by qualified service personnel in accordance with the National Electrical Code or applicable local codes CAUTION Lenses weighing more than 0 5 kg 1 1lbs must be separately su...

Страница 19: ...llation Manual AM18 Q0614 v1 0 2012 03 Note If a short circuit is detected on the lens connector the lens circuit is automatically disabled to avoid internal damage Remove the lens connector and check the pin connections Pin DC iris lens 1 Damp 2 Damp 3 Drive 4 Drive ...

Страница 20: ...Bosch Security Systems 5 2 Mounting the camera The camera can be mounted either from the top or from the bottom 1 4 20 UNC thread Figure 5 2 Mounting a camera 1 4 20 UNC CAUTION Do not expose the image sensors to direct sunlight Do not obstruct the free flow of air around the camera ...

Страница 21: ...X compliant Power can be supplied to the camera via the Ethernet cable compliant with the Power over Ethernet IEEE 802 3af standard The LEDs beside the Ethernet connection indicate Power red IP connection green and IP traffic green flashing They can be disabled in the Installer menu Power is supplied to the camera via the Ethernet cable compliant with the Power over Ethernet standard 4 5 6 4 5 6 1...

Страница 22: ...AWG16 to 22 stranded wire or AWG16 to 26 solid wire cut back 5 mm 0 2 in of insulation Connect the earth terminal of the camera to the system earth of the installation to ensure correct safety and EMC RFI protection Loosen the screws of the supplied 2 pole connector and insert the wires Tighten the screws and insert the 2 pole connector into the power socket of the camera 5 mm 4 5 6 4 5 6 1 2 3 1 ...

Страница 23: ...5V nominal 40 VDC max DC coupled with 22 kOhm pull up to 3 3 V Alarm in configurable as active low or active high Max 42 V allowed between camera ground and each of the relay pins Use the alarm input to connect external alarm devices such as door contacts or sensors A zero potential make contact or switch can be used as the actuator use a bounce free contact system Use the alarm relay output for s...

Страница 24: ... The audio input signal is transmitted in sync with the video signal Audio input Line input level not suitable for direct microphone signal impedance 12 kOhm typical 1 Vrms maximum input voltage Audio output Line output level not suitable for direct speaker connection impedance 1 5 kOhm minimum 1 Vrms maximum output voltage Wiring Shielded audio connection cable is advised Observe maximum cable le...

Страница 25: ...4 v1 0 2012 03 5 7 Local storage Figure 5 7 Inserting an microSD card 1 Unscrew the card slot cover 2 Slide the microSD card into the slot until it locks in place 3 Screw the cover into place to seal the slot 4 5 6 4 5 6 1 2 3 1 2 3 12VDC INSTALL 24VAC MENU µSD E T H P o E D A T A A L A R M ...

Страница 26: ...deo service monitor connector 1 Connect a service monitor to the composite video connector INSTALL to aid installation 2 Press the menu button for longer than 2 seconds after power up first wait 20 seconds This stops the IP video stream and enables the video analog output 4 5 6 4 5 6 1 2 3 1 2 3 12VDC INSTALL 24VAC MENU µSD E T H P o E D A T A A L A R M ...

Страница 27: ...r is used to connect the control data coming out of the camera to external devices RS485 RS422 and RS232 is supported by this data connection Note To ensure surge and electrostatic protection keep the cable length between the camera and external device to less than 3 meters Pin Data socket 1 Ground 2 RxD Rx 3 CTS Rx 4 Ground 5 TxD Tx 6 RTS Tx 5 mm 0 2 in Data 4 5 6 1 2 3 ...

Страница 28: ...ce in the wizard the options are selected by either a short press or a longer press of the button Figure 6 1 Menu button The wizard handles the following functions Lens identification Zoom and focus adjustment conditions Image orientation Auto back focus Run the wizard to adjust the focus This optimizes picture sharpness in both bright and low level lighting for example at night 4 5 6 4 5 6 1 2 3 ...

Страница 29: ... adjustment 1 Briefly press the Menu button to start the wizard You see the following on the monitor screen The lens type is identified and shown on the screen The iris is opened to its maximum value 2 Manually adjust the focal length on the lens to obtain the required field of view 3 Manually adjust the focus on the lens to obtain the sharpest image possible 4 To rotate the image 180 press and ho...

Страница 30: ...adjustment You will hear the motorized automatic back focus process running The progress is shown on the monitor 6 If the camera is not correctly focussed press the Menu button for a longer time to restart the wizard 7 If the camera is correctly focussed briefly press the Menu button The back focus position is stored The iris is set to its original value The video service output is disabled ...

Страница 31: ...e accessed To view this menu connect a laptop to the network connection of the camera 7 1 Reset button Figure 7 1 Reset button With the power on use a small pointed object to press and hold the reset button for more than 10 seconds to restore the factory defaults This is useful to restore the default IP address or to restore a previous version of the firmware if uploading a new version fails 7 2 U...

Страница 32: ...r is controlled either via an alarm input or automatically based on the observed light levels If Auto switching mode is selected the camera automatically switches the filter depending on the observed light level The switching level is programmable Note When the auto mode is selected and the switching level is set to 15 certain borderline scene lighting conditions can cause the camera to switch bac...

Страница 33: ...u system of the camera itself are limited to setting up the lens and network Note The camera can also be configured using the supplied bosch Video Client or the Bosch Video Management System 8 1 Protected network If a RADIUS server is used for network access control 802 1x authentication the camera must be configured first To configure the camera for a Radius network connect it directly to a PC vi...

Страница 34: ...check that it works properly after installation and configuration This is the only way to ensure that the camera will function as intended in the event of an alarm Your check should include the following functions Can you connect to the camera remotely Does the camera transmit all the data required Does the camera respond as desired to alarm events Is it possible to control peripheral devices if n...

Страница 35: ...ns Check all cables plugs contacts and connections Incorrect encoder stream property set for connection to hardware decoder Select the H 264 MP SD option on the Encoder Streams configuration page No connection established no image transmission The unit s configuration Check all configuration parameters Faulty installation Check all cables plugs contacts and connections Wrong IP address Check the I...

Страница 36: ...s free and then call the sender again The unit does not report an alarm Alarm source is not selected Select possible alarm sources on the Alarm sources configuration page No alarm response specified Specify the desired alarm response on the Alarm connections configuration page if necessary change the IP address Control of cameras or other units is not possible The cable connection between the seri...

Страница 37: ...formation or print out the page The unit is not operational after a firmware upload Power failure during programming by firmware file Have the unit checked by Customer Service and replace if necessary Incorrect firmware file Enter the IP address of the unit followed by main htm in your Web browser and repeat the upload Placeholder with a red cross instead of the ActiveX components JVM not installe...

Страница 38: ... network Check the cable connections in this case The device is not correctly integrated into the network Check the IP address subnet mask and gateway address 10 2 Communication with Terminal Program Data Terminal If a camera cannot be found in the network or the connection to the network is interrupted you can connect a data terminal to the camera for initial setup and for setting important param...

Страница 39: ...ted on the display 2 Enter one command at a time 3 When you have entered a value such as the IP address check the characters you have entered before pressing Enter to transfer the values to the camera Assigning an IP Address To assign an IP address that is valid for your network 1 Start a terminal program such as HyperTerminal 2 Enter the user name service The terminal program displays the main me...

Страница 40: ... 3 Repairs 10 3 1 Transfer and disposal The camera should only be passed on together with this installation guide The unit contains environmentally hazardous materials that must be disposed of according to law Defective or superfluous devices and parts should be disposed of professionally or taken to your local collection point for hazardous materials CAUTION Never open the casing of the unit The ...

Страница 41: ...nochrome 0 to 133 color Shutter Automatic Electronic Shutter AES Fixed 1 30 1 25 to 1 150000 selectable SensUp Adjustable from Off to 16x AutoBlack Automatic continuous Intelligent DNR Temporal and spatial noise filtering Sharpness Sharpness enhancement Privacy Masking Four independent areas fully programmable Video Motion Analysis Motion IVA Lens type Manual or DC iris auto detect Controls Via we...

Страница 42: ...Ohm pull up to 3 3 VDC Relay output 1 Maximum voltage 30 VAC or 40 VDC Maximum 0 5 A continuous 10 VA Audio input 1 Vrms impedance 12 kOhm Audio output 1 Vrms impedance 1 5 kOhm Audio standards AAC G 711 8kHz sampling rate L16 16kHz sampling rate Audio signal to noise ratio 50 dB Data port RS 232 422 485 Memory card slot Supports up to 2 TB microSD cards Lens mount CS compatible C mount compatible...

Страница 43: ......

Страница 44: ...Bosch Security Systems www boschsecurity com Bosch Security Systems 2012 ...

Отзывы: