background image

en 

Installation instructions

16

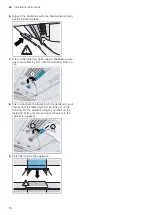
6.

Support the appliance with one hand while carrying
out the following steps.

7.

Push in the fastening bolts using a flat-blade screw-
driver and rotate by 90° until the fastening bolts un-
clip.

8.

Push in and turn the fastening bolts gently with your
fingers until the fastening bolts springs out of the
housing. Lift the appliance slightly and pull on the
fastening bolts until the locking mechanism in the
cabinet is released.

9.

Carefully remove the appliance.

Содержание DFR067T51

Страница 1: ...Register your new device on MyBosch now and get free benefits bosch home com welcome Extractor hood DFR097T51 DFR067T51 en User manual and installation instructions ...

Страница 2: ...ax 2000 m above sea level Do not use the appliance With an external timer 1 3 Restriction on user group This appliance may be used by children aged 8 or over and by people who have reduced physical sensory or mental abilities or inad equate experience and or knowledge provided that they are supervised or have been instructed on how to use the appliance safely and have understood the resulting dang...

Страница 3: ...cted operation is possible if the ap pliance is operated exclusively in circulat ing air mode WARNING Risk of fire Fatty deposits in the grease filters may catch fire Never operate the appliance without a grease filter Clean the grease filters regularly Never work with naked flames close to the appliance e g flambéing Do not install the appliance near a solid fuel heating appliance e g wood or coa...

Страница 4: ...pliance WARNING Risk of explosion Highly caustic alkaline or highly acidic clean ing agents in conjunction with aluminium parts in the interior of the appliance may cause ex plosions Never use highly caustic alkaline or highly acidic cleaning agents In particular do not use commercial or industrial cleaning agents in conjunction with aluminium parts e g grease filter on extractor hoods WARNING Ris...

Страница 5: ...e additional functions if required Switching off additional functions reduces power consumption 4 Operating modes 4 1 Air extraction mode The air which is drawn in is cleaned by the grease fil ters and conveyed to the exterior by a pipe system The air must not be discharged into a flue that is used for exhausting fumes from appliances burning gas or other fuels not applicable to appliances that on...

Страница 6: ...n the dis play 2 Press repeatedly until appears in the dis play a After approx six minutes the appliance automatic ally switches to a lower fan setting 6 5 Switching off intensive mode Press until the required fan setting is reached a Intensive mode is ended early 6 6 Switching on the fan run on During the fan run on the appliance continues to run for a short time and then switches off automatical...

Страница 7: ...eaning products with a high alcohol content Do not use hard scouring pads or cleaning sponges Do not use any special cleaners for cleaning the ap pliance while it is hot Only use glass cleaners glass scrapers or stainless steel care products if recommended in the cleaning instructions for the relevant part Wash sponge cloths thoroughly before use 7 2 Cleaning the appliance Clean the appliance as s...

Страница 8: ...he dishwasher Do not clean heavily soiled grease filters with utensils Use special grease solvent for stubborn dirt You can obtain grease solvents from after sales service or the online shop 3 Start the dishwasher Select a temperature of no more than 70 C 4 Allow the grease filters to drain 7 5 Cleaning grease filters manually The grease filters filter the grease from the cooking va pour Regularly...

Страница 9: ...an Economic Area Note Under the terms of the manufacturer s warranty the use of Customer Service is free of charge Detailed information on the warranty period and terms of warranty in your country is available from our after sales service your retailer or on our website If you contact Customer Service you will require the product number E Nr and the production number FD of your appliance The conta...

Страница 10: ...gn Handle strip 60 cm black design 11 Disposal Find out here how to dispose of old appliances cor rectly 11 1 Disposing of old appliance Valuable raw materials can be reused by recycling 1 Unplug the appliance from the mains 2 Cut through the power cord 3 Dispose of the appliance in an environmentally friendly manner This appliance is labelled in accord ance with European Directive 2012 19 EU conc...

Страница 11: ... rooms Without an adequate supply of air the air pressure falls below atmospheric pressure Toxic gases from the flue or the extraction shaft are sucked back into the living space Always ensure adequate fresh air in the room if the appliance is being operated in exhaust air mode at the same time as a room air dependent heat producing appli ance is being operated It is only possible to safely operat...

Страница 12: ... in the grease filter may catch fire Never work with naked flames close to the appliance e g flambéing Do not install the appliance near a heat producing appliance for solid fuel e g wood or coal unless a closed non remov able cover is available There must be no flying sparks WARNING Risk of injury Components inside the appliance may have sharp edges Wear protective gloves The appliance may fall d...

Страница 13: ...ossible to disconnect the appliance from the electricity supply The appliance must only be connected to a protective contact socket that has been correctly installed The mains plug for the mains power cable must be easily accessible after the appliance is installed If this is not possible an all pole isolating switch must be integrated into the permanent electrical in stallation according to the c...

Страница 14: ...outs have been made 3 If the cabinet is less than 320 mm deep remove part of the back panel 4 Create the cut out for the pipe connection 5 If the cabinet base is in place remove it 6 Remove any shavings 7 Use the enclosed mounting part to mark the fasten ing points on the inside of the cabinet and use a bradawl to make indentations where the holes are to be 170 8 19 mm wall thickness Open up the s...

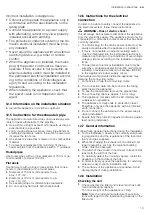
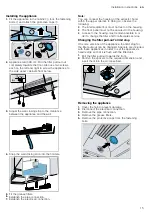
Страница 15: ...net In doing so observe the following The intermediate floor must not rest on the housing The front panel must not be secured to the housing Access to the housing must remain possible in or der to change the filter and for after sales service Changing the filter pull out s limit stop On some versions of the appliance the limit stop for the filter pull out can be changed Spacers are included with t...

Страница 16: ...ng a flat blade screw driver and rotate by 90 until the fastening bolts un clip 8 Push in and turn the fastening bolts gently with your fingers until the fastening bolts springs out of the housing Lift the appliance slightly and pull on the fastening bolts until the locking mechanism in the cabinet is released 9 Carefully remove the appliance ...

Страница 17: ......

Страница 18: ......

Страница 19: ......

Страница 20: ...ing for help You ll find it here Expert advice for your Bosch home appliances help with problems or a repair from Bosch experts Find out everything about the many ways Bosch can support you www bosch home com service Contact data of all countries are listed in the attached service directory 9001529894 9001529894 020317 en BSH Hausgeräte GmbH Carl Wery Straße 34 81739 München GERMANY www bosch home...

Отзывы: