Preparing for installation
Compress 7001i AW – 6721835318 (2021/09)
8
4
Preparing for installation
CAUTION
Risk of corrosion!
Corrosion, particularly on the condenser and evaporator fins, could
cause product malfunction or inefficient performance.
▶ Do not install the outdoor unit in areas where corrosive gases, such as
acid or alkaline gas, are produced.
▶ Do not install the product where it could be exposed to direct sea
wind (salty wind).
▶ Do not install the outdoor unit in the immediate vicinity of the sea, a
minimum distance to sea of 500 m is required. For France and Ireland
the minimum required distance to sea is 1000 m.
4.1
Installation location
▶ Place the heat pump outdoors on a flat stable surface.
▶ When placing the heat pump, make sure it can be accessed at all
times in order to carry out maintenance work. If access is restricted,
e.g. by placement on a roof, suitable measures must be taken to
ensure that maintenance work still can be carried out without
additional time expenditure or costly assembly aids.
▶ Bear in mind the sound propagation of the heat pump when placing
it, particularly in view of avoiding of noise nuisance to neighbours.
▶ Whenever possible, do not place the heat pump in front of rooms
sensitive to noise.
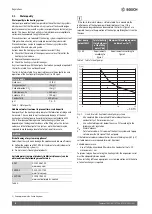
▶ Do not place the heat pump in a corner where it is flanked by walls on
3 sides. This can increase the noise level and increase the soiling of
the evaporator.
Fig. 9
Avoid placement in locations surrounded by walls
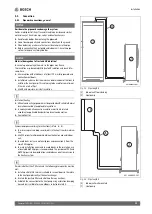
▶ With a free standing installation (not near the building) or on a roof:
– Do not install the heat pump so that the air intake side faces directly
south to avoid the effects of the sun on the air temperature sensor.
– Protect the air intake side by a wall or similar object to avoid having
strong winds blowing straight through the heat pump.
Fig. 10 Free standing heat pump
▶ Whenever possible, place the heat pump so that the front is not
directly facing the wind, as strong winds may have a negative effect
on the performance and function of the heat pump.
▶ Position the heat pump so that no snow or water from the roof of the
house drips or slides onto it. If this cannot be avoided, a protective
roof for the heat pump must be installed.
If a protective roof is installed above the heat pump, bear in mind that it
must be possible to lift the thermal insulation material of the heat pump
up and off.
▶ With the models 5 OR-S–9 OR-S, make sure there is a clearance of at
least 500 mm between the protective roof and the heat pump.
▶ With the models 13 OR-S–17 OR-T, make sure there is a clearance of
at least 600 mm between the protective roof and the heat pump.
▶ If the protective roof can be removed, the minimum clearance above
the heat pump for all models is 400 mm.
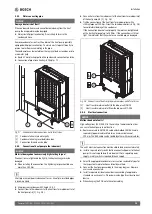
▶ Bear in mind that ice may form on the ground in front of the heat
pump if it is equipped with a sound hood (accessory).
Fig. 11 Danger! Ice formation in front of the heat pump with sound hood
(accessory)
[1]
Area in front of the heat pump with a sound hood (accessory) in
which ice can form.
~1000
~500
1
Содержание Compress 7001i AW
Страница 1: ...6721835318 2021 09 GB Installation Manual Air to Water Heat Pump Compress 7001i AW 5 17 OR S T ...
Страница 30: ......
Страница 31: ......

