background image

How it works

 en

33

Both added-steam cooking and cooking with a type of
steam heating necessitate the production of large
amounts of steam in the cooking compartment. Wipe
the cooking compartment down once the appliance
has cooled down.

Baking tins

For best results, we recommend using dark-coloured
metal baking tins.
Tinplate baking tins, ceramic dishes and glass dishes
extend the baking time and prevent the baked item
from browning evenly.
If you are using silicone moulds, check the manufac-
turer's instructions to see whether they are suitable for
use with microwaves or steam-assisted cooking. Use
the manufacturer's instructions and recipes as a guide.
Silicone moulds are often smaller than normal tins. The
given quantities and recipes may vary.

Greaseproof paper

Only use greaseproof paper that is suitable for the se-
lected temperature. Always cut the greaseproof paper
to size.

WARNING ‒ Risk of fire!

Opening the appliance door creates a draught.
Greaseproof paper may come into contact with the
heating element and catch fire.

Never place greaseproof paper loosely over ac-
cessories when preheating the appliance and while
cooking.

Always cut greaseproof paper to size and use a
plate or baking tin to hold it down.

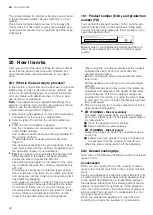
20.3 Tips for keeping acrylamide levels low
during cooking

Acrylamide is harmful to your health and is produced
when you cook cereal and potato products at very high
temperatures.

Dish

Tip

General

¡

Keep cooking times as
short as possible.

¡

Brown dishes until they
are golden brown and
not too dark.

¡

Use large, thick pieces
of food. These contain
less acrylamide.

Baked items and biscuits

¡

Set the temperature for
hot air to max. 180 °C.

¡

Brush baked items
and biscuits with egg
or egg yolk. This re-
duces the production
of acrylamide.

Oven chips

¡

Spread the chips out
evenly and in a single
layer on the baking
tray.

¡

Cook at least 400 g at
once on a baking tray
so that the chips do
not dry out.

20.4 Tips for defrosting and heating

Follow these tips for good results when defrosting and
heating.

Issue

Tip

The food should be de-
frosted, hot or cooked
once the time has
elapsed.

Set a longer cooking
time. Larger quantities
and food which is piled
high require longer times.

Once the time has
elapsed, the food should
not be overheated at the
edge and cooked in the
middle.

¡

Stir the food occasion-
ally.

¡

Set a lower microwave
power setting and a
longer cooking time.

After defrosting, poultry or
meat should not be de-
frosted on the outside
only but still frozen in the
middle.

¡

Set a lower microwave
power setting.

¡

If you are defrosting a
large quantity, turn it
several times.

The food should not be
too dry.

¡

Set a lower microwave
power setting.

¡

Set a shorter cooking
time.

¡

Cover the food.

¡

Add more liquid.

20.5 Defrosting

With your appliance you can defrost frozen food.

Defrosting food

1.

Place the frozen food in an uncovered container on
the bottom of the cooking compartment.
Delicate parts such as the drumsticks and wings of
chicken or fatty outer layers of roasts can be
covered with small pieces of aluminium foil. The foil
must not touch the walls of the appliance.

2.

Start the operation.
You can remove the foil halfway through the defrost-
ing time.

3. Note: 

Liquid is produced when you defrost meat

and poultry.
Drain off any liquid when turning and under no cir-
cumstances use it for other purposes or allow it to
come into contact with other foods.

4.

Redistribute the food or turn it once or twice as it
defrosts.
Turn large pieces of food several times.

5.

To even out the temperature, leave the defrosted
food to stand at room temperature for approx. 10–
60 minutes.
You can remove the giblets from poultry at this
point. You can continue to cook the meat even if a
small section of it is still frozen in the centre.

Содержание COA565G.0

Страница 1: ...Register your new device on MyBosch now and get free benefits bosch home com welcome Microwave Oven COA565G 0 en User manual and installation instructions ...

Страница 2: ...y installed according to the safety in structions The installer is responsible for en suring that the appliance works perfectly at its installation location Only use this appliance To prepare meals and drinks Under supervision Never leave the appli ance unattended when cooking for short periods For household use and similar applications such as In kitchens for employees in shops offices and other ...

Страница 3: ...k of scalding The accessible parts of the appliance become hot during operation Never touch these hot parts Keep children at a safe distance Hot steam may escape when you open the appliance door Steam may not be visible de pending on the temperature Open the appliance door carefully Keep children at a safe distance If there is water in the cooking compartment when it is hot this may create hot ste...

Страница 4: ... to pre pare food and drink Food and its packaging and containers may catch fire Never heat food in heat retaining pack aging Do not leave food unattended while it is heating in containers made of plastic pa per or other combustible materials Never set the microwave power too high or the cooking time too long Follow the in structions provided in this user manual Never use the microwave to dry food...

Страница 5: ... cook ware to crack Only use microwave safe cookware Cookware and containers made from metal or cookware with metal edging may lead to sparks being formed during simple mi crowave operation The appliance is dam aged Never use metal containers during mi crowave only operation Only use microwave safe cookware or use the microwave in combination with a type of heating WARNING Risk of electric shock T...

Страница 6: ...operly during operation This may dam age the front of adjacent kitchen units Keep the seal clean at all times Never operate the appliance if the seal is damaged or missing Sitting or placing objects on the appliance door may damage it Do not place hang or support objects on the appli ance door Do not place cookware or accessories on the appli ance door With certain models accessories may scratch t...

Страница 7: ...mage them Remove descaling solution immediately with water Cleaning the water tank in the dishwasher will damage it Do not clean the water tank in the dishwasher Clean the water tank with a soft cloth and standard washing up liquid 3 Environmental protection and saving energy 3 1 Disposing of packaging The packaging materials are environmentally compat ible and can be recycled Sort the individual ...

Страница 8: ...itches on the interior lighting The appliance is not heating up Touch fields Touch fields are touch sensitive surfaces To select a function touch the relevant field Symbol Touch field Use Microwave Select the microwave power levels or switch on the microwave function for grilling or steaming Steam Select a steam setting or switch on the steam function for a type of heat ing Programmes Call up the ...

Страница 9: ...s in the tank recess The drip tray is full Empty the drip tray The symbol flashes and the arrow does not flash The drip tray is not in the tank re cess Insert the drip tray into the tank re cess The symbol lights up and the arrow does not light up The drip tray is in the tank recess No further action necessary Water tank The symbol indicates the status of the water tank The symbol lights up and th...

Страница 10: ... up or defrost your food more quickly Steam Cook food with steam There are various finely tuned steam settings that will allow you to cook your food to perfection Full surface grill For grilling flat items such as steaks sausages or bread and for cooking au gratin Centre area grill For grilling small amounts of steak sausages bread and pieces of fish Microwave combined op eration In addition to th...

Страница 11: ...iance remains cool but the cooling fan still switches on The cooling fan may con tinue to run even when microwave operation has ended Condensation Condensation can occur in the cooking compartment and on the appliance door when cooking Condensa tion is normal and does not adversely affect appliance operation Wipe away the condensation after cooking 4 5 Tank cover The tank cover is located below th...

Страница 12: ...into the glass tray with its feet to the bottom Ensures that fat and meat juices drip into the glass tray Not suitable for use in microwave operation or steam mode 5 2 Other accessories You can purchase other accessories from our after sales service specialist retailers or online You will find a comprehensive range of products for your appliance in our brochures and online www bosch home com Acces...

Страница 13: ...entilate the room while the appliance is heating 4 Use the function selector to set 5 Set to grill setting 3 using the rotary selector 6 Press a The appliance starts heating 7 Use to switch off the appliance after one hour 8 Turn the function selector to the zero setting 9 Wait until the cooking compartment has cooled down 6 4 Cleaning the accessories Clean the accessory thoroughly with soapy wate...

Страница 14: ...lain Temperature resistant plastic Fully glazed ceramic without cracks These materials allow mi crowaves to pass through Microwaves do not damage heat resistant cookware Metal cutlery Note You can use metal cutlery e g place a spoon in a glass to pre vent delayed boiling ATTENTION Metal touching the wall of the cooking compartment will cause sparks which may damage the appliance or the inner door ...

Страница 15: ...tion selector to a The appliance is ready to use The display shows the maximum microwave output as a default value 3 To set the required microwave output setting press a The microwave output setting is highlighted and a default cooking time is shown on the display 4 Use the rotary selector to set the required cooking time 5 Press to start You can change the cooking time at any time during operatio...

Страница 16: ...et the cooking time 5 Press to start a The cooking time counts down and the operation starts a You can see the cooking time counting down a lights up a Once the cooking time has elapsed the appliance stops the operation and a signal sounds 9 2 Changing the microwave output setting Press until the required setting is selected on the display Note Touching it several times switches the output set tin...

Страница 17: ...r a The appliance stops the operation a flashes 2 Close the appliance door 3 Press a The appliance continues the operation a lights up 10 5 Stopping operation You can stop operation at any time Turn the function selector to the off position The fan may continue to run after operation has been paused or stopped a The appliance stops any ongoing functions 11 Steam You can use the steam function on i...

Страница 18: ...ook with added steam the appliance introduces steam into the cooking compart ment at various intervals and with varying degrees of intensity This gives you a better cooking result Your food becomes crispy on the outside develops a glossy surface is succulent and tender on the inside only undergoes a minimal reduction in volume Steam combined operation can be used with the following functions Micro...

Страница 19: ...g the water hardness Page 13 1 Press on the centre of the tank cover a The tank cover opens 2 Remove the water tank from the tank recess 3 Fill the water tank with cold water up to the MAX mark 4 Place the water tank into the tank recess and slide it in fully 5 Close the tank cover 11 7 Refilling the water tank Notes The way the appliance responds if the water tank runs dry when the appliance is i...

Страница 20: ...ean the water tank with a soft cloth and standard washing up liquid 1 Press on the centre of the tank opening a The tank cover hinges upwards 2 Pull out the water tank 3 Carefully remove the lid of the water tank 4 Empty the water tank clean it with detergent and then rinse it thoroughly with clean water 5 Dry all parts with a soft cloth 6 Rub the seal on the lid until dry 7 Leave the water tank t...

Страница 21: ...n therefore access the programmes faster and more easily No Food Accessories Shelf position Weight range in kg Information Minced beef lamb or pork1 2 Shallow cook ware without lid 0 0 10 1 20 After turning re move any meat that has already defrosted Fish fillet1 2 Shallow cook ware without lid 0 0 10 1 00 Fillet of pike cod ocean perch pol lock pike perch Chicken pieces on the bone1 2 Shallow coo...

Страница 22: ...ot use any boil in the bag rice Add 2 to 3 parts water to one part rice After the pro gramme has ended leave the rice to stand for 5 10 minutes Boiled potatoes3 1 Steam container glass tray 3 0 20 0 50 Peel and dice the potatoes The lar ger the pieces the firmer the res ult Fruit compote3 1 2 Steam container glass tray 3 0 30 0 80 Add some sugar and cinnamon to the fruit For berry compotes do not ...

Страница 23: ... setting options You can use to call up the menu and switch between the individual functions The symbols for the available func tions light up on the display and the function that you just selected is highlighted Time setting option Use Timer You can set the timer to run inde pendently of the appliance during op eration It does not affect the appli ance A signal sounds once a timer duration has el...

Страница 24: ... set Note If you do not press after setting the time the appliance automatically applies the set value after a few seconds If you have changed the position of the function se lector while configuring the settings you can only use the appliance once you turn the function selector to the zero setting To reduce the standby consumption of your appliance you can hide the clock 14 Childproof lock You ca...

Страница 25: ... the values 5 To save the changes press and hold for a few seconds Note The changes to the basic settings will be re tained even after a power cut 15 3 Discarding changes to the basic settings Turn the function selector a All changes are discarded and not saved 16 Cleaning and servicing To keep your appliance working efficiently for a long time it is important to clean and maintain it carefully 16...

Страница 26: ...ents of the appliance with hot soapy water and a dish cloth Dry with a soft cloth 16 4 Cleaning the front of the appliance ATTENTION Incorrect cleaning may damage the front of the appli ance Do not use glass cleaner metal scrapers or glass scrapers for cleaning To prevent corrosion on stainless steel fronts re move any limescale grease starch and albumin e g egg white stains immediately On stainle...

Страница 27: ... compart ment Do not clean the drip tray in the dishwasher 1 Read the information on cleaning products Page 25 2 Clean the drip tray using a dish cloth and hot soapy water 3 Rinse thoroughly with clean water 4 Dry with a soft cloth 5 Leave the drip tray to dry with the lid open 6 Rub the seal on the lid until dry 16 13 Cleaning the water tank 1 Read the information on cleaning products Page 25 2 C...

Страница 28: ...ith 250 ml water Descaling tablets order number 00311864 Dissolve one descaling tablet weight 18 g in 250 ml water for 5 minutes Rinsing If you have not used the steam function for a long time rinse the appliance To ensure that your appliance stays clean you can pump water through the pipe system The appliance then drains the water into the drip tray Note After running the rinse cycle loosened lim...

Страница 29: ... Service WARNING Risk of electric shock Incorrect repairs are dangerous Repairs to the appliance should only be carried out by trained specialist staff Only use genuine spare parts when repairing the appliance If the power cord of this appliance is damaged it must be replaced by the manufacturer the manufac turer s Customer Service or a similarly qualified per son in order to prevent any risk 17 1...

Страница 30: ...You need double the time when you have double the amount The food is colder than usual Turn or stir the food from time to time during cooking Microwave mode is cancelled Appliance has a fault If this fault recurs call the after sales service Appliance is not heat ing colon is flashing in the display Demo mode is activated in the basic settings 1 Disconnect the appliance from power supply by briefl...

Страница 31: ...ack on call our customer service The message E5005 appears on the dis play The steam function has been activated multiple times with an empty water tank Before next use make sure that the water tank is filled with cold water and fully inserted in the tank recess If this fault recurs call the after sales service 18 Disposal Find out here how to dispose of old appliances cor rectly 18 1 Disposing of...

Страница 32: ...t is still cold Preheating is necessary for selected types of food this is indicated in the table Do not place your food and accessory into the cooking compartment until it has finished preheating Some types of food turn out best if they are cooked in multiple stages These are indicated in the table If you wish to follow one of your own recipes you should use the settings listed in the table for s...

Страница 33: ...Spread the chips out evenly and in a single layer on the baking tray Cook at least 400 g at once on a baking tray so that the chips do not dry out 20 4 Tips for defrosting and heating Follow these tips for good results when defrosting and heating Issue Tip The food should be de frosted hot or cooked once the time has elapsed Set a longer cooking time Larger quantities and food which is piled high ...

Страница 34: ... lid 0 1 180 2 90 1 201 7 2 30 401 7 Goose 4500 g Cookware without lid 0 1 180 2 90 1 308 7 2 60 808 7 Fish fillet fish steak or slices 400 g Cookware without lid 0 1 180 2 90 1 59 2 10 159 Whole fish 300 g Cookware without lid 0 1 180 2 90 1 36 2 10 156 Whole fish 600 g Cookware without lid 0 1 180 2 90 1 86 2 15 256 Vegetables e g peas 300 g Cookware without lid 0 180 10 1510 Vegetables e g peas...

Страница 35: ... oven gloves to remove cookware or ac cessories from the cooking compartment 1 Take ready meals out of the packaging and place in microwave safe cookware 2 Distribute the food flat in the cookware Food that is in contact with the bottom will cook more quickly than food that is piled up Do not layer pieces of food on top of each other 3 Cover the food with a suitable lid a plate or special microwav...

Страница 36: ...es the boiling temperature without the usual steam bubbles rising to the surface Exercise caution even when only gently shaking the container The hot liquid may suddenly boil over and splatter Always place a spoon in the container when heating liquids This prevents delayed boiling ATTENTION Metal touching the wall of the cooking compartment will cause sparks which may damage the appliance or the i...

Страница 37: ...lid 3 360 3 4 7 1 Heat up baby food without the teat or lid 2 Always shake the food well after heating 3 Always check the temperature 4 Place a spoon in the glass 5 Do not overheat alcoholic drinks 6 Check the food occasionally 7 Separate the slices of meat 20 7 Bread and bread rolls You can bake bread and bread rolls using your appli ance Tips for cooking frozen products Carefully take the food o...

Страница 38: ...Shelf pos ition Type of heating Temperat ure in C Grill setting Microwave setting in W Steam setting Cooking time in mins Beef steaks 2 3 cm thick 2 3 pieces 200 g each Wire rack Glass tray 3 1 1 2 1 3 2 3 1 2 1 2 1 10 15 2 5 10 Pork neck steaks 2 3 cm thick 2 3 pieces 120 g each Wire rack Glass tray 3 1 1 2 1 2 2 2 1 2 1 2 1 15 20 2 10 15 Grilling saus ages x 4 6 150 g each Wire rack Glass tray 3...

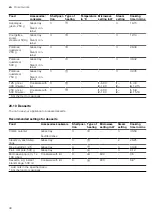
Страница 39: ...team setting Cooking time in mins Artichokes whole fresh Glass tray Steam con tainer 3 3 35 40 Spinach leaves fresh 250 g Glass tray Steam con tainer 3 3 5 7 Cauliflower whole fresh Glass tray Steam con tainer 2 3 28 35 Broccoli whole fresh 500 g Glass tray Steam con tainer 2 3 20 23 Broccoli florets frozen 500 g Glass tray Steam con tainer 3 3 14 16 Vegetables fresh 250 g Cookware with lid 0 600 ...

Страница 40: ...0 1 600 2 180 1 2 1 4 6 2 12 15 250 g rice 500 ml water Cookware with lid 0 1 600 2 180 1 2 1 6 8 2 15 18 1 Stir the food occasionally 20 10 Desserts You can use your appliance to prepare desserts Recommended settings for desserts Food Accessories cookware Shelf posi tion Type of heating Microwave setting in W Steam setting Cooking time in mins Crème caramel Glass tray Soufflé dishes 3 3 40 50 Ste...

Страница 41: ...Cookware without lid 0 600 20 25 Recommended settings for cooking in combination with the microwave Food Accessories cookware Shelf posi tion Type of heating Temperature in C Grill set ting Microwave setting in W Cooking time in mins Potato gratin Cookware without lid 0 1 360 25 32 Steaming Please take note of the following information if you are steaming test dishes Place the glass tray with stea...

Страница 42: ...n unit There is a risk of overheating Cut out work on the units should be carried out before installing the appliance Remove any shavings Otherwise the correct opera tion of electrical components may be ad versely affected Only a licensed professional may connect appliances without plugs Damage caused by incorrect connection is not covered un der the warranty WARNING Risk of injury Parts that are ...

Страница 43: ... thickness is based on the required minimum clearance Hob type raised in mm flush in mm in mm Induction hob 48 49 5 Full surface in duction hob 58 59 5 Observe the installation instructions for the hob Note Not suitable for installing under a gas hob or electric hob 21 6 Installation in a tall unit Observe the installation dimensions and the safety clearances in a tall unit To ventilate the applia...

Страница 44: ...nearby socket Ensure that the mains plug of the mains power cable is easily accessible after installation of the ap pliance If free access to the mains plug of the power cable is not possible an all pole isolating switch must be installed in the permanent electrical installation according to the installation regulations Electrically connecting an appliance without a protective contact plug Note On...

Страница 45: ......

Страница 46: ......

Страница 47: ......

Страница 48: ...ooking for help You ll find it here Expert advice for your Bosch home appliances help with problems or a repair from Bosch experts Find out everything about the many ways Bosch can support you www bosch home com service Contact data of all countries are listed in the attached service directory 9001686154 9001686154 011105 en Robert Bosch Hausgeräte GmbH Carl Wery Straße 34 81739 München GERMANY ww...

Отзывы: