background image

Digital Video Quad Processor

Unpacking | en

11

Bosch Security Systems, Inc.

User’s Guide

F.01U.090.110 | 3.0 | 2010.04

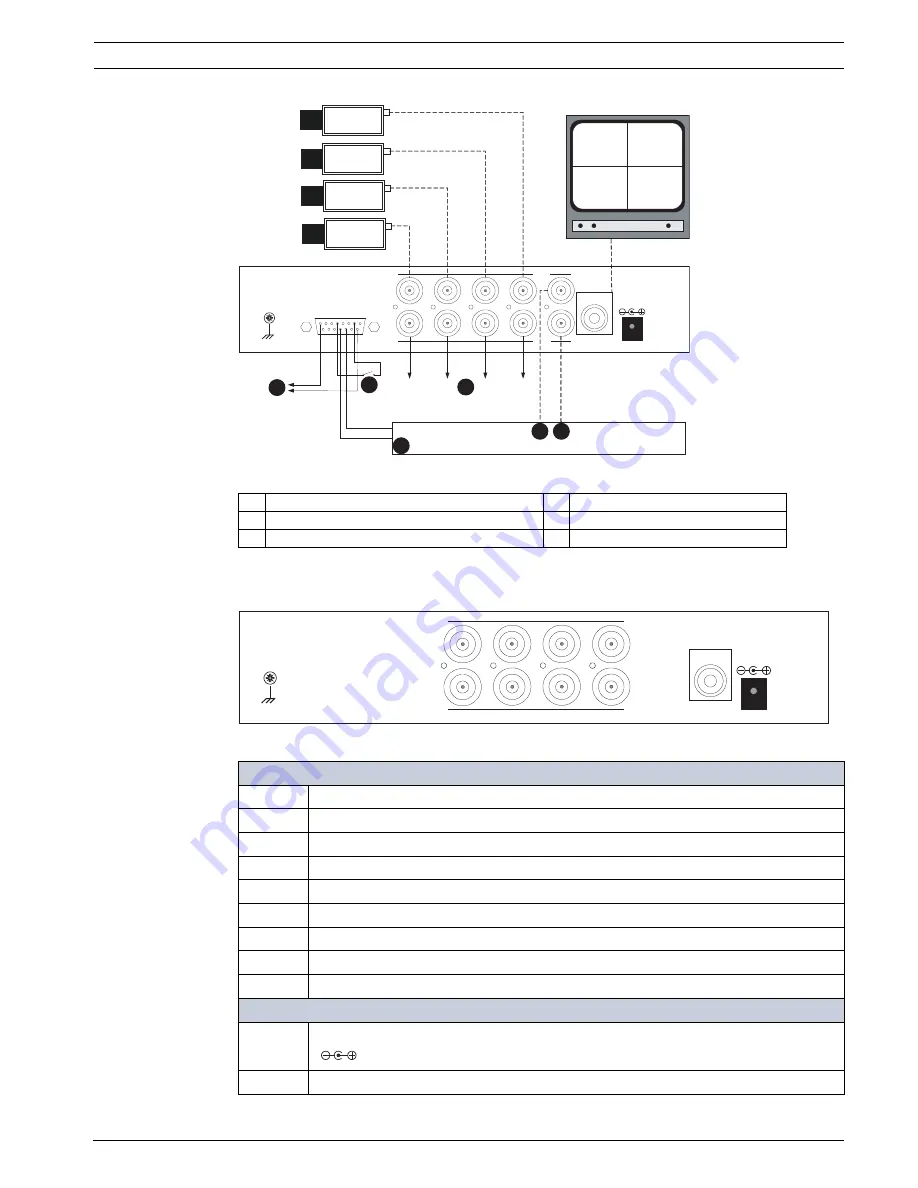
Figure 2.2

Typical Installation Configuration for LTC 2382/90

2.3.1

LTC 2380/90 Rear Panel Connections

The figure below illustrates the rear panel connectors for the LTC 2380/90 video processor.

Figure 2.3

LTC 2380/90 Rear Panel

1

RS232 to PC

4

PLAY IN

2

Alarm In (pins 1 to 5, typical alarm)

5

REC OUT (record out)

3

Auto Terminating Video Loop Outputs

6

VCR or DVR

1

2

3

4

OUT

REC OUT

ALM/RS-232

PLAY IN

GND

5V DC

IN

1

2

3

4

1

2

3

4 5

6

MON

MON

Video Inputs/Outputs

IN 1

Video Input 1 - BNC 75 Ohm, auto terminating

IN 2

Video Input 2 - BNC 75 Ohm, auto terminating

IN 3

Video Input 3 - BNC 75 Ohm, auto terminating

IN 4

Video Input 4 - BNC 75 Ohm, auto terminating

OUT 1

Video Loop Output 1 - BNC

OUT 2

Video Loop Output 2 - BNC

OUT 3

Video Loop Output 3 - BNC

OUT 4

Video Loop Output 4 - BNC

MON

Monitor Output Video - BNC 75 Ohm output impedance

Power

5V DC

2.0 mm DC Power Jack (outside diameter: 6.4 mm, pin diameter: 2.0 mm 

GND

Screw to connect an external earth wire

MON

5V DC

1

2

3

4

1

2

3

4

MON

OUT

IN

GND

Содержание 90

Страница 1: ...Digital Video Quad Processor LTC 2380 90 LTC 2382 90 en User Manuall ...

Страница 2: ......

Страница 3: ...nel Connections 11 2 3 2 LTC 2382 90 Rear Panel Connections 12 2 3 3 Wiring Requirements 12 2 3 4 Grounding Connection 14 2 3 5 Installing the Video Quad in a 19 inch Rack 14 2 4 Programming the LTC 2382 90 Video Processor 18 2 4 1 LTC 2382 90 Front Panel Function Keys 18 2 4 2 Using the Function Keys LTC 2382 90 19 2 5 Operating the Video Quad Processors 30 2 5 1 Operating the LTC 2382 90 Video Q...

Страница 4: ...iv en Table of Contents Digital Video Quad Processor F 01U 090 110 3 0 2010 04 User Manual Bosch Security Systems Inc ...

Страница 5: ...cts of any kind into this unit through openings as they may touch dangerous voltage points or short out parts that could result in a fire or electrical shock Never spill liquid of any kind on the unit Do not place objects filled with liquids such as vases or cups on the unit 6 Lightning For added protection during a lightning storm or when leaving this unit unattended and unused for long periods u...

Страница 6: ...ng service Unplug the unit from the main AC power source and refer servicing to qualified service personnel when any damage to the equipment has occurred such as the power supply cord or plug is damaged exposure to moisture water and or inclement weather rain snow etc liquid has been spilled in or on the equipment an object has fallen into the unit unit has been dropped or the unit cabinet is dama...

Страница 7: ...ion Connecting external power supply Camera lens An assembled camera lens in the outdoor housing must comply and be tested in accordance with UL IEC60950 Any output or signal lines from the camera must be SELV or Limited Power Source For safety reasons the environmental specification of the camera lens assembly must be within the environmental specification of 10 C 14 F to 50 C 122 F Camera signal...

Страница 8: ... handling precautions to avoid electrostatic discharge NOTE Wear required grounded wrist straps and observe proper ESD safety precautions when handling the electrostatic sensitive printed circuit boards Fuse rating For security protection of the device the branch circuit protection must be secured with a maximum fuse rating of 16A This must be in accordance with NEC800 CEC Section 60 Grounding and...

Страница 9: ... and found to comply with the limits for a Class B digital device pursuant to Part 15 of the FCC Rules and ICES 003 of Industry Canada These limits are designed to provide reasonable protection against harmful interference when the equipment is operated in a residential installation This equipment generates uses and can radiate radio frequency energy and if not installed and used in accordance wit...

Страница 10: ...ôlant la réception radio ou télévision L utilisateur peut parvenir à éliminer les interférences éventuelles en prenant une ou plusieurs des mesures suivantes Au besoin l utilisateur consultera son revendeur ou un technicien qualifié en radio télévision qui procédera à une opération corrective La brochure suivante publiée par la Commission fédérale des communications FCC peut s avérer utile How to ...

Страница 11: ...LITY OF ANY SECURITY OR SIGNALING RELATED FUNCTIONS OF THIS PRODUCT Copyright This user guide is the intellectual property of Bosch Security Systems Inc and is protected by copyright All rights reserved Trademarks All hardware and software product names used in this document are likely to be registered trademarks and must be treated accordingly i NOTICE This user guide has been compiled with great...

Страница 12: ...Telephone 888 289 0096 Fax 585 223 9180 Email security sales us bosch com Technical Support Telephone 800 326 1450 Fax 585 223 3508 or 717 735 6560 Email technical support us bosch com Repair Center Telephone 585 421 4220 Fax 585 223 9180 or 717 735 6561 Email security repair us bosch com Canada Telephone 514 738 2434 Fax 514 738 8480 Europe Middle East Asia Pacific Region Telephone 44 0 1495 2745...

Страница 13: ...ad processors auto detect the applicable video standard PAL or NTSC camera type color or B W and configures itself accordingly The LTC 2380 90 Video Quad processor is designed for easy installation in applications where four cameras need to be viewed on a single monitor It offers a quad display with no user controls required truly plug and play The LTC 2382 90 is a full featured Video Quad process...

Страница 14: ... identified by setting the UNIT ID parameter Other features include a flashing alarm indicator programmable audible alarm a video loss output relay and an alarm output relay for control of a VCR or other device Also available are front panel alarm clear user programmable alarm dwell time and a video loss indicator 2 3 Installing the Video Quad These units allow user friendly on screen programming ...

Страница 15: ... Loop Outputs 6 VCR or DVR 1 2 3 4 OUT RECOUT ALM RS 232 PLAYIN GND 5VDC IN 1 2 3 4 1 2 3 4 5 6 MON MON Video Inputs Outputs IN 1 Video Input 1 BNC 75 Ohm auto terminating IN 2 Video Input 2 BNC 75 Ohm auto terminating IN 3 Video Input 3 BNC 75 Ohm auto terminating IN 4 Video Input 4 BNC 75 Ohm auto terminating OUT 1 Video Loop Output 1 BNC OUT 2 Video Loop Output 2 BNC OUT 3 Video Loop Output 3 B...

Страница 16: ...tput 1 BNC OUT 2 Video Loop Output 2 BNC OUT 3 Video Loop Output 3 BNC OUT 4 Video Loop Output 4 BNC PLAY IN VCR DVR Video Input BNC 75 Ohm input impedance REC OUT Video Output to VCR DVR BNC 75 Ohm output impedance MON Monitor Output Video BNC 75 Ohm output impedance Power 5V DC 2 0 mm DC Power Jack outside diameter 6 4 mm pin diameter 2 0 mm GND Screw to connect an external earth wire 1 2 3 4 IN...

Страница 17: ...n 1 Alarm Input 1 Pin 2 Alarm Input 2 Pin 3 Alarm Input 3 Pin 4 Alarm Input 4 Pin 5 Ground Pin 6 Trigger Output Open Collector Alarm Output Pin 7 Ground Pin 8 TXD RS 232 Transmit Data Pin 9 RXD RS 232 Receive Data Pin 10 Alarm Relay NC Alarm Relay Contact Normally Closed Pin 11 Alarm Relay COM Alarm Relay Contact Common Pin 12 Alarm Relay NO Alarm Relay Contact Normally Open Pin 13 Video Loss Rela...

Страница 18: ...its can be installed side by side in a rack using the binding plates one plate supplied with each unit and the two 2 short mounting ears one short ear provided with each unit Installing a Single Unit 1 Remove the rubber feet from the bottom of the unit These feet may interfere with installing other hardware in the rack mount 2 Remove the two 2 screws from the front side A of each unit Figure 2 7 S...

Страница 19: ...ted units fit into a 19 inch rack unit 1 Turn the units over so that the front panels are towards you 2 Remove the rubber feet from the bottom of both units These feet may interfere with installing other hardware in the rack mount 3 Determine which unit will server as the right side unit and which as the left side unit 4 Remove the left front screw A from the bottom of the right unit B Figure 2 9 ...

Страница 20: ...l screws included with the rack mount kit Note that the illustrations shows a gap between the two units for clarity in actuality there should not be a gap between the units Figure 2 11 Binding Plate Connected to the Bottoms of Both Units 7 Turn the connected units over and ensure that the front panel is towards you 8 Remove the front and back inner screws from the tops of both units G and H Retain...

Страница 21: ...ble unit Figure 2 14 Side view of Video Quad Unit 11 Attach a short rack ear to the left outside edge of the double unit using two 2 M3 x 6 mm cheese head screws included with the rack mount kit 12 Attach the second short rack ear to the right outside edge of the double unit using two 2 M3 x 6 mm cheese head screws included with the rack mount kit 13 Use four 4 bolts not included to attach the sho...

Страница 22: ...here are eight keys on the front panel Table 2 1 LTC 2382 90 Front Panel Function Keys Key Label Operating Function Programming Function PLAY Selects PLAY input for display on monitor NONE MENU Selects the on screen menu Enters the programming mode SEQ ALM Selects the sequential switching function and Alarm Acknowledge NONE 1 Displays Camera 1 in Full screen mode Scrolls up through program selecti...

Страница 23: ...N menu 1 Press the MENU key to display the MAIN menu screen The unit displays the following screen The PLAY and SEQ ALM keys are not used in programming See Table 2 1 above for descriptions of the function keys Configuring the Time and Date Set the time and date format the current time date and the displayed position on the monitor from the TIME DATE menu 1 Access the MAIN menu 2 Press the Up and ...

Страница 24: ...nit displays the following menu 2 Press the Up and Down arrow keys and select one of the following options MM DD YY DD MM YY YY MM DD 3 Press the Return key to return to the TIME DATE menu Setting the Current Time and Date 1 Press the up and down arrow keys and select TIME DATE SET then press the Return key The unit displays the following menu 2 Press the Left and Right arrow keys to move the curs...

Страница 25: ...o exit the TIME DATE menu Configuring the Camera Sequence Setup You use the SEQ SETUP menu to adjust the sequence dwell times of the four cameras in Full screen and the Quad screen mode You may program dwell times as SKIP or as 2 3 4 5 6 7 8 9 10 20 30 50 60 80 or 99 seconds 1 Press the MENU key to display the MAIN menu 2 Press the Up and Down arrow keys and select SEQ SETUP then press the Return ...

Страница 26: ...splay to Quad mode on activation of the Alarm Input for the duration of the DWELL TIME The unit does not display the Alarm icon FULL switches the display to Full screen mode on activation of the Alarm Input for the duration of the DWELL TIME The unit does not display the Alarm icon To set the alarm options 1 Press Up and Down arrow keys and select ALARM OPTIONS then press the Return key The unit d...

Страница 27: ...the Up and Down arrow keys to scroll through the dwell options 1 99 SEC HOLD FOLLOW 3 Press the Return key to exit the menu Setting Alarm Polarity The ALARM POLARITY function defines how the alarm is generated for each alarm input either from Normally Open NO or Normally Closed NC contacts 1 Press the Up and Down arrow keys and select ALARM POLARITY then press the Return key The unit displays the ...

Страница 28: ... the Return key to exit Setting Relay Options The RELAY menu allows control of the alarm outputs for each alarm Input 1 Press the Up and Down arrow keys and select RELAY then press the Return key The unit displays the following menu 2 Press the Up and Down arrow keys to move the cursor to the required input 3 Press the Return key to toggle between these options OFF the unit does not activate the a...

Страница 29: ...nt on that input ON the unit activates the beeper when an alarm is present on that input 4 Press Up and Down arrow keys to select RETURN then press the Return key to exit Configuring the REC OUT Mode The REC OUT MODE defines the format of the recorded video 1 Press the Up and Down arrow keys and select the REC OUT MODE then press the Return key The unit displays the following menu 2 Press the Up a...

Страница 30: ...o the required position 5 Press the Up and Down arrow keys to select the required character 6 Press the Return key to return to the CAMERA TITLES menu 7 Press the Return key to exit the menu Displaying the Camera Titles The Camera Titles can be turned ON or OFF on the monitor 1 Press the Up and Down arrow keys and select DISPLAY 2 Press the Return key to select either ON or OFF The new setting is ...

Страница 31: ...unit displays the following menu 2 Press the Up and Down arrow keys to move the cursor to the required camera 3 Press the Return key to toggle between these options AUTO COLOR B W Setting Camera Brightness and Contrast 1 Press the Up and Down arrow keys and select ADJUSTMENT then press the Return key The unit displays the following menu 2 Press the Left and Right arrow keys to adjust the contrast ...

Страница 32: ... keys to move the cursor to the LANGUAGE option 2 Press the Up arrow key to scroll through the list of supported languages Setting the Password The unit incorporates a password function for entry to the menus This feature ensures that only authorized users can change the unit settings 1 Press the Up and Down arrow keys to move the cursor to NEW PASSWORD 2 Press the Return key to open the NEW PASSW...

Страница 33: ...turn key 3 If the password is entered incorrectly the unit displays the following screen 4 If the password is correct the unit grants access to the menus Disabling the Password 1 Press the Up and Down arrow keys and select DISABLE PASSWORD then press the Return key The unit displays the following menu 2 Press the Return key to exit the menu NEW PASSWORD INVALID PASSWORD TO EXIT PRESS RETURN KEY NE...

Страница 34: ...nu 2 Press the Up and Down arrow keys to increment or decrement the UNIT ID number 3 Press the Return key to exit 2 5 Operating the Video Quad Processors The LTC 2380 90 is a Plug and Play device it is operational as soon as power is connected No adjustments are possible The LTC 2382 90 on the other hand is a programmable unit that you can customize 2 5 1 Operating the LTC 2382 90 Video Quad Proce...

Страница 35: ...quential switching function See Section Configuring the Camera Sequence Setup page 21 to customize the sequence list and dwell times Press the SEQ key to start video sequencing The default sequence displays the cameras in the order 1 2 3 4 QUAD The quad screen is displayed after camera 4 Each camera remains on screen for the programmed dwell period unless its dwell is set to SKIP in which case it ...

Страница 36: ... to return to the Quad mode f Press the PLAY key to toggle between Live and Playback modes on the monitor To view images recorded in the SAME AS MONITOR mode 1 Insert a recorded tape into the VCR or select a playback time from the DVR and start the playback on the recording device 2 Press the PLAY key on the LTC 2382 90 unit to display the playback video from the VCR DVR The LED on the PLAY key re...

Страница 37: ...QUAD matches the user programmed values in the ALARM OPTIONS menu The unit always returns to the view mode it was in prior to alarm event upon expiry of the alarm event 2 REC output follows the VIEW operation if the REC OUT MODE is set to SAME AS MONITOR otherwise it remains in Quad mode This option includes the operation described for MLUTIPLE ALARMS In addition to the functions above you can ena...

Страница 38: ...igure 2 18 Multiple Unit Remote Configuration The signal format for the RS 232 protocol is Data Format 9600 Baud 8 Data Bit No Parity One Stop Bit Mode Duplex Unit echoes received characters Using the RS 232 Protocol Once the video processor is connected to the computer you can use the RS 232 command set to control the video processor The RS 232 command set is broken into two groups Front Panel Ke...

Страница 39: ...ate for example and allows the computer to read the video processor s Alarm Video status The table below summarizes these commands Table 2 4 RS 232 Parameter Set Read Commands You must terminate each command with either the standard 13 decimal return character or the standard 0D hex return character Setting the Time and Date over RS 232 Issue the following commands to set the time and date for the...

Страница 40: ...and The UNIT ID number must contain three digits therefore the UNIT ID for unit number 1 is 001 and the UNIT ID for unit number twenty is 020 The format of the command in a multiple unit configuration is ID XXX CMD YYY where ID is the Unit ID Address Command XXX is the UNIT ID for the appropriate unit This number must have three digits to match a valid UNIT ID CMD is the command for the unit YYY i...

Страница 41: ...he alarm status from individual units issue the S command For example to check the status of unit 50 issue this command ID 050 S The unit responds with a hexadecimal Status Byte The table below summarizes the inputs for which you can receive information and the status byte that the input returns Table 2 5 Remote Alarm and Video Loss Status If the unit experiences a combination of triggered alarms ...

Страница 42: ...0 requires no routine maintenance and is designed for long and trouble free use under normal operating conditions Repair should only be attempted by qualified personnel TIME DATE Time Date Not changed Time Format 24 hours Date Format MM DD YY Display TOP 2 SEQ SETUP Camera 1 4 Quad 2 seconds ALARM SETUP Alarm Inputs ON Dwell Time 2 seconds Alarm Input Polarities Normally Open NO Video Loss ON for ...

Страница 43: ...EC Standards Power Indicator is illuminated when power is applied to the unit Mechanical PLAY Button with LED indicator selects playback video display on the monitor Rack Mount Kit Hardware included to mount either a single unit or two units in a 19 in rack MENU Button selects on screen menu Construction Steel chassis SEQ ALM Button with LED indicator selects sequencing and alarm clear functions F...

Страница 44: ...on is switched out and termination must be supplied by the downstream equipment Chassis Earth Phillips screw Connectors LTC2382 90 Video Input Fouw 4 BNC with auto switched 75 Ohm termination Video Output Four 4 BNC loop through Monitor Output One 1 BNC 75 Ohm output impedance PLAY IN One 1 BNC 75 Ohm termination REC OUT One 1 BNC 75 Ohm output impedance ALM RS232 15 Way D type breakout terminal b...

Страница 45: ...brightness 27 contrast 27 sequence 21 titles 26 CAMERA menu 26 CAMERA TITLES menu 26 DISPLAY 26 Color 27 adjusting 27 border 28 text 30 COLOR ADJUST menu 27 ADJUSTMENT 27 BORDER COLOR 28 Commands DATE 35 ID 35 S 35 TIME 35 UI 35 1U 35 2D 35 3L 35 4R 35 ME 35 QE 35 VR 35 front panel key 34 key emulation 35 parameter read 34 parameter set 34 RS 232 35 S SR 35 Configuring alarm duration 33 alarm dwel...

Страница 46: ...OLD parameter 33 I Identification 30 Inputs 11 12 Installing 10 K Key emulation commands 35 L Language 28 Live mode 30 M MAIN menu 19 Maintenance 38 Menus ALARM SETUP 22 ALARM OPTIONS 22 BEEPER 25 CAMERA 26 CAMERA TITLES 26 DISPLAY 26 COLOR ADJUST 27 ADJUSTMENT 27 BORDER COLOR 28 MAIN 19 REC OUT MODE 25 RELAY 24 SEQ SETUP 21 SKIP 21 SYSTEM SETTINGS 28 36 DISABLE PASSWORD 29 KEY LOCK OUT 30 LANGUAG...

Страница 47: ...em settings 28 SYSTEM SETTINGS menu 28 36 DISABLE PASSWORD 29 KEY LOCK OUT 30 LANGUAGE 28 NEW PASSWORD 28 TEXT COLOR 30 UNIT ID 30 T Technical specifications 39 Text color 30 TIME FORMAT 20 Time parameter 35 TIME DATE menu 19 DATE FORMAT 20 DISPLAY 21 TIME FORMAT 20 TIME DATE SET 20 TIME DATE SET 20 U Unit address parameter 35 UNIT ID 30 collision 37 parameter 36 prefix 36 V Video loss 34 VIDEO LO...

Страница 48: ...44 en Index Digital Video Quad Processor F 01U 090 110 3 0 2010 04 User Manual Bosch Security Systems Inc ...

Страница 49: ......

Страница 50: ... Systems B V P O Box 80002 5600 JB Eindhoven The Netherlands Phone 31 40 2577 284 Fax 31 40 2577 330 emea securitysystems bosch com www boschsecurity com Asia Pacific Robert Bosch SEA Pte Ltd Security Systems 11 Bishan Street 21 Singapore 573943 Phone 65 6571 2600 Fax 65 6571 2698 apr securitysystems bosch com www boschsecurity com Bosch Security Systems Inc 2010 F 01U 090 110 3 0 2010 04 Data sub...

Отзывы: