


English |
17
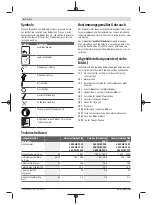
(2)
Motor unit
(3)
Fastening screw for safety cover or vacuum tube
(4)
Safety cover (blow mode)
(5)
Handle on vacuum tube (vacuum mode)
(6)
Screw for handle adjustment
(7)
Vacuum tube (vacuum mode)
(8)
Hook for shoulder strap
(9)
Shoulder strap
(10)
Collection bag (vacuum mode)
(11)
Button for unlocking nozzle or collection bag
(12)
Nozzle (blow mode)
(13)
Loop for shoulder strap hooks
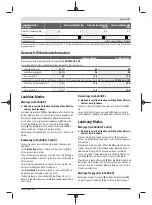
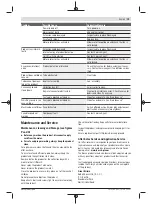
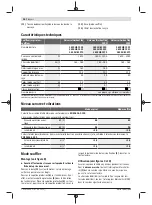
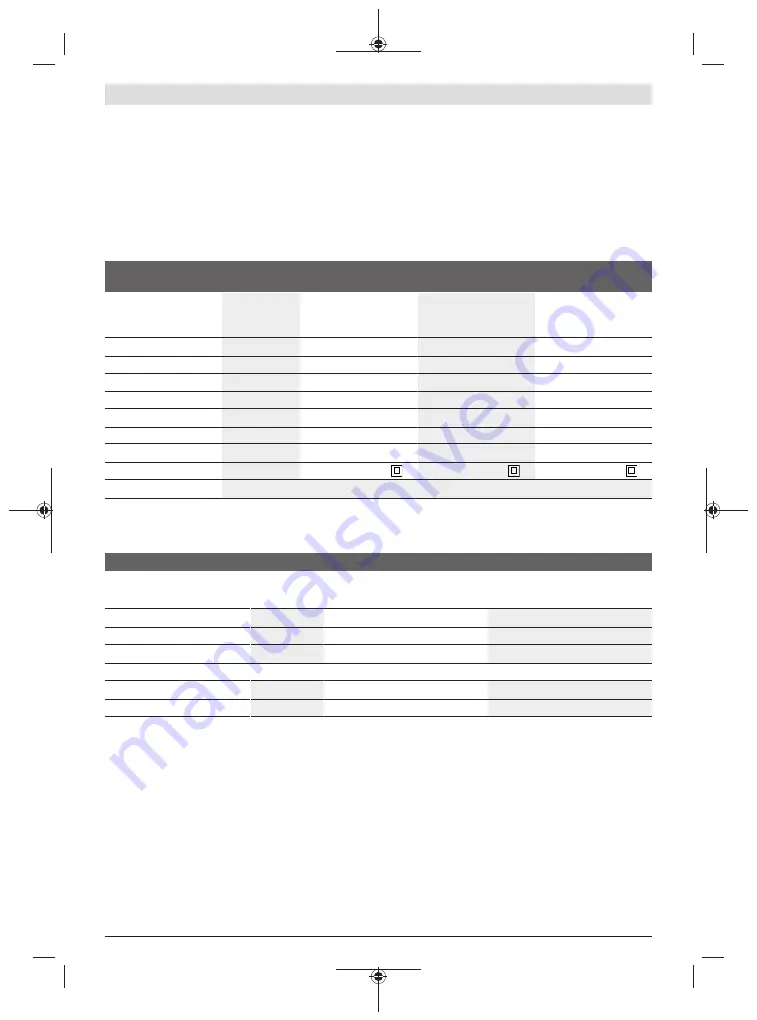
Technical Data
Leaf blower/Garden Va-
cuum Cleaner
UniversalGardenTidy
UniversalGardenTidy
2300
UniversalGardenTidy
3000
Article number
3 600 HB1 000
3 600 HB1 030
3 600 HB1 070
3 600 HB1 030
3 600 HB1 032
3 600 HB1 072
3 600 HB1 001
3 600 HB1 041
3 600 HB1 071
Rated power input
W
1800
1600 − 2300
1600 − 3000
Airflow speed, max.
km/h
165 − 285
165 − 285
165 − 285
Volume flow rate, max.
l/s
160
160
160
Shredding ratio
12:1
12:1
12:1
Collection bag capacity
l
45
45
50
Weight (blow mode)
kg
3.4
3.4
3.4
Weight (vacuum mode)
kg
4.7
4.7
4.7
Protection class
/ II
/ II
/ II
Serial number
see type plate on product
The specifications apply to a rated voltage [U] of 230 V. These specifications may vary at different voltages and in country-specific models.
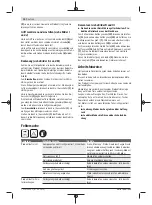
Noise/Vibration Information
Vacuum Mode
Blow Mode
Noise emission values determined according to
EN 50636-2-100
.
Typically the A-weighted noise levels of the product are:
– Sound pressure level
dB(A)
86
83
– Sound power level
dB(A)
98
96
– Uncertainty K
dB
= 2.5
= 2.5
Vibration total values a
h
(triax vector sum) and uncertainty K determined according to
EN 50636-2-100
– Vibration emission value a
h
m/s
2
< 2.5
< 2.5
– Uncertainty K
m/s
2
= 1.5
= 1.5
Blow Mode
Assembly (see figure B)
u
Before any work on the product, disconnect supply
cord from the mains.
Slide the nozzle
(12)
onto the motor unit. Take care not to
pinch your fingers during assembly.
Mount the safety cover
(4)
onto the motor unit. For this,
place the safety cover
(4)
into the hinge on the motor unit.
Position the safety cover
(4)
against the motor unit and
screw in fastening screw
(3)
until fully tight and clicks are
heard to secure the safety cover.
Operating (see figures C and D)
Make sure that the cable is not in your way while working.
To
switch on
, turn the On/Off switch
(1)
clockwise until it
clicks.
The airflow speed is variable. To increase the airflow speed,
turn the On/Off switch
(1)
clockwise.
To reduce the speed, turn the On/Off switch
(1)
anticlock-
wise.
To
switch off
, turn the On/Off switch
(1)
anticlockwise until
it clicks.
Set the On/Off switch
(1)
of the product to "0" before dis-
connecting the mains voltage or pulling the mains plug.
Bosch Power Tools
F 016 L94 042 | (27.08.2020)
Содержание 3 600 HB1 000
Страница 282: ...282 4 7 kg A 13 2 11 12 1 11 10 8 7 9 3 4 3 5 6 F 016 L94 042 27 08 2020 Bosch Power Tools ...
Страница 283: ... 283 B 12 11 4 3 Bosch Power Tools F 016 L94 042 27 08 2020 ...
Страница 284: ...284 C 1 F 016 L94 042 27 08 2020 Bosch Power Tools ...
Страница 285: ... 285 D 1 Bosch Power Tools F 016 L94 042 27 08 2020 ...
Страница 286: ...286 a c E 12 11 3 4 F 016 L94 042 27 08 2020 Bosch Power Tools ...
Страница 287: ... 287 F 3 7 Bosch Power Tools F 016 L94 042 27 08 2020 ...
Страница 288: ...288 a c G 10 F 016 L94 042 27 08 2020 Bosch Power Tools ...
Страница 289: ... 289 a c a c H I 8 9 13 13 6 5 Bosch Power Tools F 016 L94 042 27 08 2020 ...
Страница 290: ...290 J 6 K 6 5 F 016 L94 042 27 08 2020 Bosch Power Tools ...
Страница 291: ... 291 L 1 Bosch Power Tools F 016 L94 042 27 08 2020 ...
Страница 292: ...292 M 1 F 016 L94 042 27 08 2020 Bosch Power Tools ...
Страница 293: ... 293 a c a c N 10 7 11 Bosch Power Tools F 016 L94 042 27 08 2020 ...
Страница 294: ...294 O 3 7 F 016 L94 042 27 08 2020 Bosch Power Tools ...
Страница 295: ... 295 a c STOP STOP a c P Q 4 Bosch Power Tools F 016 L94 042 27 08 2020 ...
Страница 296: ...296 F 016 L94 042 27 08 2020 Bosch Power Tools ...


