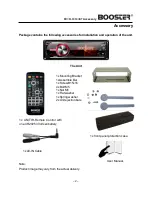
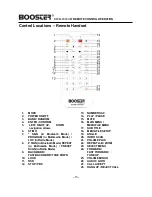
Booster BDVM-8360UBT Скачать руководство пользователя страница 16

BDVM-8360UBT 

REMOTE CONTROL OPERATION   
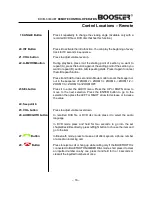
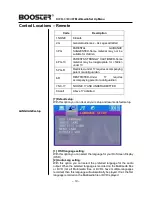
 

Control Locations 

– Remote


9 / 24. 

 / 

 buttons  

In Movie file or audio file mode, Press 

 button to restart a track, press it 

twice to skip to the  previous track.


Press 

 button to skip to the next 

track.  Press  and  hold 

 or 

 button  for  two  seconds  to  activate  fast 

forward (FF) or fast reverse (REW) search in a track. 


In  RADIO  mode,  press 

 or 

 button  to  start  automatic  searching, 

push  and  hold  for  two  seconds  to  start  manual  searching. 

   button 

Frequency up, 

 button Frequency down. 


10. LOUD button  


Press button on remote control to set LOUD ON/OFF. 
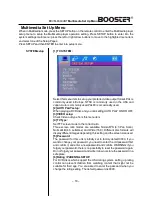
 

11. OSD button  

In SD or USB mode, short  press to show inserted  USB/SD card icon. 
Press and hold the OSD button for 2 seconds to show the USB/SD card 
information,  such  as:  Number  of  track,  Current  track  time  elapsed  => 
Current track time remain => Total  tracks time elapsed => Total tracks 
time remain.


12. STOP/PBC button 

Press it to Stop playback from the current position, press it again to final 
stop to the very beginning. Press PLAY/PAUSE button to play again.


Press and hold for two seconds to set PBC on/ off for VCD Discs. 

13. Digit 0-9 buttons 

In radio mode, select the desired preset station in the current band (0-6); 
In MULTIMEDIA mode, select track/song/title number. 
In BLUETOOTH mode, input 

”0-9” telephone number


14. PLAY/PAUSE button 

In Multimedia mode, press it to pause playback, press again to resume


15. MUTE button 

Short  press  this  button  to  mute  the  volume  output,  press  it  again  to 
resume volume. 


16. MENU button  

Press it to show the main unit setup menu, Press the UP or DOWN arrow 
to  move  to  the  next  selection.  Press  the  ENTER  button  to  go  to  the 
selection, then press the LEFT or RIGHT arrow to decrease or increase 
the  value  or  press  the  ENTER  button  to  change  the  selection.  In 
Multimedia mode with recorded DVD files or DVD discs, 


Press and hold the MENU button to activate the menu list on the screen. 
Choose  the  desired  item  and  press  the  ENTER  button  to  confirm  the 
selected item and start playing; on  front panel, press the OK button to 
confirm the selected item and start playing. (Available only if the recorded 
DVD file or DVD disc has this function).  

17. SUB-T button  

Press it to select the subtitle language (Available only  with a  recorded 
DVD file or DVD disc with subtitle function).


18. SETUP button 


In Multimedia mode press it to enter the Multimedia setup menu. 


– 15–


Содержание BDVM-8360UBT

Страница 1: ...THE PERFECT SOUND BDVM 8360UBT MANUAL DE INSTALAÇÃO DO PROPRIETÁRIO DVD com Receptor Multimídia 3 True Color TFT widescreen ...

Страница 2: ...tion 24 27 Specification 28 29 Please read all instructions carefully before attempting to install or operate Due to its technical nature it is highly recommended that your BOOSTER BDVM 8350MP is installed by a professional installer of an authorized dealer This product is only for use in vehicles with 12V DC negative ground only To get the best from your product understand its capabilities and av...

Страница 3: ... unit The Unit Note Product image may vary from the actual delivery 2 1x Mounting Bracket 1x Assemble Bar 1x Screw B15x16 4x Bolt M5 1x Nut M5 1x Flat washer 1x Spring washer 2x Unit ejection bars 1x UNIT IR Remote Control with one CR2025 3Volt cell battery User Manual 1x front panel protection case 1x AV IN Cable ...

Страница 4: ...nter to the outside of the disc but do not clean in circular motions Do not use any kind of solvent such as diluting agent gasoline liquid detergent gasoline liquid detergent antistatic aerosol used for vinyl this may cause serious disc damage Keep discs away from direct sunlight or any heat source Do not stick any paper or stickers on a disc Only use 12cm and round discs do not insert any other t...

Страница 5: ...the mounting bracket in its place 3 Connect the M5 Bolt to the rear of the unit 4 Check electrical connections as described earlier either an ISO connection or separate wiring 5 Insert the ISO connector into the unit 6 Push the unit into the mounting bracket until you hear a click 7 Move the assemble bar metal strip with holes over the M5 bolt and use the M5 nut to tighten the assemble bar 8 Use t...

Страница 6: ...ess you have the appropriate specialized knowledge of this process Depending on the build of your vehicle the installation may deviate from this description We do not assume any liability for damages caused by faulty installations or connections nor any subsequent damages We recommend that you have the device installed by a specialized company Then you will have created the prerequisites for a pro...

Страница 7: ...TION DO NOT insert the control panel into the right side It can damage the control panel Never use force or a tight grip onto the buttons or the information display when removing or attaching the Control Panel The control panel can easily be damaged by shocks To avoid damage or potential theft remove the Control panel place it into the protective case and be careful not to drop it or subject it to...

Страница 8: ...rea around the ground connection should be clean bare metal without rust paint plastic dust or dirt for a good electrical connection INCORRECT WIRING OR OPERATION WILL VOID THE WARRAN Caution Do not interchange the connection of the wiring For some car models you may need to modify wiring of the supplied power cord Contact your authorized car dealer before installing this unit Remark When you back...

Страница 9: ...er 8 1 POWER MUTE 2 MENU 3 BAND ACCEPT CALL 4 VOLUME KNOB OK 5 DSP 6 AS PS 7 IR SENSOR 8 OPEN 9 SEEK 10 SEEK 11 MODE 12 MEM PLAY PAUSE REJECT CALL 13 TFT LCD DISPLAY 14 AV IN 15 USB SOCKET 16 SD CARD SLOT 17 DISC EJECT 18 ANTI THEFT LED 19 DISC SLOT 20 RESET 21 MIC ...

Страница 10: ...ext available band and repeat the above sequence Selecting Preset Stations Select the desired BAND Now press the button or the button to choose the station or on the remote control choose a preset station number 1 6 Automatic Station search In TUNER mode press and hold button frequency increase or frequency decrease button on the front panel or the remote press it to search a station automatically...

Страница 11: ...SD press it to start or pause the playback Press and hold the button for 2 seconds to stop the playback In Bluetooth mode Hang up or Reject call See Bluetooth Chapter Mode Press the Mode button to toggle between the available audio sources in the following sequence Radio DISC USB CARD Bluetooth AV IN Radio Selections only available if media is inserted DSP Press the DSP button to choose sound effe...

Страница 12: ...screen sharpness Support 15 levels Default level is 10 SCREEN Adjust screen size 16 9 4 3 FULL COLOR RESET Resume color default status Select YES or NO and press the ENTER button to confirm YES EXPERT MENU DX Set search radio station by DX or LOCAL mode DX LOCAL STEREO Set radio audio at STEREO or MONO mode STEREO MONO BEEP Set press keys sound 2ND ALL OFF LOUD Set loudness on or off OFF ON SUBWOO...

Страница 13: ...sabled unless the parking brake is on The Unit is designed to detect parked status and must be connected to the power supply side of the parking brake switch When playing a movie file in a driving car a warning screen will be displayed on the screen When the car is placed on the hand brake the screen will switch to video automatically Improper connection or use of his connection may violate applic...

Страница 14: ... LOC in Radio Mode 8 SIGN In Bluetooth Mode REPEAT in Multimedia Mode PRESET SCAN in Radio Mode 9 BACKWARD FAST BACKWARD TUNE DOWN 10 LOUD 11 OSD 12 STOP PBC 13 NUMBERS 0 9 14 PLAY PAUSE 15 MUTE 16 MAIN MENU MEDIAFILE MENU 17 SUB TITLE 18 MEDIAFILE SETUP 19 ANGLE 20 INTRO SCAN 21 VOLUME PLUS 22 REPEAT A B ZOOM 23 SELECT MENU 24 FORWARD FAST FORWARD TUNE UP 25 VOLUME MINUS 26 AUDIO GOTO 27 CALL ACC...

Страница 15: ... Multimedia File select title and chapter number or select track number For a USB SD with mixed files select folder and file number Press the PLAY PAUSE button to play or move the cursor to select PLAY and press ENTER to play If you want to delete the list move the cursor to CLEAR press ENTER to delete the entire list set before In radio mode Press LOC button on remote control to select reception ...

Страница 16: ... VCD Discs 13 Digit 0 9 buttons In radio mode select the desired preset station in the current band 0 6 In MULTIMEDIA mode select track song title number In BLUETOOTH mode input 0 9 telephone number 14 PLAY PAUSE button In Multimedia mode press it to pause playback press again to resume 15 MUTE button Short press this button to mute the volume output press it again to resume volume 16 MENU button ...

Страница 17: ...ZOOM 4 ZOOM 1 2 ZOOM 1 3 ZOOM 1 4 ZOOM OFF 23 SEL button Press it to enter the AUDIO menu Press the UP or DOWN arrow to move to the next selection Press the ENTER button to go to the selection then press the LEFT or RIGHT arrow to decrease or increase the value 24 See point 9 25 VOL button Press to adjust volume level down 26 AUDIO GOTO button In recorded DVD file or DVD disc mode press it to sele...

Страница 18: ...rate properly The distance may vary according to the brightness of ambient light If the remote is not used for an extended period of time remove the battery to prevent possible damage from battery leakage and corrosion Do not place any objects between the remote control unit and the sensor on the unit Do not drop the remote control onto the floor it will damage it beyond repair Do not use the remo...

Страница 19: ...eck Video out type from this menu item 4 TV Type Set TFT screen mode to the correct ratio Three screen ratio modes are available Normal PS 4 3 Pan Scan Normal LB 4 3 Letterbox and Wide 16 9 Different disc formats will display different images depending this setting and the screen size used 5 Password The password for this unit is initially set to factory default 0000 If you want to change your pas...

Страница 20: ... Multimedia files or DVD s have multiple languages recorded then this language will automatically be played If not the first language recorded on the Multimedia file or DVD is played 19 Code Description 1 NONE Kid safe 2 G General Audiences ALL ages admitted 3 PG PARENTAL GUIDANCE SUGGESTED Some material may not be suitable for children 4 PG 13 PARENTS STRONGLY CAUTIONED Some material may be inapp...

Страница 21: ...e or DVD is displayed 4 DISC Menu Lang setting With this option you can select the preferred language for the disc menu When the selected language is recorded on the Multimedia file or DVD then this language will automatically be selected If not the first language recorded on the Multimedia file or DVD is displayed 5 DivX VOD setting Not Applicable AUDIO SETUP 1 Key setting This menu item serves t...

Страница 22: ... With this option you can change the Sharpness setting of the image DIGITAL setup 1 Dynamic setup This function is to adjust the linear compression rate to obtain the different compression results of the signals Standard set to OFF 2 Dual Mono setup Select the type of output of the Left and Right audio output connectors Stereo is normal Stereo L Mono is all sound on the Left Audio output R Mono is...

Страница 23: ...In Multimedia mode press it on remote or press MEM on front panel to pause playback press again to resume STOP Press the STOP button on remote or long press MEM on front panel to stop playback Press the PLAY PAUSE button to restart playback If the card or USB is removed the resume function will be cancelled Selecting Tracks If the MP3 MP4 WMA files are stored in the folders on the USB drive or Car...

Страница 24: ...ons on the remote or press BAND on the panel to select MP3 PICTURE MP4 mode In MP4 Mode press on remote control or long press BAND on the panel cursor move to folder then press Enter on remote control or press VOL on the panel to confirm selection then press the button on the front panel or on the remote to play the previous track Press the on the front panel or on the remote to play the next trac...

Страница 25: ...ing Bluetooth for the first time with your phone and the unit you need to pair the devices After you have paired the devices you do not need to pair it again unless the unit has lost all of its power Suggestion 1 Set My phone s visibility as show to all 2 Select Yes in Set as authorized Auto connect When the unit is powered on the last paired mobile phone will be connected automatically to the uni...

Страница 26: ...you prefer a private conversation instead of the Hands free calling mode press and hold the mode button for more than 2 seconds to transfer the call back to your mobile phone To transfer the call back from the mobile phone to the Radio unit press and hold the green ACCEPT CALL button for more than 2 seconds again LAST CALL mode Press the green ACCEPT CALL button to redial the last number Press the...

Страница 27: ...ically after being connected you need to transfer contacts manually Press and hold the SEL button more than 2 seconds on the remote control to start pairing the phonebook the mobile phone will be disconnected from the unit once your pairing is started this is a normal operation and not a defect of the unit Operate your mobile phone to transfer contacts one by one selected contacts or all contacts ...

Страница 28: ... play out the selected song The song will now be heard via the speakers of the unit To go back to Radio Disc SD USB or AV IN press the MODE button or stop playing the song via AVRCP AVRCP defines how to control characteristics of streaming media This includes pausing stopping and starting playback as well as other types of remote control operations Operation First presses play on the mobile phone ...

Страница 29: ...d Medium DVD DVD R DVD RW DVD R DVD RW DVD R DL DVD R DL CD CD R CDRW VCD SVCD SD SDHC USB Supported Formats MP3 WMA JPG DivX DivXPro and XviD Subtitles sub srt txt Supported file formats MP3 WMA JPG DAT VOB AVI MPG MOG2 MP4 3 11 6 0 Max Number of tracks in MP3 2 000 Max Directory depth 8 Max Album name characters 30 Sampling frequencies 44 1KHz MPEG I 22 05KHz MPEGII 11 025KHz MPEG II V 48KHz MPE...

Страница 30: ...eo input impedance 75 Ω Video output impedance 75 Ω Video output level 1 0Vp 0 2V CVBS TFT MONITOR Video standard NTSC PAL Screen diameter 3 0 inches Resolution 960 W x 240 H pixels Brightness 250 cd m Contrast 400 1 minimum Backlight LED lifespan 100000 hours at 25 ENVIRONMENT Temperature operation 10 to 60 Storage temperature 30 to 80 Humidity operation 45 to 80 RH Humidity storage 30 to 90 RH 2...

Отзывы: